- High School

Patrick prepares a presentation of a research paper that begins with the major idea. He then realizes that the topic could be antagonizing and may not please his audience. In this scenario, which of the following should Patrick use? A) Metacommunication B) The inductive approach C) The deductive approach D) Excommunication
Expert-verified answer.
- 47.9M people helped
The correct answer is letter " B ": The inductive approach.
Explanation:
While presenting information obtained from the research, we could use any of the two methods: the deductive approach or the inductive approach . The deductive approach starts by providing the conclusions and results of the study to then give the details that led to the conclusions. The inductive approach , instead, starts by providing the findings of the study to finally give the results of the research.
Then, while giving results for a study that could be negative -like in Patrick's case, it is better to use the inductive approach.
- 6.5K answers
- 845.3K people helped
Final answer:
Patrick should use the inductive approach for presenting his research paper as this method is more suitable for potentially antagonistic topics. This method begins with specific arguments or data before introducing the main idea (option b).
In this scenario, Patrick should use the inductive approach (Option B). The inductive approach refers to the presentation of information from specific to general, which, in this case, involves starting with specific arguments or data before leading up to the main contentious idea. This method is highly effective for potentially antagonistic topics as it coaxes the audience towards acceptance of the topic by providing supporting details and context before unveiling the main idea.
Metacommunication (Option A) is the use of nonverbal cues to complement or alter the meaning of verbal messages, which is not applicable here. The deductive approach (Option C), on the other hand, starts with the major argument or idea and then provides supporting details, which Patrick is trying to avoid. Excommunication (Option D) is unrelated to the question as it pertains to formal exclusion from a community or group.
Learn more about Inductive Approach here:
brainly.com/question/32099427
Still have questions?
Get more answers for free, you might be interested in, new questions in business.
Structure of a Research Presentation
Introduction.
- Engage the audience
- Focus the presentation
- Preview the presentation’s structure or content
For each major section of your presentation, follow the “4 S Structure” 1 :
- Signpost the point (“First I'm going to point out the problem with...” “My second argument is that...” “Now let me explain my methodology.”)
- State the point clearly and succinctly
- Support the point with data, cases, description, relevant studies, etc.
- Summarize the point
- Summarize and refocus
- Audience questions
For more details on structural and content elements, see Engaging Your Audience .
1 Adapted from Joyce Ferguson, "Speaking Across the Curriculum at UNCG," in Communication Across the UNCG Curriculum: A Guide for Faculty , ed. Karen Meyers, University of North Carolina— Greensboro, 2002.
Office / Department Name
Oral Communication Center
Contact Name
Amy Gaffney
Oral Communication Center Director

Help us provide an accessible education, offer innovative resources and programs, and foster intellectual exploration.
Site Search
Reference management. Clean and simple.
How to make a scientific presentation

Scientific presentation outlines
Questions to ask yourself before you write your talk, 1. how much time do you have, 2. who will you speak to, 3. what do you want the audience to learn from your talk, step 1: outline your presentation, step 2: plan your presentation slides, step 3: make the presentation slides, slide design, text elements, animations and transitions, step 4: practice your presentation, final thoughts, frequently asked questions about preparing scientific presentations, related articles.
A good scientific presentation achieves three things: you communicate the science clearly, your research leaves a lasting impression on your audience, and you enhance your reputation as a scientist.
But, what is the best way to prepare for a scientific presentation? How do you start writing a talk? What details do you include, and what do you leave out?
It’s tempting to launch into making lots of slides. But, starting with the slides can mean you neglect the narrative of your presentation, resulting in an overly detailed, boring talk.
The key to making an engaging scientific presentation is to prepare the narrative of your talk before beginning to construct your presentation slides. Planning your talk will ensure that you tell a clear, compelling scientific story that will engage the audience.
In this guide, you’ll find everything you need to know to make a good oral scientific presentation, including:
- The different types of oral scientific presentations and how they are delivered;
- How to outline a scientific presentation;
- How to make slides for a scientific presentation.
Our advice results from delving into the literature on writing scientific talks and from our own experiences as scientists in giving and listening to presentations. We provide tips and best practices for giving scientific talks in a separate post.
There are two main types of scientific talks:
- Your talk focuses on a single study . Typically, you tell the story of a single scientific paper. This format is common for short talks at contributed sessions in conferences.
- Your talk describes multiple studies. You tell the story of multiple scientific papers. It is crucial to have a theme that unites the studies, for example, an overarching question or problem statement, with each study representing specific but different variations of the same theme. Typically, PhD defenses, invited seminars, lectures, or talks for a prospective employer (i.e., “job talks”) fall into this category.
➡️ Learn how to prepare an excellent thesis defense
The length of time you are allotted for your talk will determine whether you will discuss a single study or multiple studies, and which details to include in your story.
The background and interests of your audience will determine the narrative direction of your talk, and what devices you will use to get their attention. Will you be speaking to people specializing in your field, or will the audience also contain people from disciplines other than your own? To reach non-specialists, you will need to discuss the broader implications of your study outside your field.
The needs of the audience will also determine what technical details you will include, and the language you will use. For example, an undergraduate audience will have different needs than an audience of seasoned academics. Students will require a more comprehensive overview of background information and explanations of jargon but will need less technical methodological details.
Your goal is to speak to the majority. But, make your talk accessible to the least knowledgeable person in the room.
This is called the thesis statement, or simply the “take-home message”. Having listened to your talk, what message do you want the audience to take away from your presentation? Describe the main idea in one or two sentences. You want this theme to be present throughout your presentation. Again, the thesis statement will depend on the audience and the type of talk you are giving.
Your thesis statement will drive the narrative for your talk. By deciding the take-home message you want to convince the audience of as a result of listening to your talk, you decide how the story of your talk will flow and how you will navigate its twists and turns. The thesis statement tells you the results you need to show, which subsequently tells you the methods or studies you need to describe, which decides the angle you take in your introduction.
➡️ Learn how to write a thesis statement
The goal of your talk is that the audience leaves afterward with a clear understanding of the key take-away message of your research. To achieve that goal, you need to tell a coherent, logical story that conveys your thesis statement throughout the presentation. You can tell your story through careful preparation of your talk.
Preparation of a scientific presentation involves three separate stages: outlining the scientific narrative, preparing slides, and practicing your delivery. Making the slides of your talk without first planning what you are going to say is inefficient.
Here, we provide a 4 step guide to writing your scientific presentation:
- Outline your presentation
- Plan your presentation slides
- Make the presentation slides
- Practice your presentation

Writing an outline helps you consider the key pieces of your talk and how they fit together from the beginning, preventing you from forgetting any important details. It also means you avoid changing the order of your slides multiple times, saving you time.
Plan your talk as discrete sections. In the table below, we describe the sections for a single study talk vs. a talk discussing multiple studies:
Introduction | Introduction - main idea behind all studies |
Methods | Methods of study 1 |
Results | Results of study 1 |
Summary (take-home message ) of study 1 | |
Transition to study 2 (can be a visual of your main idea that return to) | |
Brief introduction for study 2 | |
Methods of study 2 | |
Results of study 2 | |
Summary of study 2 | |
Transition to study 3 | |
Repeat format until done | |
Summary | Summary of all studies (return to your main idea) |
Conclusion | Conclusion |
The following tips apply when writing the outline of a single study talk. You can easily adapt this framework if you are writing a talk discussing multiple studies.
Introduction: Writing the introduction can be the hardest part of writing a talk. And when giving it, it’s the point where you might be at your most nervous. But preparing a good, concise introduction will settle your nerves.
The introduction tells the audience the story of why you studied your topic. A good introduction succinctly achieves four things, in the following order.
- It gives a broad perspective on the problem or topic for people in the audience who may be outside your discipline (i.e., it explains the big-picture problem motivating your study).
- It describes why you did the study, and why the audience should care.
- It gives a brief indication of how your study addressed the problem and provides the necessary background information that the audience needs to understand your work.
- It indicates what the audience will learn from the talk, and prepares them for what will come next.
A good introduction not only gives the big picture and motivations behind your study but also concisely sets the stage for what the audience will learn from the talk (e.g., the questions your work answers, and/or the hypotheses that your work tests). The end of the introduction will lead to a natural transition to the methods.
Give a broad perspective on the problem. The easiest way to start with the big picture is to think of a hook for the first slide of your presentation. A hook is an opening that gets the audience’s attention and gets them interested in your story. In science, this might take the form of a why, or a how question, or it could be a statement about a major problem or open question in your field. Other examples of hooks include quotes, short anecdotes, or interesting statistics.
Why should the audience care? Next, decide on the angle you are going to take on your hook that links to the thesis of your talk. In other words, you need to set the context, i.e., explain why the audience should care. For example, you may introduce an observation from nature, a pattern in experimental data, or a theory that you want to test. The audience must understand your motivations for the study.
Supplementary details. Once you have established the hook and angle, you need to include supplementary details to support them. For example, you might state your hypothesis. Then go into previous work and the current state of knowledge. Include citations of these studies. If you need to introduce some technical methodological details, theory, or jargon, do it here.
Conclude your introduction. The motivation for the work and background information should set the stage for the conclusion of the introduction, where you describe the goals of your study, and any hypotheses or predictions. Let the audience know what they are going to learn.
Methods: The audience will use your description of the methods to assess the approach you took in your study and to decide whether your findings are credible. Tell the story of your methods in chronological order. Use visuals to describe your methods as much as possible. If you have equations, make sure to take the time to explain them. Decide what methods to include and how you will show them. You need enough detail so that your audience will understand what you did and therefore can evaluate your approach, but avoid including superfluous details that do not support your main idea. You want to avoid the common mistake of including too much data, as the audience can read the paper(s) later.
Results: This is the evidence you present for your thesis. The audience will use the results to evaluate the support for your main idea. Choose the most important and interesting results—those that support your thesis. You don’t need to present all the results from your study (indeed, you most likely won’t have time to present them all). Break down complex results into digestible pieces, e.g., comparisons over multiple slides (more tips in the next section).
Summary: Summarize your main findings. Displaying your main findings through visuals can be effective. Emphasize the new contributions to scientific knowledge that your work makes.
Conclusion: Complete the circle by relating your conclusions to the big picture topic in your introduction—and your hook, if possible. It’s important to describe any alternative explanations for your findings. You might also speculate on future directions arising from your research. The slides that comprise your conclusion do not need to state “conclusion”. Rather, the concluding slide title should be a declarative sentence linking back to the big picture problem and your main idea.
It’s important to end well by planning a strong closure to your talk, after which you will thank the audience. Your closing statement should relate to your thesis, perhaps by stating it differently or memorably. Avoid ending awkwardly by memorizing your closing sentence.
By now, you have an outline of the story of your talk, which you can use to plan your slides. Your slides should complement and enhance what you will say. Use the following steps to prepare your slides.
- Write the slide titles to match your talk outline. These should be clear and informative declarative sentences that succinctly give the main idea of the slide (e.g., don’t use “Methods” as a slide title). Have one major idea per slide. In a YouTube talk on designing effective slides , researcher Michael Alley shows examples of instructive slide titles.
- Decide how you will convey the main idea of the slide (e.g., what figures, photographs, equations, statistics, references, or other elements you will need). The body of the slide should support the slide’s main idea.
- Under each slide title, outline what you want to say, in bullet points.
In sum, for each slide, prepare a title that summarizes its major idea, a list of visual elements, and a summary of the points you will make. Ensure each slide connects to your thesis. If it doesn’t, then you don’t need the slide.
Slides for scientific presentations have three major components: text (including labels and legends), graphics, and equations. Here, we give tips on how to present each of these components.
- Have an informative title slide. Include the names of all coauthors and their affiliations. Include an attractive image relating to your study.
- Make the foreground content of your slides “pop” by using an appropriate background. Slides that have white backgrounds with black text work well for small rooms, whereas slides with black backgrounds and white text are suitable for large rooms.
- The layout of your slides should be simple. Pay attention to how and where you lay the visual and text elements on each slide. It’s tempting to cram information, but you need lots of empty space. Retain space at the sides and bottom of your slides.
- Use sans serif fonts with a font size of at least 20 for text, and up to 40 for slide titles. Citations can be in 14 font and should be included at the bottom of the slide.
- Use bold or italics to emphasize words, not underlines or caps. Keep these effects to a minimum.
- Use concise text . You don’t need full sentences. Convey the essence of your message in as few words as possible. Write down what you’d like to say, and then shorten it for the slide. Remove unnecessary filler words.
- Text blocks should be limited to two lines. This will prevent you from crowding too much information on the slide.
- Include names of technical terms in your talk slides, especially if they are not familiar to everyone in the audience.
- Proofread your slides. Typos and grammatical errors are distracting for your audience.
- Include citations for the hypotheses or observations of other scientists.
- Good figures and graphics are essential to sustain audience interest. Use graphics and photographs to show the experiment or study system in action and to explain abstract concepts.
- Don’t use figures straight from your paper as they may be too detailed for your talk, and details like axes may be too small. Make new versions if necessary. Make them large enough to be visible from the back of the room.
- Use graphs to show your results, not tables. Tables are difficult for your audience to digest! If you must present a table, keep it simple.
- Label the axes of graphs and indicate the units. Label important components of graphics and photographs and include captions. Include sources for graphics that are not your own.
- Explain all the elements of a graph. This includes the axes, what the colors and markers mean, and patterns in the data.
- Use colors in figures and text in a meaningful, not random, way. For example, contrasting colors can be effective for pointing out comparisons and/or differences. Don’t use neon colors or pastels.
- Use thick lines in figures, and use color to create contrasts in the figures you present. Don’t use red/green or red/blue combinations, as color-blind audience members can’t distinguish between them.
- Arrows or circles can be effective for drawing attention to key details in graphs and equations. Add some text annotations along with them.
- Write your summary and conclusion slides using graphics, rather than showing a slide with a list of bullet points. Showing some of your results again can be helpful to remind the audience of your message.
- If your talk has equations, take time to explain them. Include text boxes to explain variables and mathematical terms, and put them under each term in the equation.
- Combine equations with a graphic that shows the scientific principle, or include a diagram of the mathematical model.
- Use animations judiciously. They are helpful to reveal complex ideas gradually, for example, if you need to make a comparison or contrast or to build a complicated argument or figure. For lists, reveal one bullet point at a time. New ideas appearing sequentially will help your audience follow your logic.
- Slide transitions should be simple. Silly ones distract from your message.
- Decide how you will make the transition as you move from one section of your talk to the next. For example, if you spend time talking through details, provide a summary afterward, especially in a long talk. Another common tactic is to have a “home slide” that you return to multiple times during the talk that reinforces your main idea or message. In her YouTube talk on designing effective scientific presentations , Stanford biologist Susan McConnell suggests using the approach of home slides to build a cohesive narrative.
To deliver a polished presentation, it is essential to practice it. Here are some tips.
- For your first run-through, practice alone. Pay attention to your narrative. Does your story flow naturally? Do you know how you will start and end? Are there any awkward transitions? Do animations help you tell your story? Do your slides help to convey what you are saying or are they missing components?
- Next, practice in front of your advisor, and/or your peers (e.g., your lab group). Ask someone to time your talk. Take note of their feedback and the questions that they ask you (you might be asked similar questions during your real talk).
- Edit your talk, taking into account the feedback you’ve received. Eliminate superfluous slides that don’t contribute to your takeaway message.
- Practice as many times as needed to memorize the order of your slides and the key transition points of your talk. However, don’t try to learn your talk word for word. Instead, memorize opening and closing statements, and sentences at key junctures in the presentation. Your presentation should resemble a serious but spontaneous conversation with the audience.
- Practicing multiple times also helps you hone the delivery of your talk. While rehearsing, pay attention to your vocal intonations and speed. Make sure to take pauses while you speak, and make eye contact with your imaginary audience.
- Make sure your talk finishes within the allotted time, and remember to leave time for questions. Conferences are particularly strict on run time.
- Anticipate questions and challenges from the audience, and clarify ambiguities within your slides and/or speech in response.
- If you anticipate that you could be asked questions about details but you don’t have time to include them, or they detract from the main message of your talk, you can prepare slides that address these questions and place them after the final slide of your talk.
➡️ More tips for giving scientific presentations
An organized presentation with a clear narrative will help you communicate your ideas effectively, which is essential for engaging your audience and conveying the importance of your work. Taking time to plan and outline your scientific presentation before writing the slides will help you manage your nerves and feel more confident during the presentation, which will improve your overall performance.
A good scientific presentation has an engaging scientific narrative with a memorable take-home message. It has clear, informative slides that enhance what the speaker says. You need to practice your talk many times to ensure you deliver a polished presentation.
First, consider who will attend your presentation, and what you want the audience to learn about your research. Tailor your content to their level of knowledge and interests. Second, create an outline for your presentation, including the key points you want to make and the evidence you will use to support those points. Finally, practice your presentation several times to ensure that it flows smoothly and that you are comfortable with the material.
Prepare an opening that immediately gets the audience’s attention. A common device is a why or a how question, or a statement of a major open problem in your field, but you could also start with a quote, interesting statistic, or case study from your field.
Scientific presentations typically either focus on a single study (e.g., a 15-minute conference presentation) or tell the story of multiple studies (e.g., a PhD defense or 50-minute conference keynote talk). For a single study talk, the structure follows the scientific paper format: Introduction, Methods, Results, Summary, and Conclusion, whereas the format of a talk discussing multiple studies is more complex, but a theme unifies the studies.
Ensure you have one major idea per slide, and convey that idea clearly (through images, equations, statistics, citations, video, etc.). The slide should include a title that summarizes the major point of the slide, should not contain too much text or too many graphics, and color should be used meaningfully.

Chapter 14 Creating Presentations: Sharing Your Ideas
14.1 organizing a visual presentation, learning objectives.
- Identify key ideas and details to create a concise, engaging presentation.
- Identify the steps involved in planning a comprehensive presentation.
Until now, you have interacted with your audience of readers indirectly, on the page. You have tried to anticipate their reactions and questions as all good writers do. Anticipating the audience’s needs can be tough, especially when you are sitting alone in front of your computer.
When you give a presentation, you connect directly with your audience. For most people, making a presentation is both exciting and stressful. The excitement comes from engaging in a two-way interaction about your ideas. The stress comes from the pressure of presenting your ideas without having a delete button to undo mistakes. Outside the classroom, you may be asked to give a presentation, often at the last minute, and the show must go on. Presentations can be stressful, but planning and preparation, when the time and opportunity are available, can make all the difference.
This chapter covers how to plan and deliver an effective, engaging presentation. By planning carefully, applying some time-honored presentation strategies, and practicing, you can make sure that your presentation comes across as confident, knowledgeable, and interesting—and that your audience actually learns from it. The specific tasks involved in creating a presentation may vary slightly depending on your purpose and your assignment. However, these are the general steps.
Follow these steps to create a presentation based on your ideas:
- Determine your purpose and identify the key ideas to present.
- Organize your ideas in an outline.
- Identify opportunities to incorporate visual or audio media, and create or locate these media aids.
- Rehearse your presentation in advance.
- Deliver your presentation to your audience.
Getting Started: Identifying and Organizing Key Ideas
To deliver a successful presentation, you need to develop content suitable for an effective presentation. Your ideas make up your presentation, but to deliver them effectively, you will need to identify key ideas and organize them carefully. Read the following considerations, which will help you first identify and then organize key ideas:
- Be concise. You will include the most important ideas and leave out others. Some concepts may need to be simplified.
- Employ more than one medium of expression. You should incorporate other media, such as charts, graphs, photographs, video or audio recordings, or websites.
- Prepare for a face-to-face presentation. If you must deliver a face-to-face presentation, it is important to project yourself as a serious and well-informed speaker. You will often speak extemporaneously, or in a rehearsed but not memorized manner, which allows for flexibility given the context or audience. You will need to know your points and keep your audience engaged.
Determine Your Purpose
As with a writing assignment, determining the purpose of your presentation early on is crucial. You want to inform your readers about the topic, but think about what else you hope to achieve.
Are you presenting information intended to move your audience to adopt certain beliefs or take action on a particular issue? If so, you are speaking not only to inform but also to persuade your listeners. Do you want your audience to come away from your presentation knowing how to do something they that they did not know before? In that case, you are not only informing them but also explaining or teaching a process.
Writing at Work
Schoolteachers are trained to structure lessons around one or more lesson objectives. Usually the objective, the mission or purpose, states what students should know or be able to do after they complete the lesson. For example, an objective might state, “Students will understand the specific freedoms guaranteed by the First Amendment” or “Students will be able to add two three-digit numbers correctly.”
As a manager, mentor, or supervisor, you may sometimes be required to teach or train other employees as part of your job. Determining the desired outcome of a training session will help you plan effectively. Identify your teaching objectives. What, specifically, do you want your audience to know (for instance, details of a new workplace policy) or be able to do (for instance, use a new software program)? Plan your teaching or training session to meet your objectives.
Identify Key Ideas
To plan your presentation, think in terms of three or four key points you want to get across. In a paper, you have the space to develop ideas at length and delve into complex details. In a presentation, however, you must convey your ideas more concisely.
One strategy you might try is to create an outline. What is your main idea? Would your main idea work well as key points for a brief presentation? How would you condense topics that might be too lengthy, or should you eliminate topics that may be too complicated to address in your presentation?
- What is your purpose?
- Who is your audience?
- How will you engage your audience?
- On the same paper, identify the steps you must complete before you begin creating your presentation.
Use an Outline to Organize Ideas
After you determine which ideas are most appropriate for your presentation, you will create an outline of those ideas. Your presentation, like a written assignment, should include an introduction, body, and conclusion. These components serve much the same purpose as they do in a written assignment.
- The introduction engages the audience’s attention, introduces the topic, and sets the tone for what is to come.
- The body develops your point of view with supporting ideas, details, and examples presented in a logical order.
- The conclusion restates your point of view, sums up your main points, and leaves your audience with something to think about.
Jorge, who wrote the research paper featured in Chapter 11 “Writing from Research: What Will I Learn?”, developed the following outline. Jorge relied heavily on this outline to plan his presentation, but he adjusted it to suit the new format.
Planning Your Introduction
In Chapter 12 “Writing a Research Paper”, you learned techniques for writing an interesting introduction, such as beginning with a surprising fact or statistic, a thought-provoking question or quotation, a brief anecdote that illustrates a larger concept or connects your topic to your audience’s experiences. You can use these techniques effectively in presentations as well. You might also consider actively engaging your audience by having members respond to questions or complete a brief activity related to your topic. For example, you may have your audience respond to a survey or tell about an experience related to your topic.
Incorporating media can also be an effective way to get your audience’s attention. Visual images such as a photograph or a cartoon can invoke an immediate emotional response. A graph or chart can highlight startling findings in research data or statistical information. Brief video or audio clips that clearly reinforce your message and do not distract or overwhelm your audience can provide a sense of immediacy when you plan to discuss an event or a current issue. A PowerPoint presentation allows you to integrate many of these different media sources into one presentation.
With the accessibility provided by the Internet, you can find interesting and appropriate audio and video with little difficulty. However, the clip alone will not sustain the presentation. To keep the audience interested and engaged, you must frame the beginning and end of the clip with your own words.
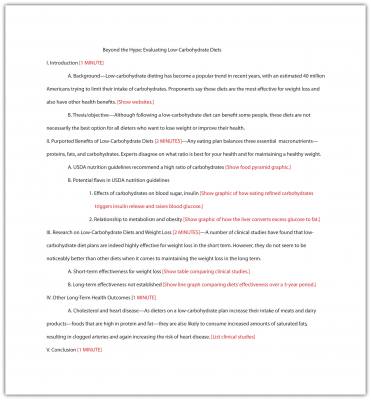
Jorge completed the introduction part of his outline by listing the key points he would use to open his presentation. He also planned to show various web links early on to illustrate the popularity of the low-carbohydrate diet trend.

Planning the Body of Your Presentation
The next step is to work with the key ideas you identified earlier. Determine the order in which you want to present these ideas, and flesh them out with important details. Chapter 10 “Rhetorical Modes” discusses several organizational structures you might work with, such as chronological order, comparison-and-contrast structure, or cause-and-effect structure.
How much detail you include will depend on the time allotted for your presentation. Your instructor will most likely give you a specific time limit or a specific slide limit, such as eight to ten slides. If the time limit is very brief (two to three minutes, for instance), you will need to focus on communicating your point of view, main supporting points, and only the most relevant details. Three minutes can feel like an eternity if you are speaking before a group, but the time will pass very quickly. It is important to use it well.
If you have more time to work with—ten minutes or half an hour—you will be able to discuss your topic in greater detail. More time also means you must devote more thought into how you will hold your audience’s interest. If your presentation is longer than five minutes, introduce some variety so the audience is not bored. Incorporate multimedia, invite the audience to complete an activity, or set aside time for a question-and-answer session.
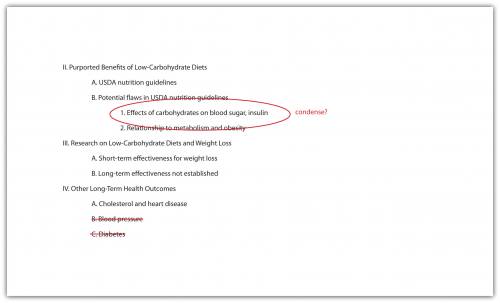
Jorge was required to limit his presentation to five to seven minutes. In his outline, he made a note about where he would need to condense some complicated material to stay within his time limit. He also decided to focus only on cholesterol and heart disease in his discussion of long-term health outcomes. The research on other issues was inconclusive, so Jorge decided to omit this material. Jorge’s notes on his outline show the revisions he has made to his presentation.
You are responsible for using your presentation time effectively to inform your audience. You show respect for your audience by following the expected time limit. However, that does not mean you must fill all of that time with talk if you are giving a face-to-face presentation. Involving your audience can take some of the pressure off you while also keeping them engaged. Have them respond to a few brief questions to get them thinking. Display a relevant photograph, document, or object and ask your classmates to comment. In some presentations, if time allows, you may choose to have your classmates complete an individual or group activity.
Planning Your Conclusion
The conclusion should briefly sum up your main idea and leave your audience with something to think about. As in a written paper, you are essentially revisiting your thesis. Depending on your topic, you may also ask the audience to reconsider their thinking about an issue, to take action, or to think about a related issue. If you presented an attention-getting fact or anecdote in your introduction, consider revisiting it in your conclusion. Just as you have learned about an essay’s conclusion, do not add new content to the presentation’s conclusion.
No matter how you choose to structure your conclusion, make sure it is well planned so that you are not tempted to wrap up your presentation too quickly. Inexperienced speakers, in a face-to-face presentation, sometimes rush through the end of a presentation to avoid exceeding the allotted time or to end the stressful experience of presenting in public. Unfortunately, a hurried conclusion makes the presentation as a whole less memorable.
Time management is the key to delivering an effective presentation whether it is face-to-face or in PowerPoint. As you develop your outline, think about the amount of time you will devote to each section. For instance, in a five-minute face-to-face presentation, you might plan to spend one minute on the introduction, three minutes on the body, and one minute on the conclusion. Later, when you rehearse, you can time yourself to determine whether you need to adjust your content or delivery.
In a PowerPoint presentation, it is important that your presentation is visually stimulating, avoids information overload by limiting the text per slide, uses speaker notes effectively, and uses a font that is visible on the background (e.g., avoid white letters on a light background or black letters on a dark background).
Work with the list you created in Note 14.4 “Exercise 1” to develop a more complete outline for your presentation. Make sure your outline includes the following:
- An introduction that uses strategies to capture your audience’s attention
- A body section that summarizes your main points and supporting details
- A conclusion that will help you end on a memorable note
- Brief notes about how much time you plan to spend on each part of the presentation (you may adjust the timing later as needed)
Identifying Opportunities to Incorporate Visual and Audio Media
You may already have some ideas for how to incorporate visual and audio media in your presentation. If not, review your outline and begin thinking about where to include media. Presenting information in a variety of formats will help you keep your audience’s interest.
Use Presentation Software
Delivering your presentation as a slideshow is one way to use media to your advantage. As you speak, you use a computer and an attached projector to display a slideshow of text and graphics that complement the speech. Your audience will follow your ideas more easily, because you are communicating with them through more than one sense. The audience hears your words and also sees the corresponding visuals. A listener who momentarily loses track of what you are saying can rely on the slide to cue his or her memory.
To set up your presentation, you will need to work with the content of your outline to develop individual slides. Each slide should focus on just a few bullet points (or a similar amount of content presented in a graphic). Remember that your audience must be able to read the slides easily, whether the members sit in the front or the back of the room. Avoid overcrowding the slides with too much text.
Using presentation software, such as PowerPoint, allows you to incorporate graphics, sounds, and even web links directly into your slides. You can also work with available styles, color schemes, and fonts to give your presentation a polished, consistent appearance. Different slide templates make it easy to organize information to suit your purpose. Be sure your font is visible to you audience. Avoid using small font or colored font that is not visible against your background.
Use PowerPoint as a Visual Aid
PowerPoint and similar visual representation programs can be effective tools to help audiences remember your message, but they can also be an annoying distraction to your speech. How you prepare your slides and use the tool will determine your effectiveness.
PowerPoint is a slideware program that you have no doubt seen used in class, seen in a presentation at work, or perhaps used yourself to support a presentation. PowerPoint and similar slideware programs provide templates for creating electronic slides to present visual information to the audience, reinforcing the verbal message. You will be able to import or cut and paste words from text files, images, or video clips to create slides to represent your ideas. You can even incorporate web links. When using any software program, it is always a good idea to experiment with it long before you intend to use it; explore its many options and functions, and see how it can be an effective tool for you.
At first, you might be overwhelmed by the possibilities, and you might be tempted to use all the bells, whistles, and sound effects, not to mention the tumbling, flying, and animated graphics. If used wisely, a dissolve or key transition can be like a well-executed scene from a major motion picture and lead your audience to the next point. But if used indiscriminately, it can annoy the audience to the point where they cringe in anticipation of the sound effect at the start of each slide. This danger is inherent in the tool, but you are in charge of it and can make wise choices that enhance the understanding and retention of your information.
The first point to consider is which visual aid is the most important. The answer is you, the speaker. You will facilitate the discussion, give life to the information, and help the audience correlate the content to your goal or purpose. You do not want to be in a position where the PowerPoint presentation is the focus and you are on the side of the stage simply helping the audience follow along. Slides should support you in your presentation, rather than the other way around. Just as there is a number one rule for handouts (do not pass them out at the start of your presentation), there is also one for PowerPoint presentations: do not use PowerPoint slides as a read-aloud script for your speech. The PowerPoint slides should amplify and illustrate your main points, not reproduce everything you are going to say.
Your pictures are the second area of emphasis you will want to consider. The tool will allow you to show graphs, charts and illustrate relationships that words may only approach in terms of communication, but your verbal support of the visual images will make all the difference. Dense pictures or complicated graphics will confuse more than they clarify. Choose clear images that have an immediate connection to both your content and the audience, tailored to their specific needs. After the images, consider using only key words that can be easily read to accompany your pictures. The fewer words the better. Try to keep each slide to a total word count of less than ten words. Do not use full sentences. Using key words provides support for your verbal discussion, guiding you as well as your audience. The key words can serve as signposts or signal words related to key ideas.
A natural question at this point is, How do I communicate complex information simply? The answer comes with several options. The visual representation on the screen is for support and illustration. Should you need to communicate more technical, complex, or in-depth information in a visual way, consider preparing a handout to distribute at the conclusion of your speech. You may also consider using a printout of your slide show with a section for taking notes, but if you distribute it at the beginning of your speech, you run the risk of turning your presentation into a guided reading exercise and possibly distracting or losing members of the audience. Everyone reads at a different pace and takes notes in their own way. You do not want to be in the position of going back and forth between slides to help people follow along.
Another point to consider is how you want to use the tool to support your speech and how your audience will interpret its presentation. Most audiences wouldn’t want to read a page of text—as you might see in this book—on the big screen. They will be far more likely to glance at the screen and assess the information you present in relation to your discussion. Therefore, it is key to consider one main idea, relationship, or point per slide. The use of the tool should be guided with the idea that its presentation is for the audience’s benefit, not yours. People often understand pictures and images more quickly and easily than text, and you can use this to your advantage, using the knowledge that a picture is worth a thousand words.
Incorporate Visual Media
Even if you do not use a slideshow to complement your presentation, you can include visual media to support and enhance your content. Visual media are divided into two major categories: images and informational graphics.
Image-based media, such as photographs or videos, often have little or no accompanying text. Often these media are more powerful than words in getting a message across. Within the past decade, the images associated with major news stories, such as the Indian Ocean tsunami of 2004, the Abu Ghraib prison abuses from 2004 to 2006, and the 2010 earthquake in Haiti, have powerfully affected viewers’ emotions and drawn their attention to these news stories.
Figure 14.1

Even if your presentation addresses a less dramatic subject, you can still use images to draw in your audience. Consider how photographs, an illustration, or a video might help your audience connect with a particular person or place or bring a historical event to life. Use visual images to support descriptions of natural or man-made phenomena. What ideas lend themselves to being explained primarily through images?
In addition, consider how you might incorporate informational graphics in your presentation. Informational graphics include diagrams, tables, pie charts, bar and line graphs, and flow charts. Informational graphics usually include some text and often work well to present numerical information. Consider using them if you are presenting statistics, comparing facts or data about several different groups, describing changes over time, or presenting a process.
Incorporate Audio Media
Although audio media are not as versatile as visual media, you may wish to use them if they work well with your particular topic. If your presentation discusses trends in pop music or analyzes political speeches, playing an audio clip is an obvious and effective choice. Clips from historical speeches, radio talk shows, and interviews can also be used, but extended clips may be ineffective with modern audiences. Always assess your audience’s demographics and expectations before selecting and including audio media.
Review the outline you created in Note 14.11 “Exercise 2”. Complete the following steps:
- Identify at least two to three places in your presentation where you might incorporate visual or audio media. Brainstorm ideas for what media would be effective, and create a list of ideas. (In Chapter 14 “Creating Presentations: Sharing Your Ideas”, Section 14.2 “Incorporating Effective Visuals into a Presentation”, you will explore different media options in greater depth. For now, focus on coming up with a few general ideas.)
- Determine whether you will use presentation software to deliver your presentation as a slideshow. If you plan to do so, begin using your outline to draft your slides.
Figure 14.2

Source: http://www.agenciabrasil.gov.br/media/imagens/2010/01/14/14.01.10RP5978.jpg/view
Planning Ahead: Annotating Your Presentation
When you make a presentation, you are giving a performance of sorts. It may not be as dramatic as a play or a movie, but it requires smooth coordination of several elements—your words, your gestures, and any media you include. One way to ensure that the performance goes smoothly is to annotate your presentation ahead of time.
To annotate means to add comments or notes to a document. You can use this technique to plan how the different parts of your presentation will flow together. For instance, if you are working with slides, add notes to your outline indicating when you will show each slide. If you have other visual or audio media to include, make a note of that, too. Be as detailed as necessary. Jotting “Start video at 3:14” can spare you the awkwardness of searching for the right clip during your presentation.
In the workplace, employees are often asked to deliver presentations or conduct a meeting using standard office presentation software. If you are using presentation software, you can annotate your presentation easily as you create your slides. Use the notes feature at the bottom of the page to add notes for each slide. As you deliver your presentation, your notes will be visible to you on the computer screen but not to your audience on the projector screen.
In a face-to-face presentation, make sure your final annotated outline is easy to read. It will serve to cue you during your presentation, so it does not need to look polished, as long as it is clear to you. Double space the text. Use a larger-than-normal font size (14 or 16 points) if that will make it easier for you to read. Boldface or italics will set off text that should be emphasized or delivered with greater emotion. Write out main points, as well as your opening and closing remarks, in complete sentences, along with any material you want to quote verbatim. Use shorter phrases for supporting details. Using your speaker notes effectively will help you deliver an effective presentation. Highlighting, all capital letters, or different-colored font will help you easily distinguish notes from the text of your speech. Read Jorge’s annotated outline.
Some students prefer to write out the full text of their face-to-face presentation. This can be a useful strategy when you are practicing your delivery. However, keep in mind that reading your text aloud, word for word, will not help you capture and hold your audience’s attention. Write out and read your speech if that helps you rehearse. After a few practice sessions, when you are more comfortable with your material, switch to working from an outline. That will help you sound more natural when you speak to an audience.
In a PowerPoint presentation, remember to have your slides in logical sequential order. Annotating your presentation before submitting it to your audience or your instructor will help you check for order and logical transitions. Too much text or data may confuse your audience; strive for clarity and avoid unnecessary details. Let the pictures or graphics tell the story but do not overload your slideshow with visuals. Be sure your font is visible. Look for consistency in the time limit of your presentation to gauge your level of preparedness.
Begin to annotate your outline. (You will probably add more notes as you proceed, but including some annotations now will help you begin pulling your ideas together.) Mark your outline with the following information:
- Write notes in brackets to any sections where you definitely plan to incorporate visual or audio media.
- If you are presenting a slideshow, add notes in brackets indicating which slides go with each section of your outline.
- Identify and set off any text that should be emphasized.

Key Takeaways
- An effective presentation presents ideas more concisely than a written document and uses media to explain ideas and hold the audience’s interest.
- Like an essay, a presentation should have a clear beginning, middle, and end.
- Good writers structure their presentations on the thesis, or point of view; main ideas; and key supporting details and create a presentation outline to organize their ideas.
- Annotating a presentation outline is a useful way to coordinate different parts of the presentation and manage time effectively.
- Successful Writing. Authored by : Anonymous. Provided by : Anonymous. Located at : http://2012books.lardbucket.org/books/successful-writing/ . License : CC BY-NC-SA: Attribution-NonCommercial-ShareAlike
Want to create or adapt books like this? Learn more about how Pressbooks supports open publishing practices.
Chapter 14: Creating Presentations: Sharing Your Ideas
14.1 Organizing a Visual Presentation 14.2 Incorporating Effective Visuals into a Presentation 14.3 Giving a Presentation 14.4 Creating Presentations: End-of-Chapter Exercises
Writing for Success Copyright © 2015 by University of Minnesota is licensed under a Creative Commons Attribution-NonCommercial-ShareAlike 4.0 International License , except where otherwise noted.
12 Structure and Format: Outlining the Speech
Rebecca Collier, M.B.A.
Learning Objectives
- Determine the general and specific purpose of a presentation.
- Create a captivating speech introduction, body and conclusion.
- Support ideas and arguments through cited research.
- Differentiate between preparation outlines and presentation notes.

Just like a building has structure and an overall plan to guide people through the space in a logical way, you will need an outline for your speech to provide a framework for your ideas and to help your audience see how these ideas connect to create your overall message. Additionally, similar to the way people have expectations for what they will experience when walking into a building, your audience will have some expectations about how your speech will unfold. When these expectations are not met, such as the example earlier, when you entered the door expecting to see the receptionist and were instead met with a toilet, your audience may find it jarring or uncomfortable if your speech does not have a recognizable introduction or conclusion, or if you abruptly jump from subtopic to subtopic without notice. In this chapter, we’ll look at how to create an outline to guide your audience through your points in an organized format for a well-structured speech. In a professional setting, most speakers outline their speeches far enough in advance of their presentation date so that they have time to practice their performance and become comfortable with the material. Creating an outline will help you feel confident during your speech, because you took the time to carefully plan out what you desired to say. This leaves you free to focus on your delivery – how you say it – during your speech. This chapter will walk you through all the different parts of a speech outline, and show you how a formal outline can be translated into less cumbersome speaking notes.
The Speech Topic
One of the hardest parts of the speech assignment for students is choosing a topic with which to work with. Oftentimes, as soon as you begin drafting an outline for a chosen topic, other topics will start to look more and more appealing, and you will want to change to a new topic. Resist this impulse, if you can! Many speech students have lost points on late assignments because they kept changing their mind about what to speak about. Once you begin working with a topic (approved by your instructor, when applicable), commit to it. Your instructor can help you navigate through the challenges of a topic with which that you are struggling with. Remember, your research and your speech delivery can make almost any topic engaging for the audience.
The Speech Purpose
Before you begin preparing your speech, your instructor will let you know what kind of speech you are working on. Is it a speech intended to inform your audience? Is it a speech where you will be persuading the audience? Or, is the speech designed for entertainment purposes? You will need to know what kind of speech you are giving before you do any other work on this assignment. To make sure that you are aware of the overall goal of the speech, your instructor may ask you to include the general purpose on your outline. There are three basic general purposes that apply to speech presentations: To inform, to persuade, and to entertain. An informative speech requires you to give a neutral, unbiased perspective to the audience, while a persuasive speech attempts to change an audience’s beliefs, feelings, or actions. An entertainment speech is used to celebrate or commemorate something or as part of a ceremony.
In addition to the general purpose, each speech will also have a corresponding specific purpose. The specific purpose identifies what you would like to leave the audience with after your speech. For example, a specific purpose for an i nformative speech about the pyramids of Giza, Egypt might read: To inform my audience about when and how the pyramids of Giza were built and what they look like today . A specific purpose for a persuasive speech about organ donation might read: To persuade my audience to register as organ donors.
Some professors might prefer that you submit a purpose statement in lieu of a specific purpose. The purpose statement identifies your goal for the audience. Using the example informative speech topic above on the pyramids of Giza, Egypt, your purpose statement might read: At the end of my speech, my audience will know when and how the pyramids of Giza were built and what they look like today. The organ donation speech might have the following purpose statement: At the end of my speech, my audience members will register as organ donors .
The Central Idea
Once you know your topic and your purpose, it’s time to brainstorm the key message of your speech. This message is known as the central idea, and it serves as a thesis for your presentation. Your instructor may ask you to include a central idea on your outline. Creating a central idea is good practice, because it shows that you can state the main ideas of the speech in one sentence. A central idea elaborates on the speech purpose. For a persuasive speech, the central idea includes what we’re persuading the audience about, and why our viewpoint is correct. For example:
Everyone should register as an organ donor because it’s easy to do, and it could save or drastically improve someone’s life at no cost to the donor.
For an informative speech, the central idea is a summary thesis, and it gives the main ideas of the speech in one strong statement. For example:
The pyramids of Giza, Egypt, were built by hand over six thousand years ago, and their outer structures and inner chambers are mostly intact today.
A strong central idea should have the following characteristics:
- It should be a complete sentence.
- It can’t be a question.
- It should encapsulate each main idea.
The Speech Introduction
Although your instructor may ask you to include the topic, general purpose, specific purpose, and central idea on your speech outline, you actually won’t share these with your audience as part of your speech. Instead, your presentation to the class should begin with your introduction. The introduction and the conclusion are the most important parts of your speech, because they are the parts that your audience is most likely to remember. Thus, the structure and development of these two parts is crucial to the success of your speech. Your speech introduction should include the following five parts:
- Attention-getter
Introduce yourself and your topic
Relate the topic to your audience
- Statement of credibility/interest
- Summary of your main ideas.
Attention-Getter
The first–and most important–thing you can do in a speech introduction is to captivate your audience and interest them in your speech topic. It is much easier to keep someone’s attention than to fight to regain it, so the attention-getter is the first part of your speech that your audience will hear.
There are lots of ways you can help your topic appeal to your listeners. One classic example is to tell a short story. This can either be a personal story, or you can recount a story you heard or read somewhere that leads into your topic. A story can help personalize your topic for the audience and bring in a human connection.
Another way to draw attention to your topic is to startle your audience with a shocking statistic or example that they won’t be expecting. Be careful with this technique. If the audience is already familiar with your “shocking” material, your attention-getter could backfire, and you may end up losing the attention of your audience instead of gaining it.
Many students like to begin their speeches by asking a series of rhetorical questions. This requires the audience to think about the speech topic and make personal applications. If you start your speech in this way, make sure that you ask a few questions. One is rarely enough to generate interest in the topic. Also, the questions should make the audience ponder something. Suppose I began my speech with, “How many of you like lemons? Well, today I’m going to inform you about Miracle Berries.” Did that get your attention? Not likely. Are you excited to hear more about my topic? It’s doubtful. Let’s try that again. “By show of hands, who here likes drinking lemonade? Okay, now who likes having a slice or two of lemons in their drinking water? Now, how many of you would enjoy snacking on slices of lemon – no sugar added? Well, what if I told you there was a way to make lemons taste intensely sweet, without adding any sugar? Today, I’m going to tell you about Miracle Berries…” When using questions as an attention getter, you might consider incorporating a silent survey. This is where you have your audience answer your questions in a physical way, such as by raising a hand. If students answer your questions vocally, the attention-getter will likely go on for far too long. A silent survey keeps the entire audience involved, without letting the audience take over your speech.
Additionally, you could begin with a powerful quote that ties into your topic. Make sure that you tell the audience where the quote comes from. If the source of the quote is someone that your audience is not likely to be familiar with, you may need to contextualize the source and explain why the words of this person are relevant. For example, if I began my speech with this quote, “Taxes are the price we pay for civilized society,” as said by Oliver Wendell Holmes Junior. Who is this person? Nobody knows, so nobody cares. I should contextualize this source, by saying something like, “According to US Supreme Court Justice Oliver Wendell Holmes Junior…“ Now my audience will understand why the person who spoke these words is relevant.
You might also try to get the audience’s attention by making them curious about your topic. Give them some clues, and see if they can guess what your topic will be from these clues. Be sure to take a moment and celebrate with them when they finally guess correctly!
Finally, you can begin your speech with some audience participation . Just make sure this is carefully planned and not too complicated. You don’t want the attention-getter to take up all the allotted time for your speech. One student began her informative presentation by having everyone write down five numbers, between zero and nine, in any order, with no repeats. She then held a mini lottery for the class by randomly drawing numbers from a hat and giving a small prize to the student who’s written-down numbers were the closest to the drawn ones. This was an exciting way to begin a speech on the New York State lottery.
The attention-getter of the speech is arguably the most important part of the presentation. If you don’t capture the audience’s attention, they are less likely to take in the rest of your speech. Thus, it is worthwhile to spend some time developing an engaging attention-getter that you are comfortable delivering.
Now that your audience is focused and interested in what you have to say, you should share with them who you are, and what you will be speaking to them about. This is especially important if you have used a detailed or complex attention-getter, where it may be necessary to clarify your actual topic for the audience.
Statement of Credibility/Interest
Once you have piqued the interest of your audience, and they know who you are and what you’ll be speaking about, it’s time to gain their trust. What makes you a credible speaker on this topic? Share with the audience why you chose this particular subject, and any personal experience you have with it. For example, if I were giving an informative speech on lacrosse: “I was first exposed to lacrosse in middle school, and I went on to play the sport for all four years of high school. Our team was very successful, and we won several championships.”
However, you might give a speech on a topic with which you have had no direct experience. Never fear! You can also tell the audience about the kinds of research you have done to prepare yourself to speak on this subject. For example: “Although I’ve never actually played lacrosse, I’ve always been curious about it. I began preparing for this speech by watching videos online to understand how the sport is played, and I found some great articles to help me understand its history and development.”
Sharing your interest in this topic, along with your experience with it, or an explanation of your research process will show the audience that you are a credible speaker on this topic and someone worth listening to.
The next step is to help the audience see how they can relate to the topic you have chosen. Be creative! This can be a challenging step, and it requires some critical thinking. Suppose you are giving a speech where you are persuading your audience that college students shouldn’t have to buy textbooks for their classes. Well, this is an easy one, because almost everyone in your audience will be a college student, and most people like to save money. Now, imagine that you are giving a speech to inform your audience about conjoined twins. It is unlikely that you will have many pairs of conjoined twins in your audience, so how can you make this topic relatable? You might start with the idea that many audience members may want to have children (or more children) someday, or they may know people who plan to have children. It’s important to be informed about a condition that could affect these future children. Also, you could take the angle that we live in a complex world, and we have to deal with lots of different kinds of people. Understanding more about the conditions of people different from ourselves can help us develop empathy. Almost any topic can relate to your audience, but some will take more work than others.
Preview your main ideas
For the final part of the speech introduction, you’ll give your audience a summary of what you’ll specifically be talking about in this speech. This is different from introducing yourself and your topic. There, you might tell the audience that you’ll be informing them about the axolotl. In the preview, you’ll let them know that this speech will describe the physical appearance of the axolotl, where it lives, and how it regenerates different parts of its body. The preview is given at the end of the introduction to help the audience pace the speech. For the example above, when you come to the part about the axolotl regenerating, the audience will know that the speech is almost done. It also helps your audience to know what they should be focusing on during your speech, and what the takeaway will be.
The speech introduction is the foundation of your presentation, and it’s important to ensure that this foundation is sturdy. If the foundation of a building is unstable, the building may crumble and fall apart. Similarly, the speech introduction prepares the audience for the body of the speech. If the introduction is underdeveloped, the rest of the speech will be weakened by association. It is worth taking some extra time to make sure your speech introduction covers each of the five steps.
Transitioning from Point to Point
Suppose you were driving a car down the highway, and the driver in front of you kept switching lanes abruptly without using a turn signal. Wouldn’t that be frustrating? Well, when a speaker doesn’t use transitions, it creates a similarly jarring experience for the audience. Using a transition phrase prepares the audience for a new topic and helps your speech flow logically from point to point. Transitions in a speech are a little bit different from transitions used in written work. When you are writing an essay, you can use a word such as “also” or “however” to move on to your next point. Yet, in a speech, you need to be more specific. The audience needs a clear signal that you are about to begin a new point. In order to transition to your first main point, you might say: “Let’s begin by,” “I’d like to start with,” “First of all, ” “To commence,” etc. For additional main ideas, you could transition with “Moving on,” “My next point will be,” “Now that we’ve looked at__________, I’ll tell you about ________,” etc. Transitions are especially helpful in separating out your main ideas for your audience so that the body of the speech has distinct sections.
The Main Ideas
The main ideas are the major subtopics of your speech. Once you know your speech topic, the next step is to decide on your main ideas. You can’t create a central idea or a speech introduction without them. The main ideas are the topic sentences of your speech. As a general rule, you should have at least two main ideas. If you only have one main idea, your speech has nowhere to go, and it may feel repetitive for the audience. That being said, you generally shouldn’t have more than five main ideas in your speech. Once you get past the fifth main idea, the audience may have trouble remembering the first one! It’s often a good idea to plan on having three main ideas for your speech. Think about how often the number three comes up in life: three strikes in baseball, three wishes, first/, second/, and third place, etc. In writing, this is known as the “Rule of Three.” How many bears does Goldilocks encounter? How many musketeers are there? People are used to hearing things come up in sets of three, and so having three main points may make it easier for your audience to remember them. In the end, though, you will need to decide on the appropriate number of points you need to develop your speech topic for your audience.
The Supporting Material
After you have your Main Ideas planned out, it’s time to start researching material to support these points. For each point, you’ll need some things to talk about. Depending on how you have chosen to organize your speech, you may need to look up some facts to share. This includes definitions, descriptions, and explanations. If you have too many facts, your speech may come across as dry and lacking in depth. Facts are generally used to lay the foundation for your main idea, and you will use other supporting materials to illustrate your point or defend your argument.
As you continue to research your topic, you should look for examples to share. Examples help your audience to understand and relate to your main idea. If I was giving an informative speech on the solar eclipses, I might share a brief example with my audience: “On Monday, August 17th, 2017, a rare, full solar eclipse of the sun crossed the North American continent.” A brief example takes an abstract idea from your speech and quickly translates it into a real-life situation. This can help make your topic clearer for your audience.
In that same speech on solar eclipses, you could also use an extended example. In this situation, you would fill in all the details to create a story for your audience. “It was a day to be remembered. Hotels across North America had been booked over a year in advance, and millions of people traveled to find a spot in the path of totality – the area, about 70 miles wide, that would experience a total eclipse of the sun. As the time of the eclipse drew near, the air felt noticeably colder, and there were strange shadows on the ground. Then, for a little over a minute in most cities, the sky was plunged into darkness and the beautiful, white corona of the sun could be seen, along with a few stars. People gasped and screamed with delight. It was over all too soon, but those who witnessed this event would never forget it.” Extended examples add a personal touch to your speech and can help ensure that you have enough content to reach the timing parameters of your assignment.
Additionally, you may decide to use a hypothetical example. When used in a speech, a hypothetical example puts the audience into your speech. “What if you…” “Suppose you…” “Imagine that you…” These types of examples work well as attention-getters in the introduction, and you can use them throughout your speech to grab the attention of your audience and refocus them on your topic. As the audience members think about how they would respond to the imagined scenario, they are directly engaging with your speech concepts.
If you are looking to build credibility with your audience on your main idea, you should include testimonies as part of your supporting material. In the court of law, a person who has experience with the subject of the trial is called upon to give their opinion or relate their direct experience. This is similar to how testimonies are used in a speech, where you will include quotes from people who are experienced with your topic. These quotes fall into two categories: expert and peer. An expert testimony comes from someone who has professional experience with the topic, or some other publicly recognized form of expertise. A peer testimony is someone who has personal experience with your topic, but this experience is not from a professional or academic standpoint. Now, which is better for your speech, expert or peer testimonies? It depends. People tend to trust an expert testimony about scientific and medical points; however, people relate to a peer testimony more when the speech point has to do with everyday life. Sometimes an expert testimony can feel out of touch with how the average person lives.
Another way to come across as a credible speaker on your topic is to include statistics in your speech. Any numerical data in your speech, except, perhaps, a date or time, would be considered a statistic. When people hear numbers, they are more likely to believe that what you are telling them is backed up by research. However, you need to make sure you are using statistics appropriately. Here are some guidelines to follow when using this type of supporting material:
- Cite : if you use a statistic in your speech, you need to tell us where that number came from. Otherwise, we’ll think you made it up!
- Sparingly : Don’t use too many statistics in your speech! Remember, statistics are like spices. If you use the right ones, they will bring out the flavors of your meal, but if you use too many, they will overwhelm your meal.
- Round : It can be difficult to process complex numbers unless we see them written out. While it’s fine to read that “New York City covers 300.36 miles,” in a speech, it’s better to say that “New York City has just over 300 miles.” It’s okay to be a little less accurate, if it helps you to be understood. Words like, “approximately,” “close to,” “almost,” “nearly,” etc. will come in handy here.
- Explain : Help your audience to understand the numbers you are using. For example: “How much is a billion dollars? You could spend $100,000 a day for 25 years before you’d run out of cash.” During your speech, help us grasp complicated numbers in terms we can relate to.
No matter what materials you decide to use in your speech to support your main ideas, you’ll want to include citations in your outline to show where you found this information. Unlike writing, which has several formal citation styles, there is no specific way to cite your sources in your speech body. Your professor may require you to use a particular writing citation style (APA, MLA, Chicago, Associated Press). If not, note that speech citations should include at least the source where you found the information and the date the information was published. You may also include the author of the information, but you may need to contextualize this for us. For example, if I said during my speech, “According to Bob Smith…,” who is Bob Smith? No one knows, and no one cares. However, if I said, “According to the financial journalist Bob Smith, in an article published by the New York Times last month…,” people may care more about Bob’s point of view. The date is important here because the recency of your information can affect its relevance. Unlike citation in a paper, you don’t need to cite your source every time you use information from it. This would become tedious for the audience to listen to. Instead, you should add your citation at the beginning or end of when you are sharing information from that source. For example: “All of the statistics I’ve shared today come from the Red Cross website, updated in 2019.” Or, “The examples you’ll be hearing in my speech all come from the Mermaid documentary published on Animal Planet in 2011.” These oral citations give your audience enough information about your source to be able to find the full reference on your outline, if they need to verify something.
The Speech Conclusion
Once you have finished taking your audience on a journey through the main ideas of your speech, it’s time to draw things to a close. However, you need to give your audience a hint that the end is coming. We call this a signal . If you forget to signal the end of your speech, you may finish speaking and find that your audience does not break into applause. They didn’t realize you were on your way to the finish line. Giving your audience a signal alerts them that your speech will be over soon and helps them emotionally prepare for the end of your speech. The signal can be given a specific phrase, such as, “I’d like to end by…” or, “to wrap things up.” Pay attention, and you may notice that your college professors will often use a verbal signal near the end of the class session, such as, “and last of all…” or “before we go…” Try using a signal phrase in your next presentation, and see if you can spot your audience visibly perking up when they hear it. More advanced signals can also signal the end of the speech by changing the rate, pitch, or volume of their remarks. However, if you are using this technique, be sure to practice in front of someone before your actual presentation in class. You may think that you’re effecting a great change in the way you are speaking, but those changes might need to be exaggerated to be noticeable by your audience. The only way you’ll know for sure is to get some live feedback.
The signal of the conclusion leads into a brief summary of your main ideas. Simply restate an overview of the main ideas you just covered to help your audience retain the message of your speech. You may notice that your professors will also do this near the end of a class session. “Today we have covered…” is a common way for this to begin.
You’ll want to cap off your conclusion with a strong statement . It’s a good idea to actually plan out, word for word, what you would like to say for the last line of your speech. The audience is most likely to remember the first thing you said, and the last thing you said, so these words are the most important part of your speech. As much as you are able, commit them to memory. This will help you to make eye contact with your audience as you speak to help the words land with maximum effect. A strong statement can be a quote, or it can refer back to something you said in your introduction. In a persuasive speech, this statement will usually contain a call to action, or it will reinforce what you want your audience to believe, feel or do after hearing your presentation. For an informative speech, the strong statement should reinforce the importance of knowing about your topic, or what makes it so interesting.
It may be useful to think of the Three S’s of the speech conclusion as you work on this part of your presentation. Using a signal, summary, and strong statement will provide closure for the audience and help them to remember the ideas that you shared.
Creating a List of References
The last piece of your outline will generally be a list of references that you have used to provide source material for your speech. There should be at least one citation in the body of your speech from each reference. A reference is not just a website link to your research, but it shares details about your source in an organized format. You will generally need to provide the author’s name and the title of the piece, along with the name of the source you got this information from, and the date it was published. If you found the source online, you will also include the URL for the web page where this source can be found. There are standardized ways to organize all this information, and your professor may ask you to use a specific format. The two most common styles for formatting references are MLA and APA. You can find many resources, both online, and in your college’s library, to help you apply the correct formatting of the style your professor has requested. Carefully following these guidelines will add a professional polish to your speech outline and help you develop attention to detail in your written work, which is a valuable skill in the workforce, and in daily life.
Practicing with the Outline
As you are preparing to present your speech, it may be helpful to highlight key words and phrases so that you can quickly find the information you need in a single glance. This way you can have consistent eye contact with your audience. You want to avoid bobbing your head up and down as you speak, alternating between reading and seeing your audience. Remember, the outline is merely there to keep you on track. You don’t have to say all the words exactly as you have written them. In fact, your words will have much greater impact with the audience if you can create the impression that you are speaking spontaneously. Don’t be afraid to check in with your outline to make sure you have included all your ideas, and in the correct order, but also don’t rely so much on the outline that you are not connected to the audience.
If your instructor has asked you to include a speech topic, general purpose, specific purpose, purpose statement, and/or central idea on your outline, do not include these as part of your speech presentation. They belong on the outline to show your professor that you understood the topic and the goals for the assignment, and that you had a clear thesis for the speech, but you don’t share these out loud with your audience. Likewise, you also won’t read off the references to the audience at the end. These are part of the written assignment, but your oral citations are sufficient to establish your credibility in your presentation. For each speech assignment, you’ll begin with the introduction and finish up with the conclusion.
To help you prepare for your in-class presentation, you should plan on practicing your speech out loud, with a timer, in front of at least one other person. The first time you run through your speech in this way, you’ll find out what you’ve got, and you will likely need to make some adjustments to your outline. You can also get some feedback on your speech delivery, so that you can begin to refine your presentation skills. Continue this process of making changes and then practicing again in front of someone. In general, by the fifth time you’ve gone through the speech, you have it loosely committed to memory. You will know the overall flow of your topics and supporting material, and you can focus on connecting with your audience.
Remember the example of the disjointed building at the beginning of this chapter? The building had important rooms, but it was very difficult to navigate between them and make use of them. This concept also applies to your speech. You might find interesting examples and compelling arguments, but if they are not organized well, your audience may miss them. A well-organized speech will help your audience process and remember your message and will give you greater confidence as a speaker. Spending a little extra time polishing your outline will pay off in dividends towards a speech performance that you can be proud of.
Review Questions
- Why is it important to create an outline for a presentation?
- What are the three general purposes of a speech presentation?
- What is the difference between a specific purpose, or purpose statement, and a central idea?
- What are the five parts of a speech introduction?
- How do speech transitions help the audience?
- Which type of example generally works well as an attention-getter for a speech?
- Why should we use statistics sparingly in our presentations?
- When would a peer testimony be more credible with the audience than an expert testimony?
- How does oral citation differ from the type of citation you would include in an essay?
- What could you say to signal the end of your speech?
- What might be included on your outline that would not be spoken out loud as part of your speech?
Class Activities
- Read aloud a series of specific purposes or purpose statements, and have the students classify the speech categories as “Informative,” “Persuasive,” or “Special Occasion.”
- Write down different types of attention-getters on small pieces of paper, such as “Story,” “Startle,” “Rhetorical Questions,” “Quote,” “Make the audience curious,” “Audience Participation,” etc. Break the students into small groups, and have each group blindly choose an attention-getter from the pile. Then, give the entire class a topic, such as “chewing gum.” Each group has to come up with an attention-getter for this topic in the category they selected.
- Have the students help you come up with a list of 10-14 totally random, but specific, people, places, or things. Help them out with a few – mustaches, the Black Widow spider, North Dakota, etc. Once you have a list, pair the students up and have them share how they would have credibility on this topic. Do they have personal experience with it? Will they need to do research?
- Keeping the same list above, have the students work with their partner to decide how they would relate this topic to their diverse classroom audience.
- Create an abbreviated preparation outline for the students that includes the general purpose, specific purpose, central Idea, and a list of main points. Break the students into groups and give each group either the introduction or a main point. The groups will prepare 1-2 minutes of content for their section and elect a spokesperson to present this to the class. Once the students are prepared, start a timer and do the presentation. The instruction should provide transitions between main ideas, as well as the conclusion.
- Have the students look up a quote from their favorite celebrity. It has to come from an article, though, and not a “Quotes” website. Put them into groups to share, and let each group pick the best one to present to the class. The elected spokesperson for that group will need to complete this oral citation phrase: “According to_______, reported by________(website or periodical) on _______(date)…” and then relay the quote.
- Assemble Make 5-10 enlarged copies of both an APA reference and an MLA references. Cut the copies up so that the author, article title, published date, Retrieval URL, etc., are all on different parts. Divide the class into groups and give each group an APA “puzzle” to assemble. The first group to correctly assemble their reference wins! Repeat with the MLA reference.
- Pass out a lined index card to each student. Give the students an easy topic, and have them free write in complete sentences on this topic until either the time is up or the card is filled. Next, have the students choose 10 key words that will help them remember what they wrote, and list those words on the blank side of the card. Then, pair the students up. Decide on a “Person A” and a “Person B.” “Person A” begins, and flips the card so that he or she can see only the key words, and the partner can see the freewriting. Have “Person A” attempt to share what he or she wrote with “Person B,” using only the key words as a prompt. At the end, “Person B” will let him or her know if anything was left out. Finally, switch roles, so that the other partner can present. Have a discussion with the class about the difference between presentation notes and preparation outlines.
Works Cited
Gallo, Carmine. Talk Like TED . New York, NY: Macmillan. 2014. Print.
Hemmert, Nancy Grass. Public Speaking in American English: A Guide for Non-Native Speakers . 1st edition. New York, NY: Pearson. 2007. Print.
Lucas, Stephen. E. The Art of Public Speaking . 12th edition. New York, NY: McGraw Hill. 2014. Print.
Powell, Susanna, et al. Stand and Deliver: High Impact Presentations . 4th edition. New York, NY: Pearson. 2014 Print.
Structure and Format: Outlining the Speech Copyright © by Rebecca Collier, M.B.A. is licensed under a Creative Commons Attribution-NonCommercial 4.0 International License , except where otherwise noted.
Share This Book
Pardon Our Interruption
As you were browsing something about your browser made us think you were a bot. There are a few reasons this might happen:
- You've disabled JavaScript in your web browser.
- You're a power user moving through this website with super-human speed.
- You've disabled cookies in your web browser.
- A third-party browser plugin, such as Ghostery or NoScript, is preventing JavaScript from running. Additional information is available in this support article .
To regain access, please make sure that cookies and JavaScript are enabled before reloading the page.
Have a language expert improve your writing
Run a free plagiarism check in 10 minutes, generate accurate citations for free.
- Knowledge Base
- Research paper
Writing a Research Paper Introduction | Step-by-Step Guide
Published on September 24, 2022 by Jack Caulfield . Revised on September 5, 2024.

The introduction to a research paper is where you set up your topic and approach for the reader. It has several key goals:
- Present your topic and get the reader interested
- Provide background or summarize existing research
- Position your own approach
- Detail your specific research problem and problem statement
- Give an overview of the paper’s structure
The introduction looks slightly different depending on whether your paper presents the results of original empirical research or constructs an argument by engaging with a variety of sources.
The five steps in this article will help you put together an effective introduction for either type of research paper.
Instantly correct all language mistakes in your text
Upload your document to correct all your mistakes in minutes

Table of contents
Step 1: introduce your topic, step 2: describe the background, step 3: establish your research problem, step 4: specify your objective(s), step 5: map out your paper, research paper introduction examples, frequently asked questions about the research paper introduction.
The first job of the introduction is to tell the reader what your topic is and why it’s interesting or important. This is generally accomplished with a strong opening hook.
The hook is a striking opening sentence that clearly conveys the relevance of your topic. Think of an interesting fact or statistic, a strong statement, a question, or a brief anecdote that will get the reader wondering about your topic.
For example, the following could be an effective hook for an argumentative paper about the environmental impact of cattle farming:
A more empirical paper investigating the relationship of Instagram use with body image issues in adolescent girls might use the following hook:
Don’t feel that your hook necessarily has to be deeply impressive or creative. Clarity and relevance are still more important than catchiness. The key thing is to guide the reader into your topic and situate your ideas.
Prevent plagiarism. Run a free check.
This part of the introduction differs depending on what approach your paper is taking.
In a more argumentative paper, you’ll explore some general background here. In a more empirical paper, this is the place to review previous research and establish how yours fits in.
Argumentative paper: Background information
After you’ve caught your reader’s attention, specify a bit more, providing context and narrowing down your topic.
Provide only the most relevant background information. The introduction isn’t the place to get too in-depth; if more background is essential to your paper, it can appear in the body .
Empirical paper: Describing previous research
For a paper describing original research, you’ll instead provide an overview of the most relevant research that has already been conducted. This is a sort of miniature literature review —a sketch of the current state of research into your topic, boiled down to a few sentences.
This should be informed by genuine engagement with the literature. Your search can be less extensive than in a full literature review, but a clear sense of the relevant research is crucial to inform your own work.
Begin by establishing the kinds of research that have been done, and end with limitations or gaps in the research that you intend to respond to.
The next step is to clarify how your own research fits in and what problem it addresses.
Argumentative paper: Emphasize importance
In an argumentative research paper, you can simply state the problem you intend to discuss, and what is original or important about your argument.
Empirical paper: Relate to the literature
In an empirical research paper, try to lead into the problem on the basis of your discussion of the literature. Think in terms of these questions:
- What research gap is your work intended to fill?
- What limitations in previous work does it address?
- What contribution to knowledge does it make?
You can make the connection between your problem and the existing research using phrases like the following.
| Although has been studied in detail, insufficient attention has been paid to . | You will address a previously overlooked aspect of your topic. |
| The implications of study deserve to be explored further. | You will build on something suggested by a previous study, exploring it in greater depth. |
| It is generally assumed that . However, this paper suggests that … | You will depart from the consensus on your topic, establishing a new position. |
Now you’ll get into the specifics of what you intend to find out or express in your research paper.
The way you frame your research objectives varies. An argumentative paper presents a thesis statement, while an empirical paper generally poses a research question (sometimes with a hypothesis as to the answer).
Argumentative paper: Thesis statement
The thesis statement expresses the position that the rest of the paper will present evidence and arguments for. It can be presented in one or two sentences, and should state your position clearly and directly, without providing specific arguments for it at this point.
Empirical paper: Research question and hypothesis
The research question is the question you want to answer in an empirical research paper.
Present your research question clearly and directly, with a minimum of discussion at this point. The rest of the paper will be taken up with discussing and investigating this question; here you just need to express it.
A research question can be framed either directly or indirectly.
- This study set out to answer the following question: What effects does daily use of Instagram have on the prevalence of body image issues among adolescent girls?
- We investigated the effects of daily Instagram use on the prevalence of body image issues among adolescent girls.
If your research involved testing hypotheses , these should be stated along with your research question. They are usually presented in the past tense, since the hypothesis will already have been tested by the time you are writing up your paper.
For example, the following hypothesis might respond to the research question above:
The final part of the introduction is often dedicated to a brief overview of the rest of the paper.
In a paper structured using the standard scientific “introduction, methods, results, discussion” format, this isn’t always necessary. But if your paper is structured in a less predictable way, it’s important to describe the shape of it for the reader.
If included, the overview should be concise, direct, and written in the present tense.
- This paper will first discuss several examples of survey-based research into adolescent social media use, then will go on to …
- This paper first discusses several examples of survey-based research into adolescent social media use, then goes on to …
Scribbr’s paraphrasing tool can help you rephrase sentences to give a clear overview of your arguments.
Full examples of research paper introductions are shown in the tabs below: one for an argumentative paper, the other for an empirical paper.
- Argumentative paper
- Empirical paper
Are cows responsible for climate change? A recent study (RIVM, 2019) shows that cattle farmers account for two thirds of agricultural nitrogen emissions in the Netherlands. These emissions result from nitrogen in manure, which can degrade into ammonia and enter the atmosphere. The study’s calculations show that agriculture is the main source of nitrogen pollution, accounting for 46% of the country’s total emissions. By comparison, road traffic and households are responsible for 6.1% each, the industrial sector for 1%. While efforts are being made to mitigate these emissions, policymakers are reluctant to reckon with the scale of the problem. The approach presented here is a radical one, but commensurate with the issue. This paper argues that the Dutch government must stimulate and subsidize livestock farmers, especially cattle farmers, to transition to sustainable vegetable farming. It first establishes the inadequacy of current mitigation measures, then discusses the various advantages of the results proposed, and finally addresses potential objections to the plan on economic grounds.
The rise of social media has been accompanied by a sharp increase in the prevalence of body image issues among women and girls. This correlation has received significant academic attention: Various empirical studies have been conducted into Facebook usage among adolescent girls (Tiggermann & Slater, 2013; Meier & Gray, 2014). These studies have consistently found that the visual and interactive aspects of the platform have the greatest influence on body image issues. Despite this, highly visual social media (HVSM) such as Instagram have yet to be robustly researched. This paper sets out to address this research gap. We investigated the effects of daily Instagram use on the prevalence of body image issues among adolescent girls. It was hypothesized that daily Instagram use would be associated with an increase in body image concerns and a decrease in self-esteem ratings.
The introduction of a research paper includes several key elements:
- A hook to catch the reader’s interest
- Relevant background on the topic
- Details of your research problem
and your problem statement
- A thesis statement or research question
- Sometimes an overview of the paper
Don’t feel that you have to write the introduction first. The introduction is often one of the last parts of the research paper you’ll write, along with the conclusion.
This is because it can be easier to introduce your paper once you’ve already written the body ; you may not have the clearest idea of your arguments until you’ve written them, and things can change during the writing process .
The way you present your research problem in your introduction varies depending on the nature of your research paper . A research paper that presents a sustained argument will usually encapsulate this argument in a thesis statement .
A research paper designed to present the results of empirical research tends to present a research question that it seeks to answer. It may also include a hypothesis —a prediction that will be confirmed or disproved by your research.
Cite this Scribbr article
If you want to cite this source, you can copy and paste the citation or click the “Cite this Scribbr article” button to automatically add the citation to our free Citation Generator.
Caulfield, J. (2024, September 05). Writing a Research Paper Introduction | Step-by-Step Guide. Scribbr. Retrieved September 19, 2024, from https://www.scribbr.com/research-paper/research-paper-introduction/
Is this article helpful?

Jack Caulfield
Other students also liked, writing strong research questions | criteria & examples, writing a research paper conclusion | step-by-step guide, research paper format | apa, mla, & chicago templates, get unlimited documents corrected.
✔ Free APA citation check included ✔ Unlimited document corrections ✔ Specialized in correcting academic texts
| Please verify captcha to continue browsing Quizgoat.com |
| --> |
- For educators
- English (US)
- English (India)
- English (UK)
- Greek Alphabet
This problem has been solved!
You'll get a detailed solution that helps you learn core concepts.
Question: Patrick is developing a presentation for a research paper that begins with the major idea. He then realizes that the topic could be antagonizing to his audience. In this scenario, Patrick should consider using the _____ approach. a. contingency b. deductive c. system d. inductive

Not the question you’re looking for?
Post any question and get expert help quickly.
IMAGES
VIDEO
COMMENTS
Study with Quizlet and memorize flashcards containing terms like Patrick prepares a presentation for a research paper that begins with the major idea. He then realizes that the topic could be antagonizing and may not please his audience. In this scenario which of the following outlining approaches should Patrick use?, In the process for selecting an outline for a message, which of the ...
Patrick prepares a presentation for a research paper that begins with the major idea. He then realizes that the topic could be antagonizing and may not please his audience. In this scenario, which of the following outlining approaches should Patrick use? the inductive approach.
Patrick prepares a presentation for a research paper that begins with the major idea. He then realizes that the topic could be antagonizing and may not please his audience. In this scenario which of the following outlining approaches should Patrick use?
Patrick should use the inductive approach for presenting his research paper as this method is more suitable for potentially antagonistic topics. This method begins with specific arguments or data before introducing the main idea (option b). Explanation: In this scenario, Patrick should use the inductive approach (Option B). The inductive ...
Your solution's ready to go! Our expert help has broken down your problem into an easy-to-learn solution you can count on. Question: Patrick prepares a presentation of a research paper that begins with the major idea. He then realizes that the topic could be antagonizing and may not please his audience. In this scenario, which of the ...
Body. For each major section of your presentation, follow the "4 S Structure" 1: Signpost the point ("First I'm going to point out the problem with..." "My second argument is that..." "Now let me explain my methodology.") State the point clearly and succinctly. Support the point with data, cases, description, relevant studies, etc.
Related Articles. This guide provides a 4-step process for making a good scientific presentation: outlining the scientific narrative, preparing slide outlines, constructing slides, and practicing the talk. We give advice on how to make effective slides, including tips for text, graphics, and equations, and how to use rehearsals of your talk to ...
Prepare for a face-to-face presentation. ... In Chapter 12 "Writing a Research Paper", you learned techniques for writing an interesting introduction, such as beginning with a surprising fact or statistic, a thought-provoking question or quotation, a brief anecdote that illustrates a larger concept or connects your topic to your audience ...
You have already taken the major steps toward making your presentation successful, as a result of the content planning you did in Chapter 14 "Creating Presentations: Sharing Your Ideas", Section 14.1 "Organizing a Visual Presentation" and Section 14.2 "Incorporating Effective Visuals into a Presentation". Now, it is time to plan and ...
Writing for Success. Chapter 14: Creating Presentations: Sharing Your Ideas. 14.1 Organizing a Visual Presentation. 14.2 Incorporating Effective Visuals into a Presentation. 14.3 Giving a Presentation. 14.4 Creating Presentations: End-of-Chapter Exercises.
Patrick prepares a presentation for a research paper that begins with the major idea. He then realizes that the topic could be antagonizing and may not please his audience. In this scenario, which of the following outlining approaches should Patrick use? the inductive approach.
The main ideas are the topic sentences of your speech. As a general rule, you should have at least two main ideas. If you only have one main idea, your speech has nowhere to go, and it may feel repetitive for the audience. That being said, you generally shouldn't have more than five main ideas in your speech.
Patrick prepares a presentation of a research paper that begins with the major idea. He then realizes that the topic could be antagonizing and may not please his audience. In this scenario, which of the following should Patrick use? ... Zelda decided to write emails requesting business owners and major corporations in the city for donations ...
Patrick prepares a presentation for a research paper that begins with the major idea. He then realizes that the topic could be antagonizing and may not please his audience. In this scenario, which of the following outlining approaches should Patrick use?
Patrick prepares a presentation for a research paper that begins with the major idea. He then realizes that the topic could be antagonizing and may not please his audience. In this scenario, which of the following outlining approaches should Patrick use? a. The deductive approach b.
Table of contents. Step 1: Introduce your topic. Step 2: Describe the background. Step 3: Establish your research problem. Step 4: Specify your objective (s) Step 5: Map out your paper. Research paper introduction examples. Frequently asked questions about the research paper introduction.
Patrick prepares a presentation of a research paper that begins with the major idea. He then realizes that the topic could be antagonizing and may not please his audience. In this scenario, which of the following should Patrick use?
It is used when an audience is likely to like the main idea. B. It is used to discourage audience involvement. ... routine. D. It is used when an audience needs to be persuaded by the message. business-communications; 13. Patrick prepares a presentation for a research paper that begins with the major idea. ... Zelda decided to write emails ...
Answer to Solved Patrick is developing a presentation for a research | Chegg.com
Determining the central idea to be conveyed _____ can be disseminated using a variety of media or forms, including memos, letters, emails, instant or text messaging, faxes, press releases, company websites, blogs, blog applications, wikis, and reports. ... Patrick prepares a presentation for a research paper that begins with the major idea. He ...