Understanding IP Address Assignment: A Complete Guide

Introduction
In today's interconnected world, where almost every aspect of our lives relies on the internet, understanding IP address assignment is crucial for ensuring online security and efficient network management. An IP address serves as a unique identifier for devices connected to a network, allowing them to communicate with each other and access the vast resources available on the internet. Whether you're a technical professional, a network administrator, or simply an internet user, having a solid grasp of how IP addresses are assigned within the same network can greatly enhance your ability to troubleshoot connectivity issues and protect your data.
The Basics of IP Addresses
Before delving into the intricacies of IP address assignment in the same network, it's important to have a basic understanding of what an IP address is. In simple terms, an IP address is a numerical label assigned to each device connected to a computer network that uses the Internet Protocol for communication. It consists of four sets of numbers separated by periods (e.g., 192.168.0.1) and can be either IPv4 or IPv6 format.
IP Address Allocation Methods
There are several methods used for allocating IP addresses within a network. One commonly used method is Dynamic Host Configuration Protocol (DHCP). DHCP allows devices to obtain an IP address automatically from a central server, simplifying the process of managing large networks. Another method is static IP address assignment, where an administrator manually assigns specific addresses to devices within the network. This method provides more control but requires careful planning and documentation.

Considerations for Efficient IP Address Allocation
Efficient allocation of IP addresses is essential for optimizing network performance and avoiding conflicts. When assigning IP addresses, administrators need to consider factors such as subnetting, addressing schemes, and future scalability requirements. By carefully planning the allocation process and implementing best practices such as using private IP ranges and avoiding overlapping subnets, administrators can ensure smooth operation of their networks without running out of available addresses.
IP Address Assignment in the Same Network
When two routers are connected within the same network, they need to obtain unique IP addresses to communicate effectively. This can be achieved through various methods, such as using different subnets or configuring one router as a DHCP server and the other as a client. Understanding how IP address assignment works in this scenario is crucial for maintaining proper network functionality and avoiding conflicts.
Basics of IP Addresses
IP addresses are a fundamental aspect of computer networking that allows devices to communicate with each other over the internet. An IP address, short for Internet Protocol address, is a unique numerical label assigned to each device connected to a network. It serves as an identifier for both the source and destination of data packets transmitted across the network.
The structure of an IP address consists of four sets of numbers separated by periods (e.g., 192.168.0.1). Each set can range from 0 to 255, resulting in a total of approximately 4.3 billion possible unique combinations for IPv4 addresses. However, with the increasing number of devices connected to the internet, IPv6 addresses were introduced to provide a significantly larger pool of available addresses.
IPv4 addresses are still predominantly used today and are divided into different classes based on their range and purpose. Class A addresses have the first octet reserved for network identification, allowing for a large number of hosts within each network. Class B addresses reserve the first two octets for network identification and provide a balance between network size and number of hosts per network. Class C addresses allocate the first three octets for network identification and are commonly used in small networks.
With the depletion of available IPv4 addresses, IPv6 was developed to overcome this limitation by utilizing 128-bit addressing scheme, providing an enormous pool of potential IP addresses - approximately 3.4 x 10^38 unique combinations.
IPv6 addresses are represented in hexadecimal format separated by colons (e.g., 2001:0db8:85a3:0000:0000:8a2e:0370:7334). The longer length allows for more efficient routing and eliminates the need for Network Address Translation (NAT) due to its vast address space.
Understanding these basics is essential when it comes to assigning IP addresses in a network. Network administrators must consider various factors such as the number of devices, network topology, and security requirements when deciding on the IP address allocation method.
In the next section, we will explore different methods of IP address assignment, including Dynamic Host Configuration Protocol (DHCP) and static IP address assignment. These methods play a crucial role in efficiently managing IP addresses within a network and ensuring seamless communication between devices.
Methods of IP Address Assignment
IP address assignment is a crucial aspect of network management and plays a vital role in ensuring seamless connectivity and efficient data transfer. There are primarily two methods of assigning IP addresses in a network: dynamic IP address assignment using the Dynamic Host Configuration Protocol (DHCP) and static IP address assignment.
Dynamic IP Address Assignment using DHCP
Dynamic IP address assignment is the most commonly used method in modern networks. It involves the use of DHCP servers, which dynamically allocate IP addresses to devices on the network. When a device connects to the network, it sends a DHCP request to the DHCP server, which responds by assigning an available IP address from its pool.
One of the key benefits of dynamic IP address assignment is its simplicity and scalability. With dynamic allocation, network administrators don't have to manually configure each device's IP address. Instead, they can rely on the DHCP server to handle this task automatically. This significantly reduces administrative overhead and makes it easier to manage large networks with numerous devices.
Another advantage of dynamic allocation is that it allows for efficient utilization of available IP addresses. Since addresses are assigned on-demand, there is no wastage of unused addresses. This is particularly beneficial in scenarios where devices frequently connect and disconnect from the network, such as in public Wi-Fi hotspots or corporate environments with a high turnover rate.
However, dynamic allocation does have some drawbacks as well. One potential issue is that devices may receive different IP addresses each time they connect to the network. While this might not be an issue for most users, it can cause problems for certain applications or services that rely on consistent addressing.
Additionally, dynamic allocation introduces a dependency on the DHCP server. If the server goes down or becomes unreachable, devices will not be able to obtain an IP address and will be unable to connect to the network. To mitigate this risk, redundant DHCP servers can be deployed for high availability.
Static IP Address Assignment
Static IP address assignment involves manually configuring each device's IP address within the network. Unlike dynamic allocation, where addresses are assigned on-demand, static assignment requires administrators to assign a specific IP address to each device.
One of the main advantages of static IP address assignment is stability. Since devices have fixed addresses, there is no risk of them receiving different addresses each time they connect to the network. This can be beneficial for applications or services that require consistent addressing, such as servers hosting websites or databases.
Static assignment also provides greater control over network resources. Administrators can allocate specific IP addresses to devices based on their requirements or security considerations. For example, critical servers or network infrastructure devices can be assigned static addresses to ensure their availability and ease of management.
However, static IP address assignment has its limitations as well. It can be time-consuming and error-prone, especially in large networks with numerous devices. Any changes to the network topology or addition/removal of devices may require manual reconfiguration of IP addresses, which can be a tedious task.
Furthermore, static allocation can lead to inefficient utilization of available IP addresses. Each device is assigned a fixed address regardless of whether it is actively using the network or not. This can result in wastage of unused addresses and may pose challenges in scenarios where addressing space is limited.
In order to efficiently allocate IP addresses within a network, there are several important considerations that need to be taken into account. By carefully planning and managing the allocation process, network administrators can optimize their IP address usage and ensure smooth operation of their network.
One of the key factors to consider when assigning IP addresses is the size of the network. The number of devices that will be connected to the network determines the range of IP addresses that will be required. It is essential to accurately estimate the number of devices that will need an IP address in order to avoid running out of available addresses or wasting them unnecessarily.
Another consideration is the type of devices that will be connected to the network. Different devices have different requirements in terms of IP address assignment. For example, servers and other critical infrastructure typically require static IP addresses for stability and ease of access. On the other hand, client devices such as laptops and smartphones can often use dynamic IP addresses assigned by a DHCP server.
The physical layout of the network is also an important factor to consider. In larger networks with multiple subnets or VLANs, it may be necessary to segment IP address ranges accordingly. This allows for better organization and management of IP addresses, making it easier to troubleshoot issues and implement security measures.
Security is another crucial consideration when allocating IP addresses. Network administrators should implement measures such as firewalls and intrusion detection systems to protect against unauthorized access or malicious activities. Additionally, assigning unique IP addresses to each device enables better tracking and monitoring, facilitating quick identification and response in case of any security incidents.
Efficient utilization of IP address ranges can also be achieved through proper documentation and record-keeping. Maintaining an up-to-date inventory of all assigned IP addresses helps prevent conflicts or duplicate assignments. It also aids in identifying unused or underutilized portions of the address space, allowing for more efficient allocation in the future.
Furthermore, considering future growth and scalability is essential when allocating IP addresses. Network administrators should plan for potential expansion and allocate IP address ranges accordingly. This foresight ensures that there will be sufficient addresses available to accommodate new devices or additional network segments without disrupting the existing infrastructure.
In any network, the assignment of IP addresses is a crucial aspect that allows devices to communicate with each other effectively. When it comes to IP address assignment in the same network, there are specific considerations and methods to ensure efficient allocation. In this section, we will delve into how two routers in the same network obtain IP addresses and discuss subnetting and IP address range distribution.
To understand how two routers in the same network obtain IP addresses, it's essential to grasp the concept of subnetting. Subnetting involves dividing a larger network into smaller subnetworks or subnets. Each subnet has its own unique range of IP addresses that can be assigned to devices within that particular subnet. This division helps manage and organize large networks efficiently.
When it comes to assigning IP addresses within a subnet, there are various methods available. One common method is manual or static IP address assignment. In this approach, network administrators manually assign a specific IP address to each device within the network. Static IP addresses are typically used for devices that require consistent connectivity and need to be easily identifiable on the network.
Another widely used method for IP address assignment is Dynamic Host Configuration Protocol (DHCP). DHCP is a networking protocol that enables automatic allocation of IP addresses within a network. With DHCP, a server is responsible for assigning IP addresses dynamically as devices connect to the network. This dynamic allocation ensures efficient utilization of available IP addresses by temporarily assigning them to connected devices when needed.
When considering efficient allocation of IP addresses in the same network, several factors come into play. One important consideration is proper planning and design of subnets based on anticipated device count and future growth projections. By carefully analyzing these factors, administrators can allocate appropriate ranges of IP addresses for each subnet, minimizing wastage and ensuring scalability.
Additionally, implementing proper security measures is crucial when assigning IP addresses in the same network. Network administrators should consider implementing firewalls, access control lists (ACLs), and other security mechanisms to protect against unauthorized access and potential IP address conflicts.
Furthermore, monitoring and managing IP address usage is essential for efficient allocation. Regular audits can help identify any unused or underutilized IP addresses that can be reclaimed and allocated to devices as needed. This proactive approach ensures that IP addresses are utilized optimally within the network.
The proper assignment of IP addresses is crucial for maintaining network security and efficiency. Throughout this guide, we have covered the basics of IP addresses, explored different methods of IP address assignment, and discussed considerations for efficient allocation.
In conclusion, understanding IP address assignment in the same network is essential for network administrators and technical professionals. By following proper allocation methods such as DHCP or static IP assignment, organizations can ensure that each device on their network has a unique identifier. This not only enables effective communication and data transfer but also enhances network security by preventing unauthorized access.
Moreover, considering factors like subnetting, scalability, and future growth can help optimize IP address allocation within a network. Network administrators should carefully plan and allocate IP addresses to avoid conflicts or wastage of resources.
Overall, a well-managed IP address assignment process is vital for the smooth functioning of any network. It allows devices to connect seamlessly while ensuring security measures are in place. By adhering to best practices and staying updated with advancements in networking technology, organizations can effectively manage their IP address assignments.
In conclusion, this guide has provided a comprehensive overview of IP address assignment in the same network. We hope it has equipped you with the knowledge needed to make informed decisions regarding your network's IP address allocation. Remember that proper IP address assignment is not only important for connectivity but also plays a significant role in maintaining online security and optimizing network performance.
Enhance Online Security: The Ultimate Guide to Conceal Your IP Address
Alternative Methods to Conceal Your IP Address Without a VPN
Maintain Privacy: Learn How to Alter Your IP Address
The Significance of IP Address for Online Security and Privacy
Comprehensive Handbook on VPNs, IP Addresses, and Proxy Servers

Blog Post View
How are ip addresses assigned.
When you're connected to a network, your computer or smart device will obtain an IP address either from your ISP or your router. There are 2 ways how you can assign an IP address to your device: (1) dynamically via DHCP or (2) statically by manually assigning an IP address yourself. In either case, you must use the IP address that is provided to you by your ISP, or the IP range you allocated yourself within your private space (i.e. private IP address).
How are IP addresses allocated?
Before we can discuss IP assignment, we need to understand how IP addresses are allocated. There are two versions of IP addresses: IPv4 (version 4) and IPv6 (version 6). There are numerical differences , but they essentially serves the same purpose by uniquely identifying a device on the Internet. There are a few organizations that allocate and manage IP addresses globally, and they are:
- ICAAN (The Internet Corporation for Names & Numbers): ICANN manages supply of all IPv4 and IPv6 addresses as well as domain name system ( DNS ) and Root Servers.
- IANA (Internet Assigned Numbers Authority): IANA is a part of ICANN that maintains technical aspect of the DNS. DNS is the system that translates human-readable domain names to machine friendly IP addresses.
- ARIN (American Registry for Internet Numbers): ARIN is a region specific organization that manages IP addresses for the USA, Canada, Caribbean and North Atlantic islands.
- ISP (Internet Service Providers): ISPs reach out to ARIN and register blocks of IP addresses (i.e. class A, B and C). In addition to ISPs, large corporations may reach out to ARIN to register blocks of IP address for their corporate use.
- RIR (Regional Internet Registry): Much like the ARIN for managing IP address for North American region, RIR manages IP addresses for rest of the world.
As ARIN and RIR manages IP addresses for the region, they allocate and deallocate IP addresses for countries, ISPs and corporations. A larger blocks of IP addresses are assigned to countries, the accuracy of IP location for country level is approximately 95% - 98% depending on the provider.
Once one or more blocks of IP addresses are assigned to an ISP or Corporation, the organization assigns the IP address to its customers. When you purchase the Internet Service from an ISP, you have an option to obtain static (non-changing) or dynamic (changing) IP Address(es). Most home users obtain a dynamic IP address, and small businesses may obtain static IP addresses. The IP addresses obtained from an ISP are "public" IP addresses which are a globally unique number within the Internet.
Once the IP address is obtained by your router from your ISP, you have an option to create a private network by assigning private IP addresses to your devices that are not globally unique, but unique within your private network.
IP addresses are governed by ICANN, and ARIN and RIR are responsible for allocating IP addresses to ISPs and Corporations within its regions. IANA manages DNS for translating domain names to IP addresses. The IP addresses are then assigned to individuals or small businesses either statically or dynamically via DHCP, and every computing devices on the Internet must have an IP address to communicate with each other.
Share this post
Comments (0), leave a comment.
All comments are moderated. Spammy and bot submitted comments are deleted. Please submit the comments that are helpful to others, and we'll approve your comments. A comment that includes outbound link will only be approved if the content is relevant to the topic, and has some value to our readers.
Reply Comment
Do not sell or share my personal information..
At IPLocation.net, we prioritize the privacy and security of our visitors. We want you to feel confident and comfortable when browsing our website. That's why we want to assure you that we do not sell or share any personal information collected from our website. Your trust is important to us. Whether you're browsing our site for information, or engaging with our content, rest assured that any data you provide remains strictly confidential. We adhere to stringent privacy policies and comply with all relevant regulations to safeguard your information. Your privacy matters, and we are committed to maintaining the highest standards of data protection. If you have any questions or concerns regarding our privacy practices, please don't hesitate to reach out to us.
© 2006 - 2024, Brand Media, Inc. All rights reserved.
Steve's Smart Home Networking Guide
Practical Home Networking and Home Automation
IP Addresses on Home Networks – A Beginner’s Guide
All devices connected to a home network require an IP (Internet Protocol )address.
Understanding IP addresses is essential for configuring devices to work on your network, troubleshooting network issues etc.
What are IP Addresses?
Devices requiring an IP addresses is no different from telephones requiring a telephone number , or a house requiring an address.
An IP address is essential to identify a device on the network so that it can receive data e.g movies, emails etc in just the same way a a telephone number is required to receive phone calls.
Just as house numbers have a particular format e.g. 25,King street, etc and phone numbers have a structure like area code + local number then so to do IP addresses.
IP Address Types
There are two type of IP address- IPv4 which is the original and older address type and IPv6 which is the newer type.
Currently home networks use the IPv4 address type although you will also see IPV6 addresses assigned, but not really used.
Because IPv4 addresses are what home networks currently use we will concentrate on these addresses in this tutorial.
IPV4 Addresses
An IP address ( IPv4 ) consist of 4 numbers separated by a dot and look like this:
192.168.1.1
All IP addresses on a home network need to be unique which is important to note if you need to manually allocate them.
The right most number is the important number as far as most people are concerned, and will be different for each device on the home network
The screen shot below shows a device map with the IP address allocation for part of my home network. Notice which part of the address changes.
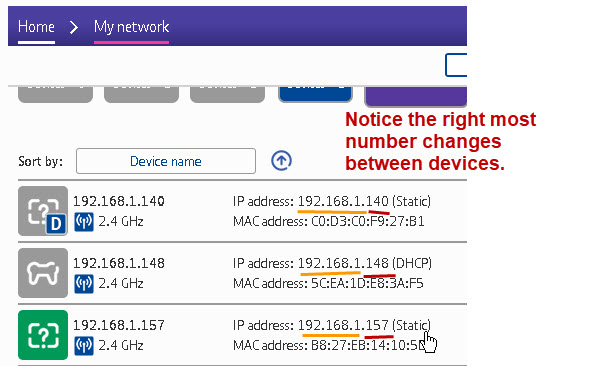
Home Network IP address Assignment
IP address can be assigned:
- Automatically
Manual IP Address Assignment
Manually assigned addresses are known as static addresses.
When assigning a static IP address you will also need to enter other important address information.
The screen shot below shows the static address assignment on my Windows 10 computer however all devices have a similar form for the IP address assignment.
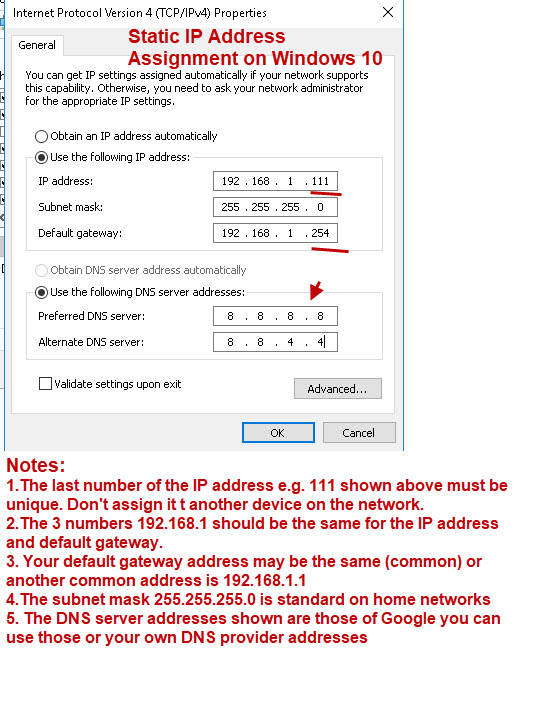
1. My home network use the network address 192.168.1 (first three numbers) also common is 192.168.0 and 10.x.x.x
2. The default gateway is the address of your home router. This is assigned to the router as a static IP address. Common gateway addresses use the first or last addresses of the range which are 1 and 254 .
3. The subnet mask is important as is usually 255.255.255.0
4. You need the address of 1 DNS server to access websites on the Internet. The Google DNS server is available to use for free but you can use your ISP DNS servers.
5. You can choose to manually assign the DNS addresses and automatically assign the IP address or vice versa.
6. Make a note of the addresses you assign so as to avoid address conflicts .
Automatic IP Address Assignment- DHCP
This is the default configuration on most devices.
This is what it looks like on my Windows 10 computer.
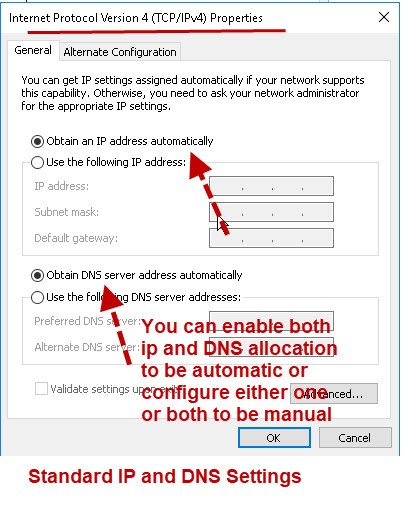
On home networks this service is provided by the home router which has DHCP enabled by default.
If no DHCP server is available Windows machines (some versions) will auto assign an address. This address starts with 169.254
e.g. 169.254.0.1
No DNS server address will be allocated which means that you will not have access to the internet unless you know the IP address of the server.
Finding Your IP Address,Gateway Address etc?
You may need to find out what DNS servers you are using or the IP or MAC address of:
- Your Home Router.
- Your own computer/tablet/phone
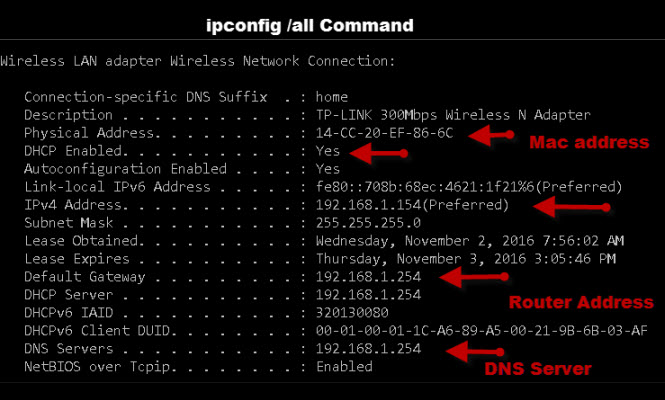
The main tool you use is the ipconfig (windows) or ifconfig (linux) tool.
The screen shot below shows the ipconfig command use with the /all switch. i.e. ipconfig/all
Common Questions and Basic Troubleshooting
Q- what happens if dhcp fails.
A- Because IP addresses are leased from the DHCP server your client machine will keep its existing address until the lease expires usually 1 day. and so will run normally for a while.
New machines joining the network will not get an IP address and may auto assign one depending on the device.
They will not work with existing machines and because they don’t have a DNS server address they wont be able to access the Internet.
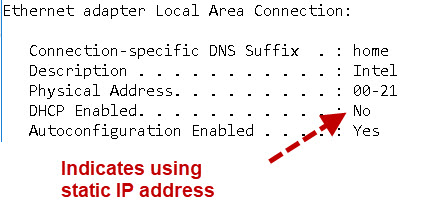
Q -How do I know if I have a static IP address or a automatically assigned one?
A- You can look at the network adapter properties or on Windows open a command line and type
ipconfig /all
If you see the entry DHCP Enabled .. No then you are using a static IP address.
Q- What happens if a have two DHCP servers on my Home Network?
A- This may cause strange behaviour and is to be avoided. On home networks the home router provides the DHCP service by default. If you try to reuse old routers as Wireless access points then you can run into this problem
Q -What is The IP address of my router or default gateway?
A- You can find it using the ipconfig command line tool (ifconfig on Linux) as shown above. When viewing your configuration some devices refer to it as the default router whereas other use the term default gateway.
In the screen shot above it is 192.168.1.254
Your home router generally comes with a static IP address assigned. Common addresses are:
192.168.1.254 and 192.168.1.1
However you can change it if you want, but because this is the main device on the home network I would leave it as it is. If you do change it you will need to make changes on any devices that use a static IP address.
Q- What happens if I assign the same IP address to two separate devices?
A- You get an IP address conflict and the devices wont work.
Q- Do I need to subnet my Home Network?
A- Almost certainly no. See Home network Subnet masks explained .
Q- What is ARP?
A- ARP stands for address resolution protocol and translates an IP address to a MAC address.
Related tutorials and Resources
- How to Setup and Configure your Home Router
- Setting Up Static IP Addresses on Windows 10
- Understanding DHPC on Home Networks
- Name Resolution on Home Networks
- Setting Up A DNS Server using DNSMasq
- Understanding Multicast DNS
- Home networking Course
I thoroughly enjoyed reading this and other articles on “home networks”. As a long time computer user & developer, I found your writing style refreshing. I look forward to future essays on related topics such as home router configuration, home LAN “tuning” &”trouble shooting”. ~~~ 0:¬ Dan
Very helpful. Thank you. Would you say it is beneficial to assign IP addresses or just allow the system to get on with it?
You should always let the system do it unless you really have a need to do it manually you might find this useful https://youtu.be/2yOMNugsdE0 rgds Steve
Leave a Reply Cancel reply
Your email address will not be published. Required fields are marked *
Hot Reading
Related reading, contact us to understand our services.
We are multilingual and speak in your language.
IF YOU'D LIKE TO CONTACT US NOW
You can reach us via the channel below or use the live chat at bottom right.
- +852-29888918
- [email protected]
- A3, 11/F, TML Tower,Tsuen Wan, N.T, HongKong SAR A3, 11/F, TML Tower, Tsuen Wan, N.T, Hong Kong SAR

IF YOU'D LIKE US TO CONTACT YOU
Kindly fill in the form below and our IP specialist will contact you on the same working day.
© 2016-2024 LARUS Limited
How to configure a static IP on Windows 10 or 11
Do you need to switch from a dynamic to a static IP address configuration on Windows 11 or 10? Here's how.
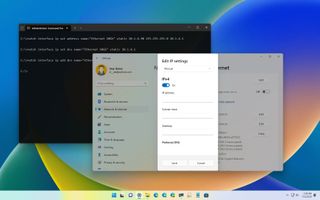
- Windows 11 static IP
- Windows 10 static IP
On Windows, the router's Dynamic Host Configuration Protocol (DHCP) server is (usually) responsible for assigning a dynamic Transmission Control Protocol/Internet Protocol (TCP/IP) configuration to every device in the network, including to your computer running Windows 11 or Windows 10.
Although a dynamic IP address is the recommended configuration for most situations, you may need to change to a static IP address if you're thinking about setting up a printer or file sharing, or you have to configure port forwarding on the router to your computer.
The reason is that a dynamic network configuration can change at any time after the lease from the DHCP expires and if the address changes, network resources you may have configured will stop working. Setting a static IP address will always stay the same on the computer, allowing a more reliable experience sharing resources in the network or forwarding ports.
Whatever the reason, on Windows 10 and 11, you have many ways to configure a static TCP/IP address, including using the Settings app and Command Prompt.
This guide will walk you through the different ways to configure a static network configuration on Windows 11 and 10.
How to set a static TCP/IP network configuration on Windows 11
On Windows 11, you can change your computer's dynamic IP configuration to static in at least two ways through the Settings app or commands.
Configure IP from Settings app
Get the Windows Central Newsletter
All the latest news, reviews, and guides for Windows and Xbox diehards.
To assign a permanent TCP/IP configuration on Windows 11, use these steps:
- Open Settings .
- Click on Network & internet .
- (Optional) Click on Advanced network settings .
- Under the "More settings" section, click on Hardware and connection properties.
- Note the current IPv4 , Subnet mask , Default Gateway , and DNS server addresses to determine the new configuration, as it has to be in the same network scope.
- Click the Ethernet or Wi-Fi page on the right side from the "Network & internet." page.
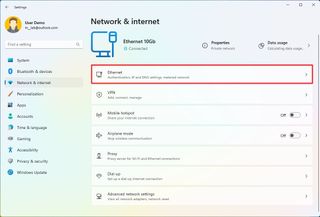
- Quick note: If you select the Wi-Fi page, you need to click on the connection properties to access the network settings.
- Click on the Edit button for the "IP assignment" setting.
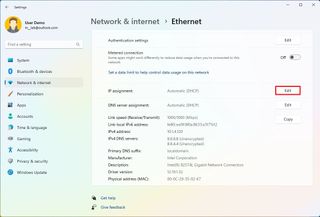
- Select the Manual option from the drop-down menu.
- Turn on the IPv4 toggle switch.
- Confirm the IP address for the computer – for example, 10.1.4.90.
- Confirm the subnet mask for the configuration – for example, 255.255.255.0.
- Confirm the default gateway address (usually your router's IP) – for example, 10.1.4.1.
- Confirm the preferred DNS address – for example, 10.1.4.1.
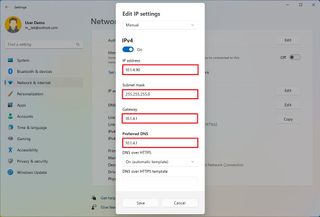
- Quick note: In a home network, you may also be able to use the router's IP address for the DNS configuration. You can also use third-party DNS services like Google Public DNS, Cloudflare, Cisco's OpenDNS, and others.
- (Optional) Select the "On (automatic template)" option for the "DNS over HTTPS" setting and leave the "Fallback to plaintext" option disabled unless you want to encrypted as well as unencrypted traffic or you're troubleshooting connectivity.
- Quick note: DNS over HTTPS (DoH) is a feature that encrypts the DNS queries over the HTTPS protocol to improve security and privacy on the internet. You only want to enable this feature if the DNS server supports this feature.
- Confirm the alternate DNS address (if applicable).
- (Optional) Select the "On (automatic template)" option for the "DNS over HTTPS" setting and leave the "Fallback to plaintext" option disabled.
- Click the Save button.
Once you complete the steps, the computer will start using the static network configuration. If everything has been configured correctly, you should be able to open the web browser to access the internet.
If you entered an address (such as the DNS address) and then changed it, you probably won't be able to save the settings. If this is the case, cancel the configuration, start over, enter the correct configuration, and then try to save the settings.
Configure IP from Command Prompt
To set a static TCP/IP configuration on Windows 11, use these steps:
- Open Start .
- Search for Command Prompt , right-click the top result, and select the Run as administrator option.
- Type the following command to see your current networking configuration and press Enter : ipconfig /all
- Confirm the name of the adapter and the networking configuration, including the IPv4 , Subnet mask , Default Gateway , and DNS Servers .
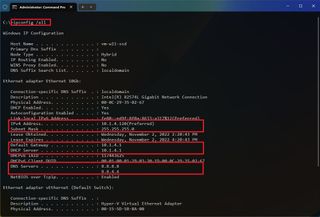
- Type the following command to configure a static TCP/IP address and press Enter : netsh interface ip set address name= "ADAPTER-NAME" static IP-ADDRESS SUBNET-ADDRESS DEFAULT-GATEWAY-ADDRESS
In the above command, replace ADAPTER-NAME with the name of your network adapter. Change IP-ADDRESS SUBNET-ADDRESS DEFAULT-GATEWAY-ADDRESS with the device IP address, subnet mask, and default gateway addresses you want. For example, this command sets the 10.1.4.90, 255.255.255.0, 10.1.4.1 configuration: netsh interface ip set address name="Ethernet 10Gb" static 10.1.4.90 255.255.255.0 10.1.4.1
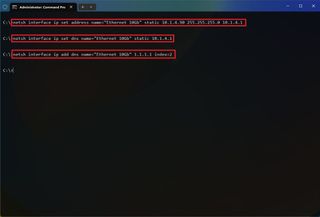
- Type the following command to set a DNS server address and press Enter : netsh interface ip set dns name="ADAPTER-NAME" static DNS-ADDRESS
In the command, change ADAPTER-NAME with your adapter's name and DNS-ADDRESS with the DNS server address of the network. For example, this command sets the local router as the DNS server: netsh interface ip set dns name="Ethernet 10Gb" static 10.1.4.1
- Type the following command to set an alternate DNS server address and press Enter : netsh interface ip add dns name="ADAPTER-NAME" DNS-ADDRESS index=2
In the command, change ADAPTER-NAME with the adapter's name and DNS-ADDRESS with an alternate DNS server address. For example, netsh interface ip add dns name="Ethernet 10Gb" 1.1.1.1 index=2
After you complete the steps, the commands will set a static network configuration on Windows 11.
How to set a static TCP/IP network configuration on Windows 10
On Windows 10, you can also use the Settings app and Command Prompt to set up a static IP network configuration.
To assign a permanent TCP/IP configuration on Windows 10, use these steps:
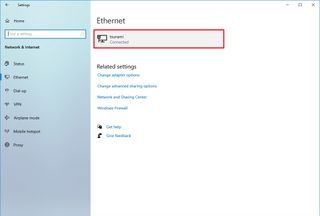
- Click on Ethernet or Wi-Fi .
- Click on the active connection on the right side.
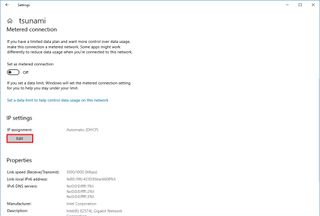
- Click the Edit button for the "IP assignment" setting.
- Select the Manual option.
- Confirm the subnet prefix length (subnet mask) for the configuration – for example, 24 to specify the 255.255.255.0 subnet mask.
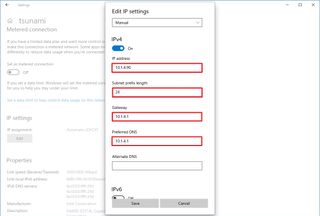
- Quick tip: It's important to use the number that represents the network instead of the subnet mask. Otherwise, the configuration won't save. If you don't know the subnet prefix length for your subnet mask, you can use any online subnet calculator to find out.
Once you complete the steps, Windows 10 will start using the static IP configuration. If you lose network connectivity, restart the computer to regain access to the local network and internet.
To change from dynamic to static IP address with commands on Windows 10, use these steps:
In the command, change ADAPTER-NAME with your adapter's name and DNS-ADDRESS with the DNS server address of the network. For example, this command sets the local router as the DNS server: netsh interface ip set dns name=" Ethernet 10Gb" static 10.1.4.1
In the command, change ADAPTER-NAME with the adapter's name and DNS-ADDRESS with an alternate DNS server address. For example, netsh interface ip add dns name="Ethernet0" 1.1.1.1 index=2
After you complete the steps, the network configuration will switch from dynamic to static on Windows 10.
Mauro Huculak has been a Windows How-To Expert contributor for WindowsCentral.com for nearly a decade and has over 15 years of experience writing comprehensive guides. He also has an IT background and has achieved different professional certifications from Microsoft, Cisco, VMware, and CompTIA. He has been recognized as a Microsoft MVP for many years.
- 2 I never knew how much I'd love a soundbar on my desk, but I'd trade some of its volume for something else
- 3 This third-party app bypasses Microsoft's stringent Windows 11 24H2 system requirements and installs the massive update on unsupported hardware
- 4 Xbox Insiders in the Alpha Skip-Ahead ring are getting a much requested Discord feature with the latest update
- 5 "We've been wanting to address the Bolter family for a while," Warhammer 40,000: Space Marine 2 is getting Public Test Servers in 2025 — and there's big gameplay changes coming soon.
Windows OS Hub / Windows 10 / Adding Multiple IP Addresses (Aliases) to a Single Network Adapter
Adding Multiple IP Addresses (Aliases) to a Single Network Adapter
Windows allows to assign multiple IP addresses (aliases) to a single physical network adapter. This can be useful when you want to run multiple websites with unique IP addresses on the same IIS server , if you want to bind an application to a specific IP, or if you are preparing to change IP addresses on your network. In Windows, you can add a secondary (virtual) static IP address to an existing network adapter using the GUI or the command prompt.
Assigning an Additional IP Address to a Network Adapter on Windows
The skipassource flag and the primary nic ip address, how to add a second ip address from cmd/powershell.
The Control Panel GUI can be used to add an additional IP address to the network adapter.
- Navigate to the Control Panel –> Network and Internet –> Network and Sharing Center -> Change adapter settings (or just run the ncpa.cpl command);
- Open the network interface properties;
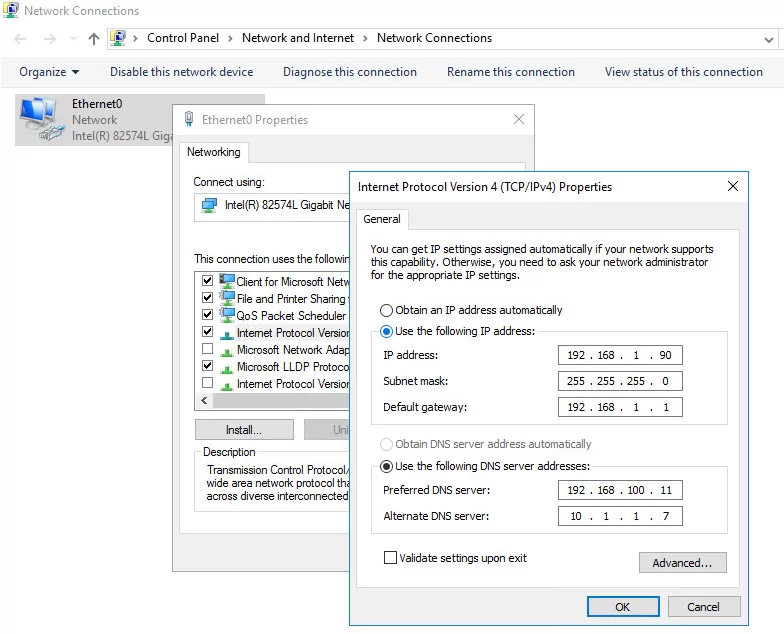
- Click the Advanced button and then click Add in the IP Addresses section;
- Specify an additional IP address, subnet mask, and click Add ;
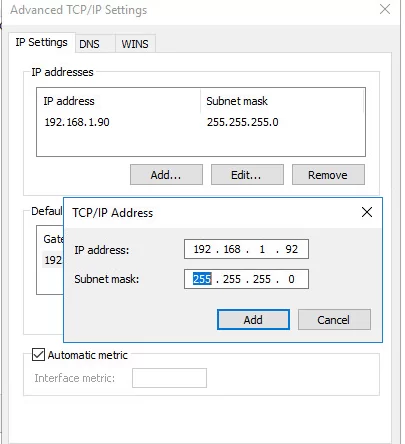
Run the ipconfig command and check that there are now two IP addresses assigned to the network interface.

To check the availability of the second IP address over the network from other computers, use the ping command.
If you assign an additional IP from the Control Panel GUI, this IP address will be used for outgoing connections. There is no such thing as a primary IP address in Windows. To prevent Windows from using a specific IP address for outbound connections, you need to enable the SkipAsSource option for it.
Use PowerShell to list the IPv4 addresses assigned to network adapters on Windows:
Get-NetIPAddress | where AddressFamily -eq IPv4| Select-Object IPAddress, InterfaceAlias, SkipAsSource

In this example, SkipAsSource is set to False for all computer IP addresses. If you want to make a particular IP address the primary source, disable the SkipAsSource option for all the other IP addresses.
Get-NetIPAddress 192.168.1.90 | Set-NetIPAddress -SkipAsSource $True

Now the specified IP will not be used by Windows as a source for outgoing connections, except the cases where it is explicitly used by a specific app. Also, if the SkipAsSource flag is enabled, the second IP address will not be registered in DNS (if dynamic registration is enabled).
You can enable the SkipAsSource flag when adding an additional IP address from the prompt. For example, using netsh :
Netsh int ipv4 add address name="Local Area Connection" 192.168.1.92 255.255.255.0 SkipAsSource=True
List all assigned IP addresses and their SkipAsSource values:
netsh int ipv4 show ipaddresses level=verbose
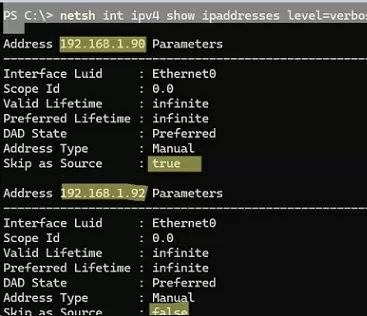
Also, you can also use PowerShell to configure a second IP for an Ethernet0 network adapter:
New-NetIPAddress –IPAddress 192.168.1.92 –PrefixLength 24 –InterfaceAlias Ethernet0 –SkipAsSource $True
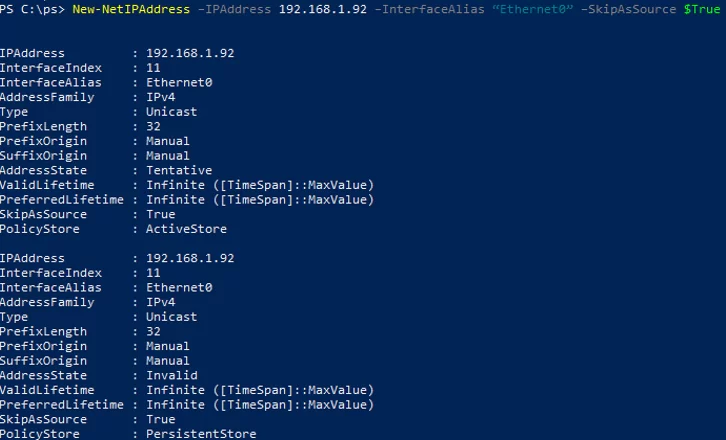
Get-NetIPAddress 192.168.1.92 | Set-NetIPAddress -SkipAsSource $False

Remove the additional IP address:
Get-NetIPAddress 192.168.1.92| Remove-NetIPAddress
FTP Server Quick Setup on Windows 10/11 and Windows Server
Using wmi filters to target group policies in active directory, related reading, remove a specific device from the safely remove..., check the software installation/removal history in windows, validating ad user credentials with powershell, run powershell scripts on a schedule with task..., how to add or reinstall the microsoft pdf....
Hey, It’s really good contents. I have a question about this. Do the multiple IPs in single NIC have a priority? If the server want to connect to another server using the NIC, which IP would be used? I manage some server like this condition, they operate differently, so I confused. Do you know anything about this?
You can set the SkipAsSource=False flag for all non-primary IP addresses.
what should we give in DNS server ip & alternate DNS ip?
You will always use the DNS address of the primary IP address when resolving.
Interesting stuff. I’d like to utilise it for the following scenario: NEW AD-DC, new name okay but: masses of devices w/hard code DNS IP. Use the 2nd IP for the DNS service.
Were you able to set it in a DC? Did you have replication issues? I need to do the same as I have network devices pointing to an IP as DNS
Hello — I hope you are still active here and can assist me.,
I wish to use a dedicated Server 2019 to only host (10 to 15) websites. I have changed the registrar to point the domain to my custom DNS assignment. We have a single static IP. Goal = set up one server to host multiple web sites over using one IP address. Only have one NIC card installed. Traffic for all websites will be small (< 10,000 per month). Using a SonicWall TZ500 firewall.
Do we need to create additional private IPs — one for each web site? Running ipconfig shows only one private IP — 192.168.1.145. Could we create additional IPs … 146, 147, 148, etc?? What is limit on the # of IPs that can be created?
Any suggestions you can offer will be appreciated.
Leave a Comment Cancel Reply
Notify me of followup comments via e-mail. You can also subscribe without commenting.
Current ye@r *
Leave this field empty
How-To Geek
How do ip addresses work.

Your changes have been saved
Email is sent
Email has already been sent
Please verify your email address.
You’ve reached your account maximum for followed topics.
Quick Links
What is an ip address, what's the difference between ipv4 and ipv6, how does a device get its ip address.
Every device connected to a network---computer, tablet, camera, whatever---needs a unique identifier so that other devices know how to reach it. In the world of TCP/IP networking, that identifier is the Internet Protocol (IP) address.
If you've worked with computers for any amount of time, you've likely been exposed to IP addresses---those numerical sequences that look something like 192.168.0.15. Most of the time, we don't have to deal with them directly, since our devices and networks take care of that stuff behind the scenes. When we do have to deal with them, we often just follow instructions about what numbers to put where. But, if you've ever wanted to dive a little deeper into what those numbers mean, this article is for you.
Related: 8 Common Network Utilities Explained
Why should you care? Well, understanding how IP addresses work is vital if you ever want to troubleshoot why your network isn't working right , or why a particular device isn't connecting the way you'd expect it to. And, if you ever need to set up something a little more advanced---like hosting a game server or media server to which friends from the internet can connect---you'll need to know something about IP addressing. Plus, it's kind of fascinating.
Note: We're going to be covering the basics of IP addressing in this article, the kind of stuff that people who use IP addresses, but never really thought much about them, might want to know. We're not going to be covering some of the more advanced, or professional, level stuff, like IP classes, classless routing, and custom subnetting...but we will point to some sources for further reading as we go along.
An IP address uniquely identifies a device on a network. You've seen these addresses before; they look something like 192.168.1.34.
An IP address is always a set of four numbers like that. Each number can range from 0 to 255. So, the full IP addressing range goes from 0.0.0.0 to 255.255.255.255.
The reason each number can only reach up to 255 is that each of the numbers is really an eight digit binary number (sometimes called an octet). In an octet, the number zero would be 00000000, while the number 255 would be 11111111, the maximum number the octet can reach. That IP address we mentioned before (192.168.1.34) in binary would look like this: 11000000.10101000.00000001.00100010.
Computers work with the binary format, but we humans find it much easier to work with the decimal format. Still, knowing that the addresses are actually binary numbers will help us understand why some things surrounding IP addresses work the way they do.
Don't worry, though! We're not going to be throwing a lot of binary or math at you in this article, so just bear with us a bit longer.
The Two Parts of An IP Address
A device's IP address actually consists of two separate parts:
- Network ID: The network ID is a part of the IP address starting from the left that identifies the specific network on which the device is located. On a typical home network, where a device has the IP address 192.168.1.34, the 192.168.1 part of the address will be the network ID. It's custom to fill in the missing final part with a zero, so we might say that the network ID of the device is 192.168.1.0.
- Host ID: The host ID is the part of the IP address not taken up by the network ID. It identifies a specific device (in the TCP/IP world, we call devices "hosts") on that network. Continuing our example of the IP address 192.168.1.34, the host ID would be 34---the host's unique ID on the 192.168.1.0 network.
On your home network, then, you might see several devices with IP address like 192.168.1.1, 192.168.1.2, 192.168.1 30, and 192.168.1.34. All of these are unique devices (with host IDs 1, 2, 30, and 34 in this case) on the same network (with the network ID 192.168.1.0).
To picture all this a little better, let's turn to an analogy. It's pretty similar to how street addresses work within a city. Take an address like 2013 Paradise Street. The street name is like the network ID, and the house number is like the host ID. Within a city, no two streets will be named the same, just like no two network IDs on the same network will be named the same. On a particular street, every house number is unique, just like all host iDs within a particular network ID are unique.
The Subnet Mask
So, how does your device determine which part of the IP address is the network ID and which part the host ID? For that, they use a second number that you'll always see in association with an IP address. That number is called the subnet mask.
On most simple networks (like the ones in homes or small businesses), you'll see subnet masks like 255.255.255.0, where all four numbers are either 255 or 0. The position of the changes from 255 to 0 indicate the division between the network and host ID. The 255s "mask out" the network ID from the equation.
Note: The basic subnet masks we're describing here are known as default subnet masks. Things get more complicated than this on bigger networks. People often use custom subnet masks (where the position of the break between zeros and ones shifts within an octet) to create multiple subnets on the same network. That's a little beyond the scope of this article, but if you're interested, Cisco has a pretty good guide on subnetting .
The Default Gateway Address
Related: Understanding Routers, Switches, and Network Hardware
In addition to the IP address itself and the associated subnet mask, you'll also see a default gateway address listed along with IP addressing information. Depending on the platform you're using, this address might be called something different. It's sometimes called the "router," "router address," default route," or just "gateway." These are all the same thing. It's the default IP address to which a device sends network data when that data is intended to go to a different network (one with a different network ID) than the one the device is on.
The simplest example of this is found in a typical home network.
If you have a home network with multiple devices, you likely have a router that's connected to the internet through a modem. That router might be a separate device, or it might be part of a modem/router combo unit supplied by your internet provider. The router sits between the computers and devices on your network and the more public-facing devices on the internet, passing (or routing) traffic back and forth.
Say you fire up your browser and head to www.howtogeek.com. Your computer sends a request to our site's IP address. Since our servers are on the internet rather than on your home network, that traffic is sent from your PC to your router (the gateway), and your router forwards the request on to our server. The server sends the right information back to your router, which then routes the information back to the device that requested it, and you see our site pop up in your browser.
Typically, routers are configured by default to have their private IP address (their address on the local network) as the first host ID. So, for example, on a home network that uses 192.168.1.0 for a network ID, the router is usually going to be 192.168.1.1. Of course, like most things, you can configure that to be something different if you want.
Related: How to Find Your Router's IP Address on Any Computer, Smartphone, or Tablet
DNS Servers
There's one final piece of information you'll see assigned alongside a device's IP address, subnet mask, and default gateway address: the addresses of one or two default Domain Name System (DNS) servers. We humans work much better with names than numerical addresses. Typing www.howtogeek.com into your browser's address bar is much easier than remembering and typing our site's IP address.
DNS works kind of like a phone book, looking up human-readable things like website names, and converting those to IP addresses. DNS does this by storing all that information on a system of linked DNS servers across the internet. Your devices need to know the addresses of DNS servers to which to send their queries.
Related: What Is DNS, and Should I Use Another DNS Server?
On a typical small or home network, the DNS server IP addresses are often the same as the default gateway address. Devices send their DNS queries to your router, which then forwards the requests on to whatever DNS servers the router is configured to use. By default, these are usually whatever DNS servers your ISP provides, but you can change those to use different DNS servers if you want. Sometimes, you might have better success using DNS servers provided by third parties , like Google or OpenDNS.
You also may have noticed while browsing through settings a different type of IP address, called an IPv6 address. The types of IP addresses we've talked about so far are addresses used by IP version 4 (IPv4)---a protocol developed in the late 70s. They use the 32 binary bits we talked about (in four octets) to provide a total of 4.29 billion possible unique addresses. While that sounds like a lot, all the publicly available addresses were long ago assigned to businesses. Many of them are unused, but they are assigned and unavailable for general use.
In the mid-90s, worried about the potential shortage of IP addresses, the internet Engineering Task Force (IETF) designed IPv6. IPv6 uses a 128-bit address instead of the 32-bit address of IPv4, so the total number of unique addresses is measured in the undecillions---a number big enough that it's unlikely to ever run out.
Unlike the dotted decimal notation used in IPv4, IPv6 addresses are expressed as eight number groups, divided by colons. Each group has four hexadecimal digits that represents 16 binary digits (so, it's referred to as a hextet). A typical IPv6 address might look something like this:
2601:7c1:100:ef69:b5ed:ed57:dbc0:2c1e
The thing is, the shortage of IPv4 addresses that caused all the concern ended up being mitigated to a large extent by the increased use of private IP addresses behind routers. More and more people created their own private networks, using those private IP addresses that aren't exposed publicly.
So, even though IPv6 is still a major player and that transition will still happen, it never happened as fully as predicted---at least not yet. If you're interested in learning more, check out this history and timeline of IPv6 .
Now that you know the basics of how IP addresses work, let's talk about how devices get their IP addresses in the first place. There are really two types of IP assignments: dynamic and static.
Related: How to Find Any Device's IP Address, MAC Address, and Other Network Connection Details
A dynamic IP address is assigned automatically when a device connects to a network. The vast majority of networks today (including your home network) use something called Dynamic Host Configuration Protocol (DHCP) to make this happen. DHCP is built into your router. When a device connects to the network, it sends out a broadcast message requesting an IP address. DHCP intercepts this message, and then assigns an IP address to that device from a pool of available IP addresses.
There are certain private IP address ranges routers will use for this purpose. Which is used depends on who made your router, or how you have set things up yourself. Those private IP ranges include:
- 10.0.0.0 - 10.255.255.255: If you're a Comcast/Xfinity customer, the router provided by your ISP assigns addresses in this range. Some other ISPs also use these addresses on their routers, as does Apple on their AirPort routers.
- 192.168.0.0 - 192.168.255.255: Most commercial routers are set up to assign IP addresses in this range. For example, most Linksys routers use the 192.168.1.0 network, while D-Link and Netgear both use the 198.168.0.0 range
- 172.16.0.0 - 172.16.255.255: This range is rarely used by any commercial vendors by default.
- 169.254.0.0 - 169.254.255.255: This is a special range used by a protocol named Automatic Private IP Addressing. If your computer (or other device) is set up to retrieve its IP address automatically, but cannot find a DHCP server, it assigns itself an address in this range. If you see one of these addresses, it tells you that your device could not reach the DHCP server when it came time to get an IP address, and you may have a networking issue or trouble with your router.
The thing about dynamic addresses is that they can sometimes change. DHCP servers lease IP addresses to devices, and when those leases are up, the devices must renew the lease. Sometimes, devices will get a different IP address from the pool of addresses the server can assign.
Most of the time, this is not a big deal, and everything will "just work". Occasionally, however, you might want to give a device an IP address that does not change. For example, maybe you have a device that you need to access manually, and you find it easier to remember an IP address than a name. Or maybe you have certain apps that can only connect to network devices using their IP address.
In those cases, you can assign a static IP address to those devices. There are a couple of ways to do this. You can manually configure the device with a static IP address yourself, although this can sometimes be janky. The other, more elegant solution is to configure your router to assign static IP addresses to certain devices during what would normally be dynamic assignment by the DHCP server. That way, the IP address never changes, but you don't interrupt the DHCP process that keeps everything working smoothly.
How to Assign Static IP Address to Your Devices
By default, your router assigns dynamic IP Address to every device that connects to it. This is called DHCP (short for Dynamic Host Control Protocol). But sometimes, we need our devices to have the same IP address (i.e. Static IP) every time it connects to the network. Reason being,
- Access your computer from the Internet.
- Share data between two devices on the same network.
- Quickly access your Network Printer or NAS.
- Use your computer as a media server.
- Or your work WiFi requires you to use Static IP address.
What IP address should you choose?
If two devices on the network have the same IP address, then there will be conflicts. The Internet won’t work on one of them or both, depending on your router. So, it’s important to assign a unique IP address to your computer. There are a couple of ways to pick an unused IP address.
For instance– first find your device’s IP address , say it’s 192.168.1.7 ; then keep the first three values (i.e. 192.168.1) as it’s and replace the last digit with some far number like 192.168.1.222 . Though make sure the last digit should be between a 0-255 range.
Assigning Static IP address to most devices is easy, just go to its network settings, look for DHCP option and turn it OFF. Once you do that, you’ll see a text area to enter Static IP address. Enter the new IP address there, save changes and that’s it.
So let’s see how to Assign Static IP address to various Operating Systems
1. Assign IP Address on Windows 10/8/7
You can do this quickly through the command line. You will need to first find your subnet mask, default gateway, and network adapter name. In my case, I’m on a Wi-Fi network, so the adapter name is Wi-Fi. To find yours just type the following command.
Once you get the output, find for the Network Adapter which has IP listed under it. The adapter name is a one-word name suffixed to the end of the Network Title. You will also need the Subnet mask and the Default Gateway Address.
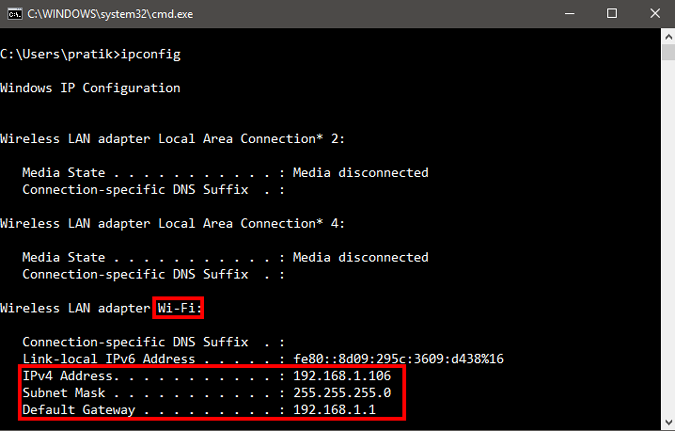
Once you have the adapter name, Subnet Mask and Default Gateway, run the following command.
Wherein, Wi-Fi should be replaced by your adapter name and the IP, subnet mask and gateway address according to your configuration.
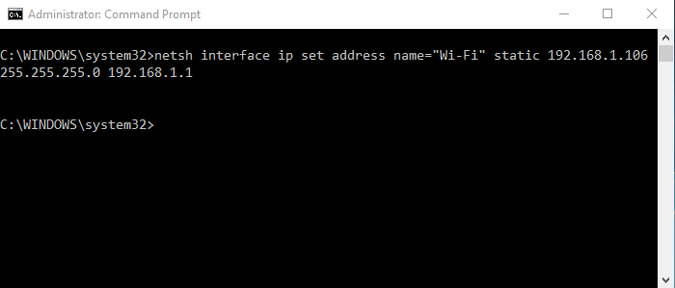
This will change your IP address from DHCP to manual with the static IP address you have specified.
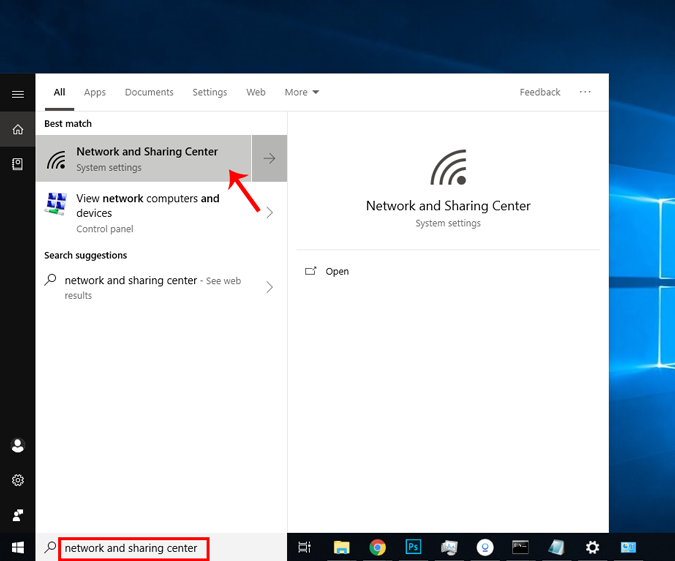
In case you find it too confusing, you are not alone. You can do the same via GUI which is much more intuitive. You’ll need the Subnet Mask and Default Gateway Address . You can refer to the above step on how to find these details. Once you have noted down the address, click on Start Menu and type in Network and Sharing Center. Click once you see the Network and Sharing Center Icon.
Alternatively, if you are in Windows 10 then you can right-click on the Start menu and click on “ Network Connections “.
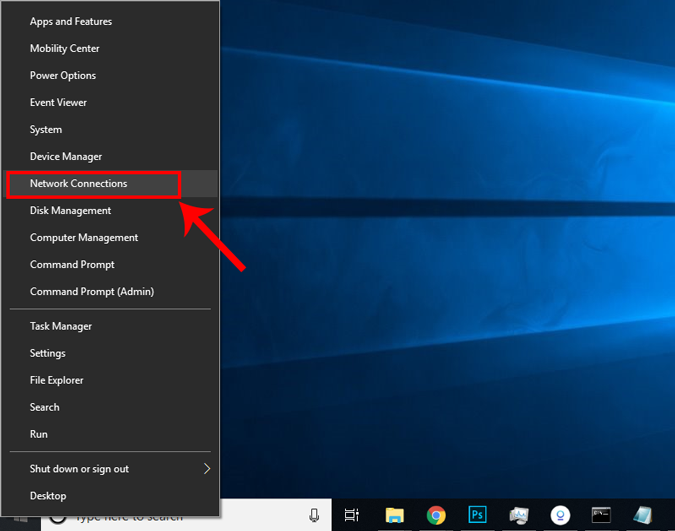
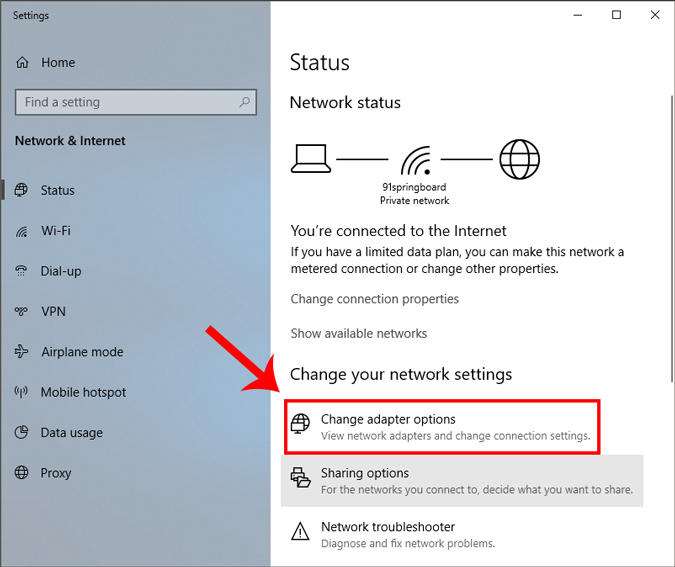
A new window will open, click on Change Adapter Options.
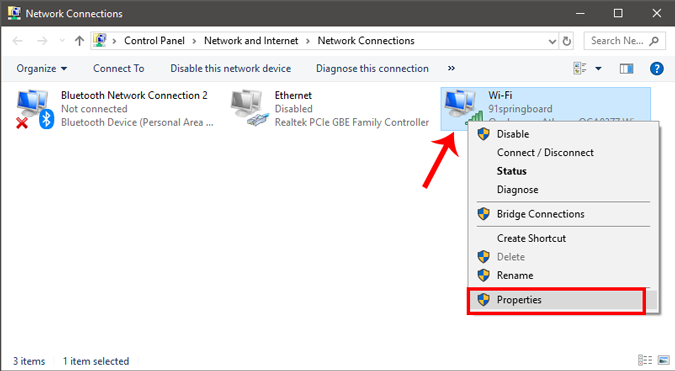
Right Click on your Current Network Adapter ( like WiFi) and choose Properties.
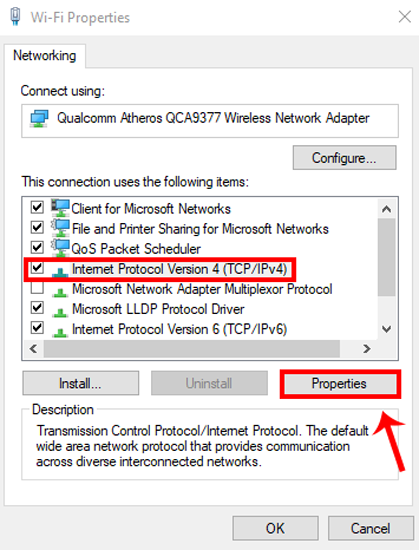
When the new window pops up, select Internet Protocol Version 4(TCP/IPv4) and click on Properties.
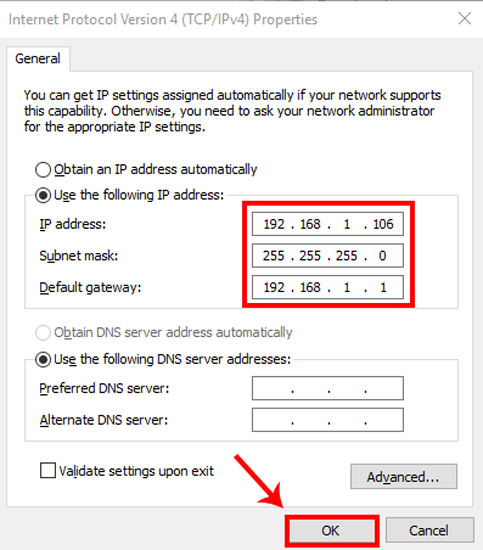
Once you get the pop-up window, select “ Enter the IP address you want ” and fil the IP Address, For Subnet Mask , and Default Gateway Address enter the values that you have noted down previously. Next, click on OK to save changes.
To switch to dynamic IP, click on Obtain the IP address automatically. Once this is enabled, your system will start picking an IP address dynamically from the router.
2. How to setup static IP on Ubuntu
On Ubuntu, you can set a static IP Address via the terminal or GUI. Firstly, let’s start with the command line. Right-click anywhere on the desktop to open the terminal.
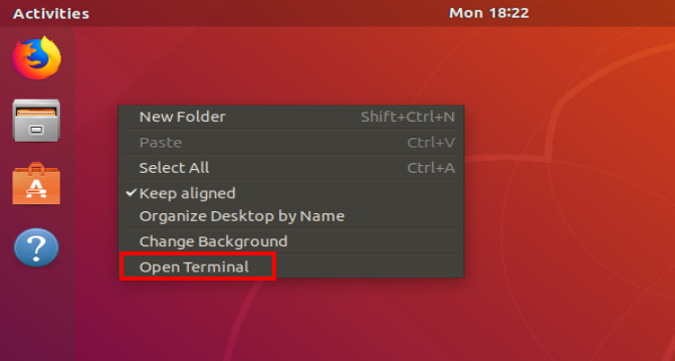
Once the terminal window opens, we need to run a command. We need the subnet mask and network adapter name in order to set a static IP and to get that, run the following command on the terminal.
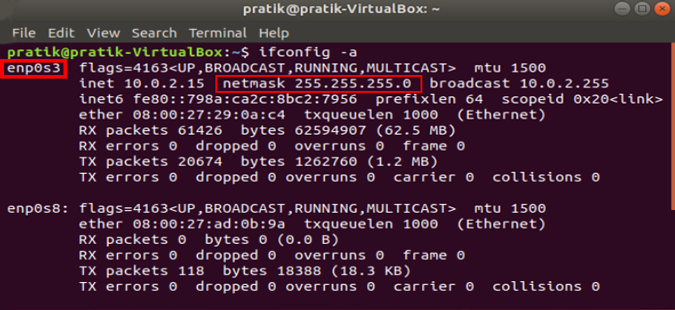
Once you have the subnet mask noted down, in my case, it’s 255.255.255.0, we can proceed further.
It is pretty simple and straight forward. We need to open the Network Adapter settings. To do that, click on the Network Icon at the top right corner of the desktop.
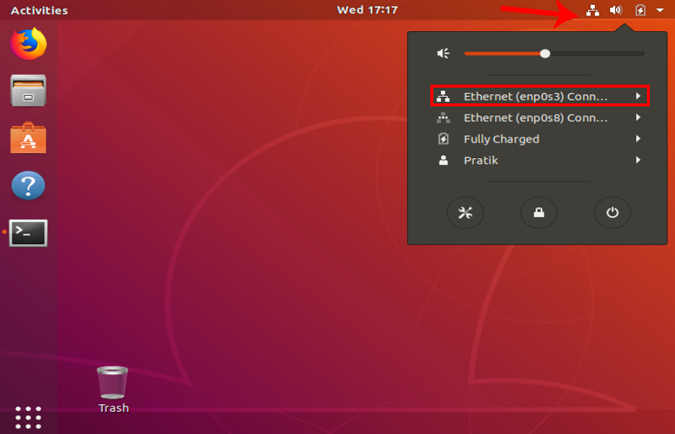
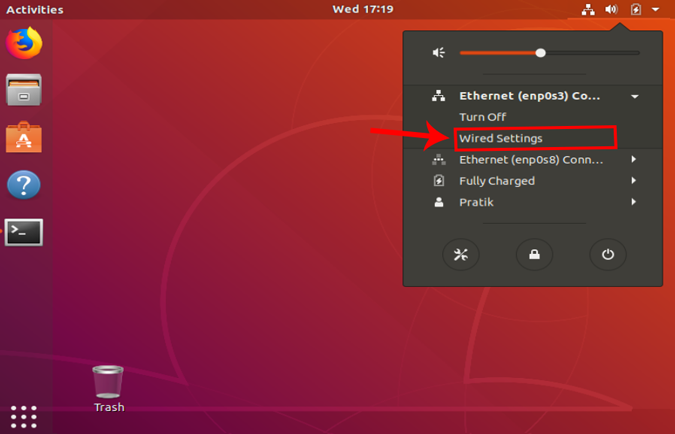
Now, navigate on the active network and click on the expand button for more options. Click on Wired Settings to open the Network menu.
Once you get the Wired Settings dialogue, make sure you are on the Network page. Click on the Settings icon beside the active network to open the adapter properties.
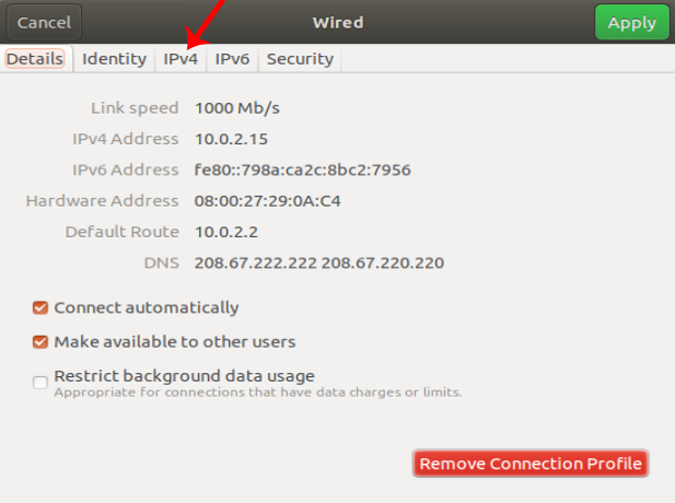
When you get the pop-up, navigate to the IPv4 tab to change the IP settings.
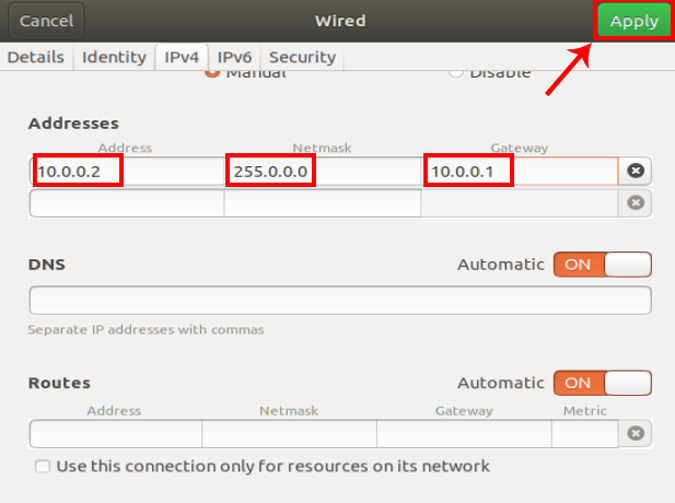
On the IPv4 tab, select the radio button which says “ Manual “. Some text fields will appear, you need to enter the IP address, Netmask and Gateway accordingly. Once it is validated, you can click on the Apply button to register the changes.
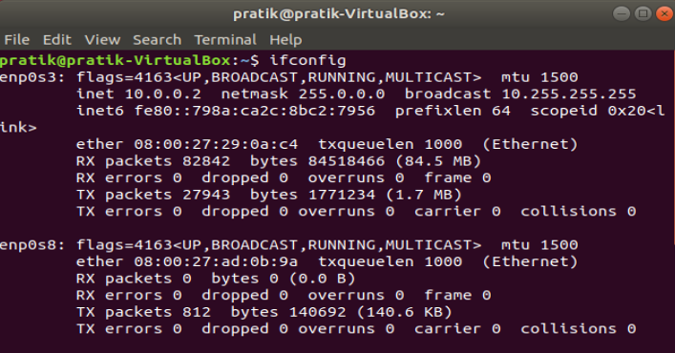
Again you need to restart the network for the changes to take effect. You can do it manually via command line or just switch off and switch on the Network adapter. Once done, run ifconfig on the terminal to check the IP address. It should be the same IP address which you have specified earlier.
3. How to setup static IP on Mac
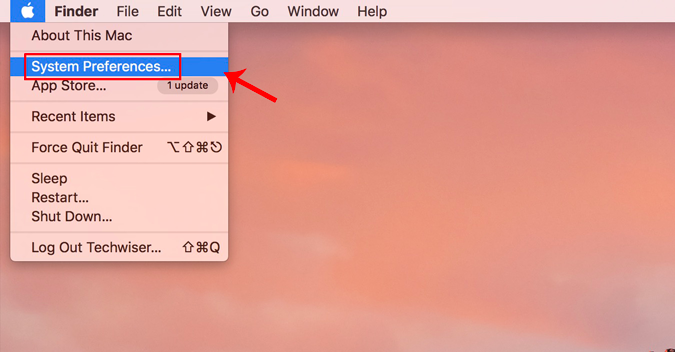
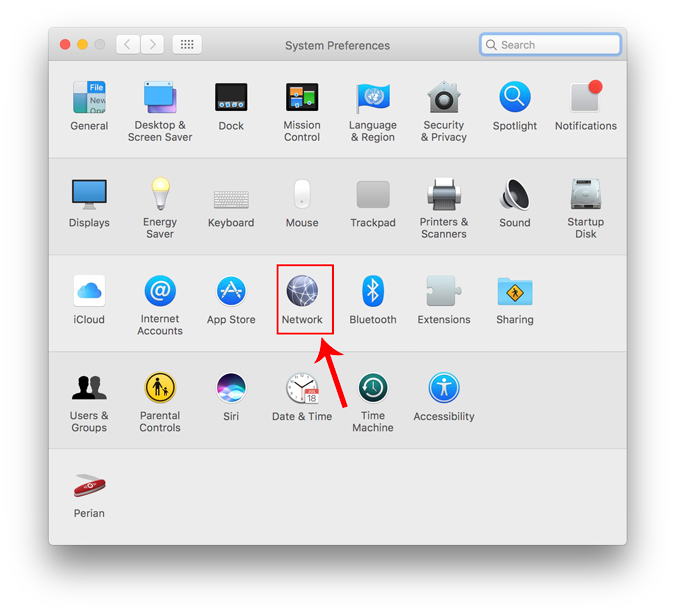
If you are on macOS, setting static IP is quite similar to that of Ubuntu. But, here you don’t need the subnet mask or Default Gateway Address. Right click on the apple icon at the top left corner of the desktop. Click on System Preferences from the dropdown list.
Once the System Preferences dialogue box displays, navigate to Network and click on it to open the Network Settings
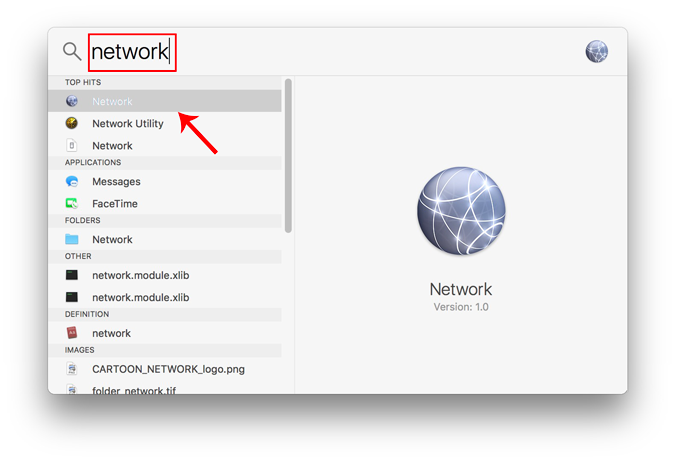
Alternatively, you can also hit Cmd+Space to trigger the Spotlight search. Type “ Network ” in the search bar and click on the icon once it appears. This will directly navigate you to the Network Settings.
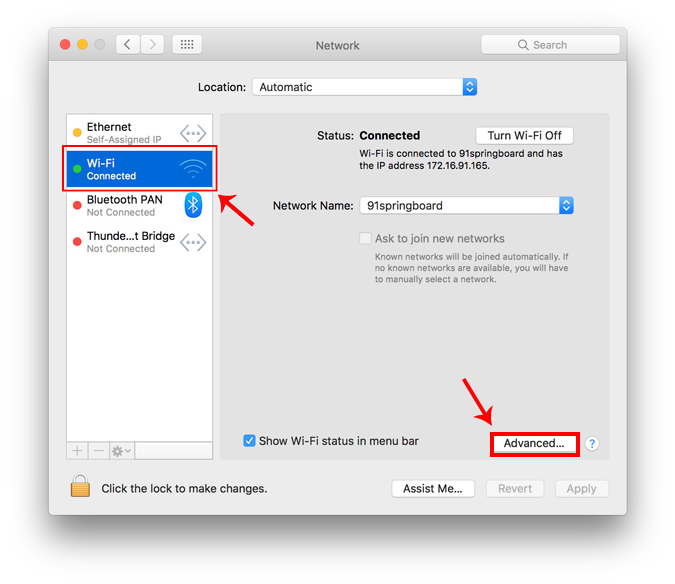
From the pop-up window, select an active network interface. For example, I am connected to a WiFi network so my active network is Wi-Fi. Make sure you are on the active network tab and then click on Advanced .
A new window will open the configuration settings for that adapter. Move over to the IP settings by clicking on the TCP/IP tab .
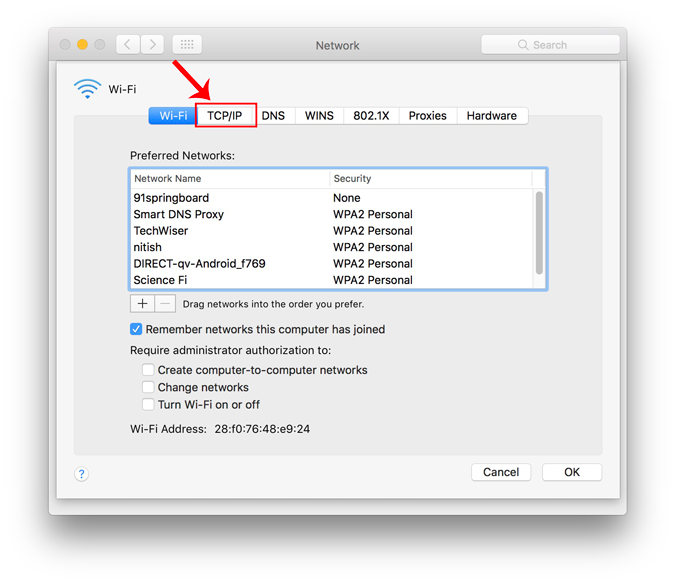
From the Configure IPv4 menu, choose Using DHCP with manual address. Enter a static IP address in the IPv4 Address and leave the Subnet Mask and Router field as default. Click Ok to save the changes.
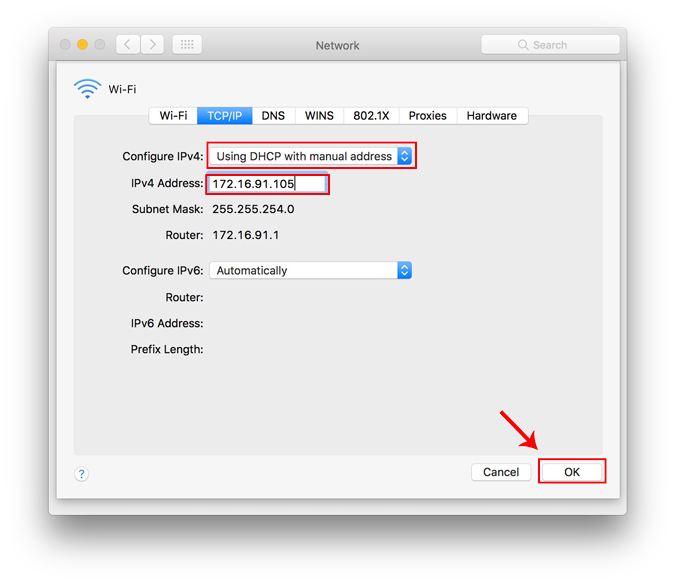
Now when you do an ifconfig, the system should be using the static IP you have defined in the previous times. If the IP’s have not changed, try restarting the Wi-Fi and it should fix it.
To switch back to dynamic IP, move back to “ Using DHCP ” from the Configure IPv4 menu.

4. How to setup static IP on Android
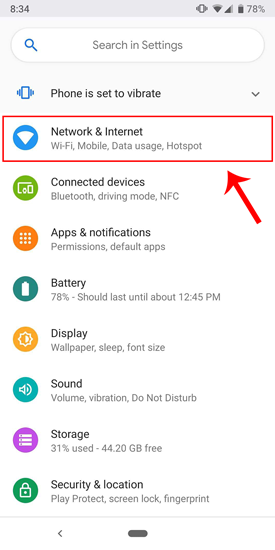
The network which you are connected to should be on top of the list. Tap on the settings icon beside the Wi-Fi network name.
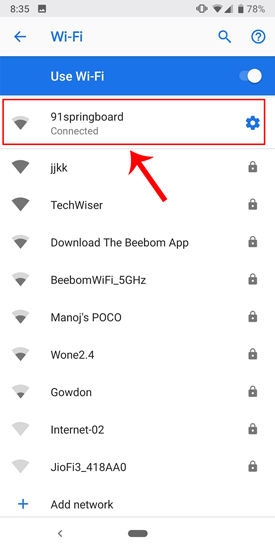
Once the pop-up opens, you will see IP settings at the bottom of the menu. The default option is “DHCP”. Tap on it to change the IP configuration.
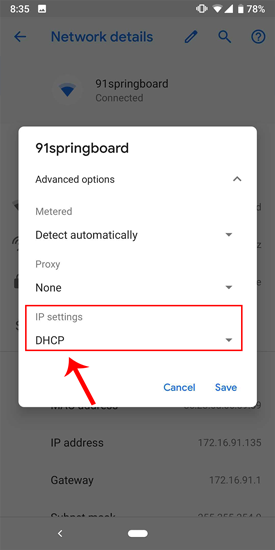
Select “ Static ” from the presented drop-down menu. Enter the desired IP address and leave the other options as default. Make sure that other devices are not using the same IP. You can see the IP address of the other devices in your network by using a small utility called Fing . For a detailed process, check our article on how to find the IP Address of any Device on your network . Once you have entered the IP, click on Save to register the change. Now, your Android phone should start using the desired IP Address.
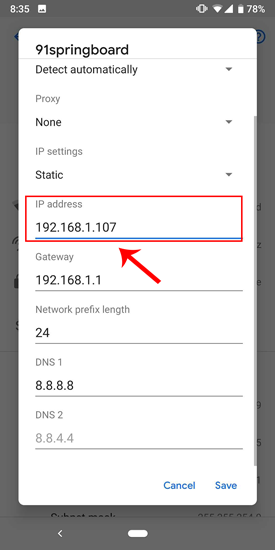
In almost all the Android version, you get the option to set static IP Address. For some rare older Android versions, you can use a third-party app like WiFi Static . It’s free and it doesn’t require ROOT.
To switch back to dynamic IP, repeat the same procedure and select “DHCP” from the IP settings instead.
5. How to setup static IP on iPhone and iPad
If you are using an iPhone or iPad, then you can set static IP Address natively. You would need the Subnet Mask of your network. This can be obtained from the Wi-Fi settings and we would see to it in the further steps. To get started, click on the Settings icon in the dock to get to the Settings menu.
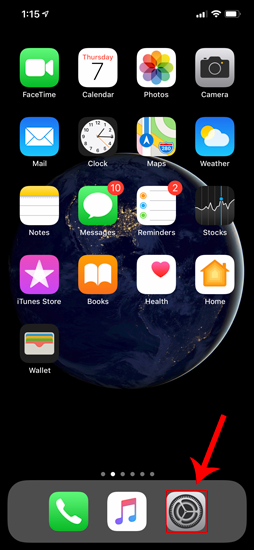
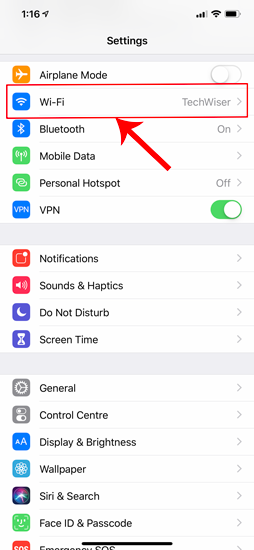
Now on the Settings menu page, tap on Wi-Fi to get to the Wi-Fi settings.
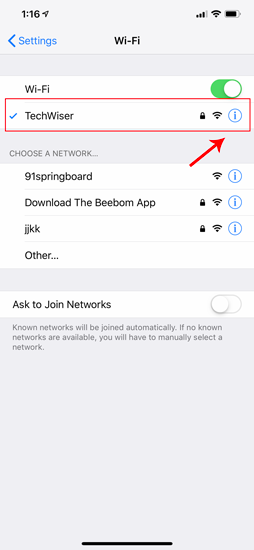
On the Wi-Fi page, you should see your connected Wi-Fi network at the top. Click on the “i” button beside it. This will open the Wi-Fi configuration window.
Once the Wi-Fi settings page appears, you will see an option called “ Configure IP “. By Default, this would be set to automatic. Just below this option, you will see “ Subnet Mask “, note it down as we will need it in the further steps. In order to set static IP, we need to change Configure IP it to Manual. Tap on it and it will open the IPv4 settings page.
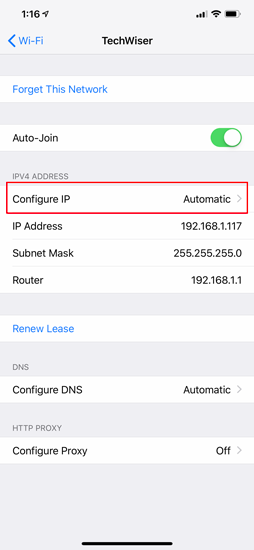
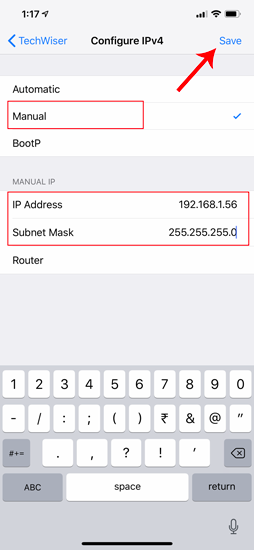
There should be 3 options available on the “Configure IPv4” page. Select “ Manual ” from it. As soon as Manual IP is enabled, you will get extra text fields at the bottom to enter the IP Address, Subnet Mask, Router. We need to fill in the IP Address of our choice and Subnet Mask which we noted down in the previous step. Now, after you fill both the fields, the save button at the top right corner will be enabled. Click on it to save the static IP configuration.
Now, when you return to the Wi-Fi settings page, you will see your device is using the Static IP address. This should be the same IP address we have set in the IP configuration menu.
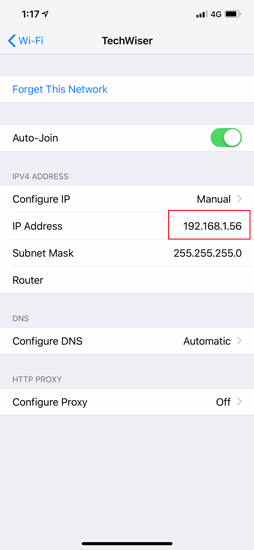
This static IP address will be applicable only to that particular Wi-Fi network. In case, you connect to some other Wi-Fi network the IP will change accordingly.
6. How to setup static IP to any Device from Router
Other network devices like your Wireless Printer, PS4, NAS, IP Camera, Raspberry Pi , etc. do not have an Interface. Hence, in order to configure the network, either you have to connect remotely or use the router. If you have access to the router, setting Static IP for network devices is the easiest and convenient way. I would recommend this method over any other.
So, to assign a Static IP Address to any network device, you need to login to the web portal of the router. The web portal address, username, and password are mostly printed behind the router. In case you don’t have physical access to the router, the web portal URL is mostly the PC’s gateway address. To find that, open command prompt and type the following command.
Once you have the web portal loaded, log in with the credentials. Now every router has a different web UI, but the overall structure is the same. Basically, you will have to link the IP Address to the Mac Address and Hostname of the device. So, we need to find the MAC address & Hostname of the network device. To do that, look for DHCP client list which should look something like the following screenshot.
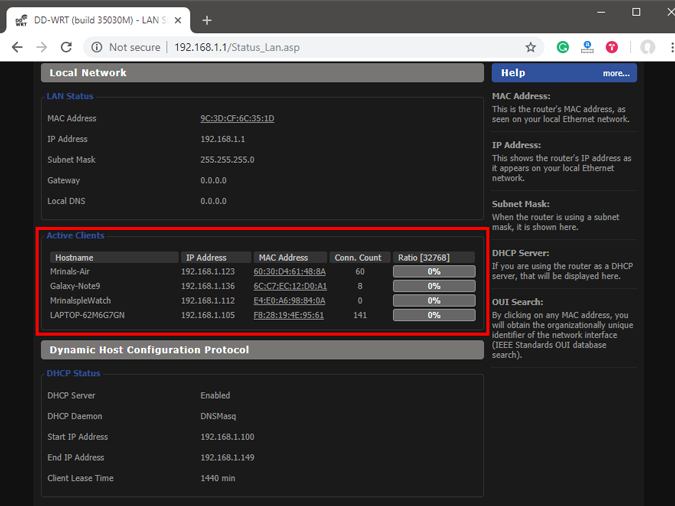
You can get your MAC Address & Hostname under DHCP Client list. Once, you have the MAC address & Hostname noted down, we can proceed further. On most of the routers, you will have the option to set a Static IP under the section IP Mac binding or DHCP Static IP option. In case you are on a custom ROM like dd-wrt, head over to Services tab and you will have DHCP Server . Under DHCP Server, add an entry for Static Leases by clicking on the Add button.
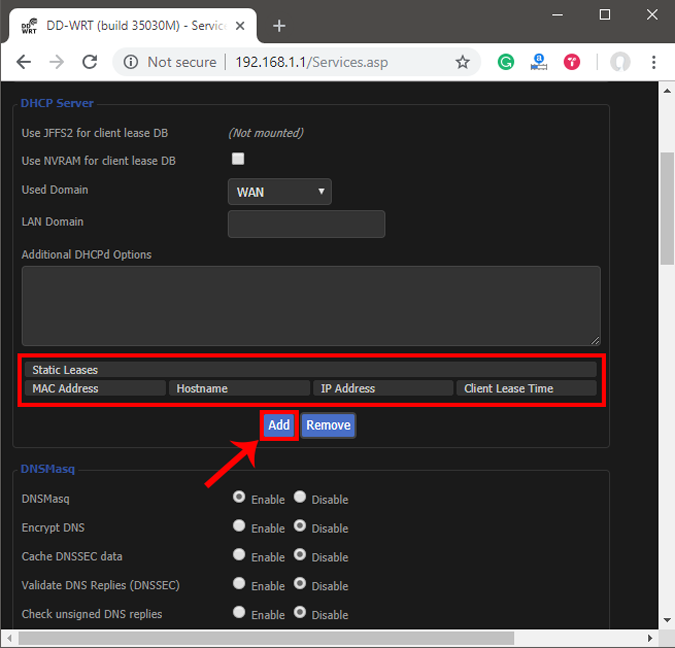
Clicking on the Add button will create a new row. You have to enter the MAC Address, Hostname, desired Static IP and Lease time . Lease time is a unit in minutes after which your IP will be renewed. Since we are adding only 1 entry for the particular host the IP will be the same even after the renewal. Once, done click on Save changes .
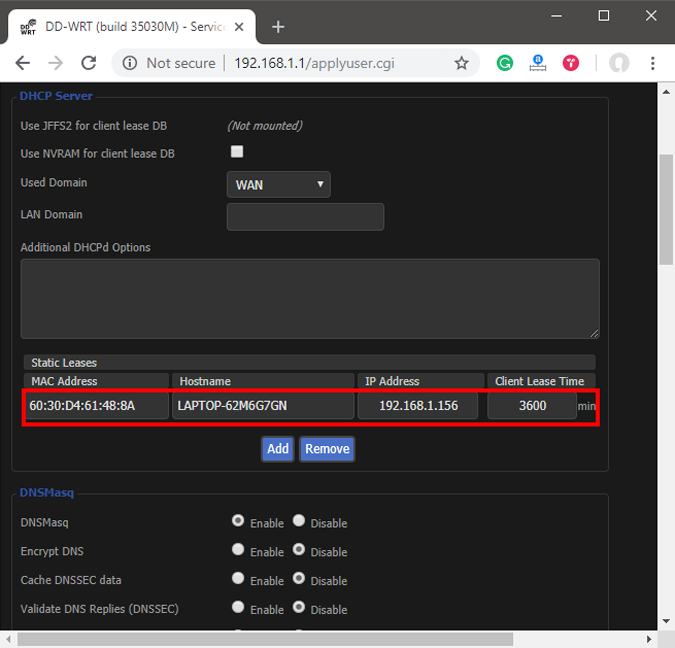
Once you have configured successfully on the router, just restart the Wi-Fi on the device. When it connects it should start using the static IP. In case of issues, make sure that you have the correct MAC Address and Hostname. To check, just run the command ipconfig or look back again in the router’s DHCP client list.
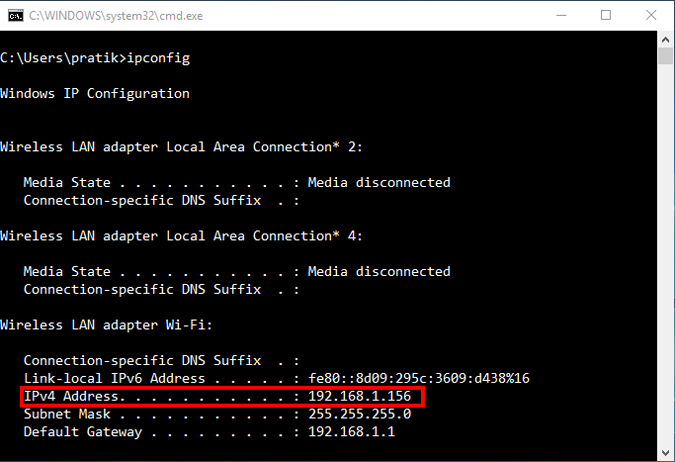
These changes are written to the ROM so restarting the router won’t make changes to the static IP configuration. In order to get back to Dynamic IP, just remove the entry from the IP leases.
What’s next
Once you have started configuring the IPs on Router and network devices, you are good to go configure telnet and SSH. Have a look at our brief article on How to Enable Telnet Server in Windows 10 , Best SSH clients for iOS To Manages Remote Servers and 6 Best FTP Clients For Android . A word of caution would be to note down the static IPs assigned to devices as assigning the same IP to two network devices would render them useless.
Also Read: How To Change DNS on Windows|Mac|Android|iOS
Mrinal Saha
Mrinal is a tech geek who spends half of his day reading and writing about tech. While the nights are spent on shooting or editing YouTube videos. Feel free to geek out with him on-
You may also like
How to add and customize text in davinci..., how to get notified when friend, group chat,..., how to install vencord on discord for windows..., how to install betterdiscord on windows and mac, how to change notification sound on discord desktop..., save instagram songs directly to spotify without leaving..., how to enable low light on whatsapp video..., finding the best android private messaging app: we..., how to forward messages on discord: a detailed..., discord game and video quests: how to play..., leave a comment cancel reply.
You must be logged in to post a comment.
How to set static IP address on Windows 10
You can assign a static IP address manually on your computer in more than one way, and in this guide, I'll show you four ways on Windows 10.
- To set a static IP address on Windows 10, open Settings > Network & Internet > Wi-Fi (or Ethernet ), click the connection, click “Edit,” select “Manual,” turn on “IPv4,” and set the static IP address.
- To manually configure a static network configuration from Control Panel, open Control Panel > Network and Internet > Network and Sharing Center > Change adapter settings , open the network adapter properties, check the “Internet Protocol Version 4 (TCP/IPv4),” click “Properties,” and set the static IP address.
- Alternatively, you can manually set a static IP address from Command Prompt and PowerShell.
On Windows 10, setting a static IP address on your computer may be necessary for various reasons. For example, if you plan to share files in the network , set up a shared printer , enable and use Remote Desktop , or configure port forwarding on the router, you may need to do this.
If you don’t assign a static IP address, services or a port forwarding configuration will eventually stop working. The reason is that devices use dynamic IP addresses assigned by the Dynamic Host Configuration Protocol (DHCP) server (usually the router) by default, which can change anytime, as soon as you restart the machine or after the dynamically assigned configuration lease expires. On the other hand, a static configuration is permanent, and it’ll remain the same until you change it.
Whatever the reason it might be, Windows 10 offers multiple ways to configure a static network configuration through the Settings app, the legacy Control Panel, and the command line using Command Prompt and PowerShell.
In this guide , I will teach you how to set a static IP address to a Windows 10 computer. (You can also use these instructions to configure a static address on Windows 11 .)
Set a static IP address on Windows 10 from Settings
Set a static ip address on windows 10 from control panel.
- Set a static IP address on Windows 10 from Command Prompt
- Set a static IP address on Windows 10 from PowerShell
To set a static IP address manually on Windows 10, use these steps:
Open Settings on Windows 10.
Click on Network & Internet .
Click on “Wi-Fi” or “Ethernet.”
Click on the current network connection.

Click the Edit button under the “IP settings” section.

Select the Manual option from the drop-down menu.
Turn on the “IPv4” toggle switch.

Set a static IP address for use on the Windows 10 computer.
Specify a “Subnet prefix length” (subnet mask). If your network’s subnet mask is 255.255.255.0 , then you should use the subnet prefix length “24.”
Specify a “Default Gateway” address.
Specify a “Preferred DNS” address.
Specify an “Alternate DNS address” (if applicable).
Click the Save button.

After you complete the steps, you can test your settings using your web browser to open a website.
Check if the IP address is static or dynamic
To check if you configured the settings correctly or to tell if your device is using static or dynamic settings, use these steps:
Open Settings .
Click on Wi-Fi or Ethernet .
Select the network connection.
Check whether the computer is using static (manual) or dynamic (automatic) IP address configuration under the “IP settings” section.

Once you complete the steps, you will know if your computer has been configured correctly.
To configure a static IP from the Control Panel, use these steps:
Open Control Panel .
Click on Network and Internet .
Click on Network and Sharing Center .
Click the Change adapter settings option on the left navigation pane.

Right-click the Wi-Fi or Ethernet adapter and select the Properties option.
Select the “Internet Protocol Version 4 (TCP/IPv4)” option.
Click the Properties button.

Select the “Use the following IP address” option.
Set the static IP address for the adapter – for example, 10.1.2.220 .
Specify a Subnet mask for the network, such as 255.255.255.0 .
Specify a Default gateway (which is usually the router’s IP address).
Confirm the “Preferred DNS server” address under the “Use the following DNS server addresses set Preferred DNS server” section. (It is Usually your router’s IP address or the server IP address that provides the DNS resolution.)
(Optional) Specify an Alternative DNS server. (The computer will use this address if it cannot reach the preferred DNS server.)
Click the OK button.

Click the Close button again.
Once you complete the steps, you can open your web browser and load a website to see if the configuration works.
Set a static IP address on Windows 10 from Command Prompt
To set a static IP address manually from Command Prompt, use these steps:
Open Start .
Search for Command Prompt , right-click the top result, and select the Run as administrator option.
Type the following command to see your current networking configuration and press Enter :
Under the network adapter, note the name of the adapter as well as the following information in these fields:
- Subnet mask
- Default Gateway
- DNS Servers

Type the following command to assign a static IP address on Windows 10 and press Enter :
In the above command, replace “Ethernet0” with the name of your network adapter. Change “10.1.4.220 255.255.255.0 10.1.4.1” with the device IP address, subnet mask, and default gateway address corresponding to your network configuration.
Type the following command to set a DNS server address and press Enter :
In the command, make sure to change “Ethernet0” with your adapter’s name and “10.1.4.1” with the DNS server address of the network.
Type the following command to set an alternate DNS server address and press Enter :
In the command, replace “Ethernet0” with your adapter’s name and “8.8.8.8” with an alternate DNS server address.

(Optional) Type the following command, and if the “DHCP Enabled” is set to “No,” then the static configuration has been applied and press Enter :
After you complete the steps, you can test the new configuration using the ping command (for example ping google.com ) to see if the internet is working. Alternatively, you can open a website to see if the configuration works.
Set a static IP address on Windows 10 from PowerShell
Windows 10 also includes the PowerShell command line console that allows you to use the “NetTCPIP” module to manage networking settings, including the ability to change your computer’s IP address settings. Microsoft recommends using this command-line method instead of netsh .
To set a static IP address on Windows 10 from PowerShell, use these steps:
Search for PowerShell , right-click the result, and select the Run as administrator option.
Type the following command to view your current network configuration and press Enter :
After running the command, note the following information:
- InterfaceIndex
- IPv4Address
- IPv4DefaultGateway

Type the following command to set a static IP address and press Enter :

In the command, replace the “InterfaceIndex” number (5) with the corresponding number of your adapter. Change “IPAddress” with the static IP address you want to assign to your device. If necessary, change PrefixLength (subnet mask) with the correct bit number. Typically, on a home network, the setting is “24.” Also, change the “DefaultGateway” option with the network’s default gateway address.
Type the following command to assign a DNS server address and press Enter :

If you need to set a secondary DNS server address, use a comma to use the same command with another address. For example:
In the command, replace the “InterfaceIndex” number (5) with your network adapter’s corresponding number. Also, change “ServerAddresses” with the DNS IP address.
(Optional) Type the following command, and if the “PrefixOrigin” and “SuffixOrigin” are set to “Manual” in the output, then the static configuration has been applied, and press Enter :
After you complete the steps, you can test the new configuration by opening your web browser and navigating a website.
Whatever method you use, assigning an IP address within the network range and outside of the DHCP server scope is recommended to allow proper connectivity and prevent address conflicts. If multiple devices share the same address, this will cause a networking conflict, preventing connection to the internet.
Although there are two main standards in use today, including IPv4 and IPv6 , version 4 is still the most widely used, especially in local networks, and for this reason, this guide focuses on setting up IPv4.
Update July 4, 2024: This guide has been updated to ensure accuracy and reflect changes to the process.
Mauro Huculak is a Windows How-To Expert who started Pureinfotech in 2010 as an independent online publication. He has also been a Windows Central contributor for nearly a decade. Mauro has over 15 years of experience writing comprehensive guides and creating professional videos about Windows and software, including Android and Linux. Before becoming a technology writer, he was an IT administrator for seven years. In total, Mauro has over 21 years of combined experience in technology. Throughout his career, he achieved different professional certifications from Microsoft (MSCA), Cisco (CCNP), VMware (VCP), and CompTIA (A+ and Network+), and he has been recognized as a Microsoft MVP for many years. You can follow him on X (Twitter) , YouTube , LinkedIn and About.me . Email him at [email protected] .
- How to remove Gallery page from File Explorer on Windows 11
- How to check if network traffic is using DNS resolver you set
We hate spam as much as you! Unsubscribe any time Powered by follow.it ( Privacy ), our Privacy .
- Engineering Mathematics
- Discrete Mathematics
- Operating System
- Computer Networks
- Digital Logic and Design
- C Programming
- Data Structures
- Theory of Computation
- Compiler Design
- Computer Org and Architecture
Configure IP in Windows 10
Prerequisite : IP address , Subnet mask , DNS server .
Introduction : An IP address is basically an identifier for a device on a network, it helps in sending information to and from a specific device on the network. An IP address is a string of numbers separated by periods. IP addresses are expressed as a set of four numbers ex- 192.168.0.10. Each number in the set can range from 0 to 255. So, the full IP addressing range goes from 0.0.0.0 to 255.255.255.255.
The internet needs a way to differentiate between different computers, routers, and websites. IP addresses provide a way of doing so and form an essential part of how the internet works.
Let us see how IP works behind the scene –
- Your device indirectly connects to the internet by connecting at first to a network connected to the internet, which then grants your device access to the internet.
- When you are at home, that network will probably be your Internet Service Provider (ISP). At work, it will be your company network.
- Your IP address is assigned to your device by your ISP.
- Your internet activity goes through the ISP, and they route it back to you, using your IP address. Since they are giving you access to the internet, it is their role to assign an IP address to your device.
- However, your IP address can change. For example, turning your modem or router on or off can change it. Or you can contact your ISP, and they can change it for you.
- When you are out and about – for example, traveling – and you take your device with you, your home IP address does not come with you. This is because you will be using another network (Wi-Fi at a hotel, airport, or coffee shop, etc.) to access the internet and will be using a different (and temporary) IP address, assigned to you by the ISP of the hotel, airport or coffee shop.
This article covers the steps to configure IP to connect to the Internet.
Steps to follow : 1. Go to the search bar and search for control panel. Once it appears then double click on it. A dialogue box will appear.

2. In the dialogue box, find “Networks and Internet” option and click on it.

3. A new menu will appear, find “Network and Sharing Center”, present in the left hand side. Click on it.

4. Click on “Change adapter settings” at the left hand side of the menu.

5. Right click on the desired network to which you want your computer to be connected. If you are unable to find the desired network then do the following –
- Check whether the router is switched on or not.
- Check if the ethernet wire has been properly plugged or not.
- If you are using hotspot, then check whether the device is visible to other devices or not. You can check it by going to the tethering hotspot settings of your phone.

6. Click on the “Properties”.

7. Select IPv4. The IPv4 address is a 32-bit number that uniquely identifies a network interface on a machine. It is widely used even when its successor protocol, i.e. IPv6 is more efficient.

8. Go to “Properties” and Click on the “Use the following IP address” radio button for manually adding the IP address.

9. Enter the details provided by your ISP. These includes –
- IP address – An IP address is a unique address that identifies a device on the internet or a local network. IP stands for “Internet Protocol,” which is the set of rules governing the format of data sent via the internet or local network.
- Subnet mask – A subnet mask is used to divide an IP address into two parts. One part identifies the host (computer), the other part identifies the network to which it belongs.
- DNS server – It is basically a phonebook of internet that maps IP addresses to its domain name.

Similar Reads
Please login to comment..., improve your coding skills with practice.
What kind of Experience do you want to share?
Stack Exchange Network
Stack Exchange network consists of 183 Q&A communities including Stack Overflow , the largest, most trusted online community for developers to learn, share their knowledge, and build their careers.
Q&A for work
Connect and share knowledge within a single location that is structured and easy to search.
What is IPv4 Autoconfiguration and why it overwrites static IP
I have to connect to a router with a static IP and subnet (machine automation, not internet). In ipconfig, subnet mask shows the subnet address I inputed but the IP is assigned a different one from the address I inputted. The previous computer connects properly and the only difference I notice in ipconfig is the new computer has "Autoconfiguration IPv4".
What is IPv4 Autoconfiguration? IP should be assigned from the router's DHCP, and if there is a IP-MAC conflict I should receive an error message. Why is IPv4 Autoconfiguration appear in PC's command prompt instead of the usual IPv4 in this case?
Googling yield a solution but that require modification of the registry to disable Autoconfiguration. I had already had the latest driver update. I suspect there is an alternative solution.

- wireless-networking
- Please provide a screenshot of the network connection’s IPv4 properties, where you entered your desired IP address etc. – Daniel B Commented Aug 22, 2017 at 6:09
- Picture uploaded. As you see I set IP to be 100.0.0.255/255.255.0.0 but ipconfig shows Autoconfiguration IPv4 169.254.196.218/255.255.0.0 – KMC Commented Aug 22, 2017 at 6:55
- It might be that Windows incorrectly assumes that .255 is an incorrect IP, but it is valid with that subnet mask. Did you try any other IP addresses? – Paul Commented Aug 22, 2017 at 6:59
- Unfortunately I cannot since the device is fixed sending message only to 255. Why would OS autoconfiguration IPv4? Shouldn't that be the job of the router's DHCP? – KMC Commented Aug 22, 2017 at 7:11
- Just making sure: You’re positive you set up the correct network adapter? – Daniel B Commented Aug 22, 2017 at 7:19
6 Answers 6
The screenshot shows an IPv4 address that start with 169.254.
This is from the "link local" range (e.g., RFC 3927 page 31 discusses what Windows XP using these addresses). Some people call these addresses "APIPA" addresses, named after Windows XP's process called Automatic Private IP Assignment (APIPA).
It seems that as technology has advanced, there are now two causes that commonly resulting in an address in this range.
- Windows will use this if it is set to use DHCP, and it tries to get an address from a DHCP server, and fails.
- "Duplicate Address Detection" ("DAD") has resulted in noticing an IP address conflict. From the comments that have been made, it seems that the feature of "Duplicate Address Detection" detection may also result in automatically assigning a different IP address, even if an IP address is statically configured.
The potential fixes to having such an address can be:
- check the logs to see if there is anything mentioned about a duplicate IP address. If so, try to determine what other device had that address, and why it did. If it got that address by DHCP, try to determine which DHCP server was used by each address that got that address, and troubleshoot the DHCP server(s). (Note that accidentally having an unknown extra DHCP server might be a common cause for this.)
- get DHCP communication functioning successfully,
- or to go to the NIC properties and specify an "Alternate Configuration" process that uses a specified "User configuration", or to use a static IP address.
Why DHCP isn't working is a separate question. This is the correct answer for specifically what you asked, which is: "What is IPv4 Autoconfiguration".
As for why DCHP overwrites static IP: DHCP usually doesn't. If you see an Autoconfiguration address in Microsoft Windows, then you're not using a "static IP" assignment. (Instead, you're configured to be trying to use DHCP, or DAD is taking effect.)
According to one comment (which was made via a proposed suggested edit), newer versions of Microsoft Windows may silently set an autoconfig IP (instead of showing a message on the screen). This is likely caused by DAD.
Trying to disable DAD might not be a great way to fix the problem, as that may cause the computer to start working on the desired IP address, but not address the issue that another device is trying to use the same IP address (which may cause problems immediately, or later when the other device starts being more active again).
- It's worth noting that in the time since this answer was written, RFC 3927 has been rejected . – Brett Holman Commented Jun 6, 2022 at 14:11
- 4 @BrettHolman I don't see that being the case. Having reviewed this (because I understand an RFC may be deprecated/obsoleted, but never heard of an RFC being "rejected"), I've determined that Errata ID 6293 has been rejected. Errata ID 6293 seems to be a proposed complaint/correction/update about RFC 3927, and this Errata was probably rejected due to a procedural concern: the rejector seems to indicate that if that text is going to be properly updated than that should happen by drafting a new RFC, not making an Errata on the old RFC. (So the RFC itself was never "rejected" that I can see.) – TOOGAM Commented Jun 15, 2022 at 18:43
- Thank you for the clarification, I mistook the attached Errata rejection for rejection of the RFC. I really appreciate the response :) – Brett Holman Commented Jun 16, 2022 at 14:38
- To disable DAD , I needed to add my user to the "Network Configuration Operators" group on the lusrmgr.msc app (following learn.microsoft.com/en-us/answers/questions/536989/… ), then run Set-NetIPInterface -InterfaceAlias "Ethernet" -AddressFamily IPv4 -DadTransmits 0 on powershell (run as admin). Then when I ran netsh interface ip set address name="Ethernet" static $DESIRED_IP_ADDRESS $NETMASK , it updates in ipconfig correctly. – Ben Butterworth Commented Sep 4 at 12:38
As the alternative to editing registry you can try this solution:
- open command line
- check id of network connection - it will be in the 1st column: netsh interface ipv4 show inter
- run this command replacing <id> with id of your network connection: netsh interface ipv4 set interface <id> dadtransmits=0 store=persistent
- open services.msc and disable dhcp client
- disconnect network cable, restart computer, start dhcp client service and plug in network cable
source: http://the-it-wonders.blogspot.com/2013/04/autoconfiguration-ipv4-address-196254xx.html
Since I can't add comment to TOOGAM's answer: autoconfiguration apparently can overwrite static ip configuration. Today I had a laptop (with Windows 10, version 1709) that couldn't access network and had both static ip and autoconfiguration ip visible in ipconfig output even though I put static ip in network card configuration.
- Thanks jacob_w. This happened to us today too for no apparent reason, and your fix made it work. We've done many machines the same way and this is the first time we've seen this, so go figure. If anyone works out the actual reason this happens, please post. – radsdau Commented Jun 12, 2018 at 6:11
- I feel pretty certain that steps 4 and 5 could be replaced by this: run IPConfig /release and then run IPConfig /renew . That may take a while, but would be faster (and easier) than the steps 4 and 5 provided, and would fully accomplish the critical steps that would happen by performing the longer steps 4 and 5 listed here. The basic reason either approach (either version of steps 4 and 5) would work is simply re-attempting a DHCP Discover or DHCP Request communication. – TOOGAM Commented Dec 15, 2019 at 14:24
- 1 If that works, the typical real problem is unreliability with the DHCP process. That could happen due to bad networking (bad center of cables, loose connection in the connectors of cables, wireless signal interference, filled DHCP scope which may randomly have an available address based on other devices)... maybe too many possible causes to list them all here, but not caused by a bad registry setting. – TOOGAM Commented Dec 15, 2019 at 14:28
I had the same issue and in my case i had a static IP
So the Comment by another person "As for why it overwrites static IP: It doesn't. -- Is Incorrect
In my scenario it was one of the VMs and there was another VM with the same IP. Instead of throwing the error about duplicate IP in my case it performed Auto Configuration
- 1 this was my issue. i'm working with a printer that has a static ip of 192.168.123.100. I connected this printer to my laptop through ethernet, and also set the NIC ip to be 192.168.123.100, but because it conflicted with the printer's ip, the NIC defaulted back to 169.254. – Simon Commented Sep 12, 2019 at 18:22
- On professionally-run networks I've encountered, we didn't typically have encounter duplicate addresses, so "duplicate address detection" wasn't actively affecting things. The " Obtain an IP address automatically " option basically boiled down to attempting DHCP, and if that failed, using the Alternate Configuration tab (which was usually unconfigured, resulting in APIPA assigning an IPv4 (169.254.*) link-local address. The " Use the following address " option resulted in a static IP, not causing DHCP or Link-Local to work. – TOOGAM Commented Dec 15, 2019 at 14:41
- I suspect that if Duplicate Address Detection (DAD) is being particularly useful, that may be because of some sort of issue with DHCP (e.g., server doesn't exist on the LAN being used, which may be quite likely with some "virtual machine" setups... or a filled DHCP scope, which may be remedied with an increased scope size or figuring out what is using up the addresses in an existing scope). My inclination would be to figure out why DHCP is not being a working, reliable solution, and trying to address that as a problem. (Of course, that works for me, who knows how to set up/troubleshoot DHCP) – TOOGAM Commented Dec 15, 2019 at 14:44
- 2 Question is about static IP – SeanClt Commented Dec 15, 2019 at 15:21
I had the same issue. I read that this is because the NIC card is not working properly, even though the Ethernet card said it was working properly. I have an HP desktop computer. I went to HP support, downloaded and reinstalled the Realtek Ethernet Controller Drivers for it and it fixed the card problem. No more autoconfiguration ipv4 address. Hope this help others.
- 2 You say "No more autoconfiguration ipv4 address." But that's wrong, based on the output you quote, as the output says " Autoconfiguration Enabled . . . . : Yes ". What is true is that you didn't get an Autoconfiguration address from the "Link-local" (IPv4 169.254.*) range. Instead, your Autoconfiguration successfully got an address from the DHCP server, which is identified in your output on the line that says " DHCP Server . . . . . . . . . . . : 172.16.0.1 ". So whatever device is at 172.16.0.1 (which is also your Default Gateway, so is some type of router) served you well, with DHCP. – TOOGAM Commented Dec 15, 2019 at 14:32
Its caused by a conflicting IP address. (Someone else on the same network has the same IP).
Changing the static IP helped me, but i am aware its not always practical. For me it worked because i connect to this computer alone.
- 1 Your answer could be improved with additional supporting information. Please edit to add further details, such as citations or documentation, so that others can confirm that your answer is correct. You can find more information on how to write good answers in the help center . – Community Bot Commented May 4, 2023 at 12:06
I had the same issue.
I had a hyper-v instance with several network adapters, all set with static IP addresses.
One instance was set up with 8 network adapters, all static IP. One adapter would have an auto configured ipv4 169 address, eventhough I set it with a static IP. Very frustrating, and after trying many other things I figured it out. It had been set with a static IP address that was already taken by another device. Simply changing the static IP address fixed the autoconfigured 169 issue.
You must log in to answer this question.
Not the answer you're looking for browse other questions tagged windows-10 wireless-networking router ipv4 ..
- The Overflow Blog
- CEO Update: Building trust in AI is key to a thriving knowledge ecosystem
- How to improve the developer experience in today’s ecommerce world
- Featured on Meta
- Preventing unauthorized automated access to the network
- Upcoming initiatives on Stack Overflow and across the Stack Exchange network...
Hot Network Questions
- How does a modern day satellite fall apart in space?
- Has any mass protest in the USA after 1945 successfully pressured the government to change its decision based on the protesters' demands?
- Variance of MLE's in mixture distribution
- Is it reasonable to view religions as theories, and, if so, to examine their theoretical predictions in order to test them empirically?
- How can I block localhost access from other computers on the same local network?
- Eight points on edges of a unit cube, there exists two at distance at most one.
- Looking for a book about an alien lost or stranded on earth and the people it comes in contact with
- Protection from liability for actions of employees
- An empty program that does nothing in C++ needs a heap of 204KB but not in C
- Is registering to vote in the US automatically counted as a vote for that party?
- What are some options for adding a sound equality operator (or avoiding it) in a type system with subtyping?
- Why does my cheese become tasteless when directly contacting the heat surface when making a grilled cheese sandwich?
- Join attributes by location with condition
- Does adding an MIT-licenced package to my research software qualify the author for co-authorship?
- Manhwa where the male lead is cursed to become a dog
- In 1964, were some prospective voters in Louisiana asked to "spell backwards, forwards"?
- How to synchronize both hands when shredding guitar?
- Are my skin colors realistic?
- How to know if the network is configured through /etc/network/interfaces, NetworkManager, Systemd or Netplan?
- Get drive's path using its name
- What to do if a work is too extensive to be properly presented in a single paper?
- Planet where tourists are weighed on arrival and departure so it keeps its mass to prevent orbital destabilization
- Leaving e-bike out in the rain WITHOUT battery
- Trigonometric inequality
How To Get A Network Switch To Assign IP

- Internet & Connectivity
- WiFi & Ethernet
Introduction
Understanding the basics of network switches and ip address assignment.
Network switches play a vital role in the functioning of computer networks, serving as the central point for connecting devices and facilitating the seamless transfer of data. When it comes to assigning IP addresses within a network, network switches are essential components that enable efficient communication between devices. In this article, we will delve into the fundamental concepts of network switches and explore the process of configuring and assigning IP addresses to devices connected to the switch.
The process of assigning IP addresses to devices connected to a network switch is crucial for enabling effective communication and data transfer. Understanding the intricacies of network switches and IP address assignment is essential for network administrators, IT professionals, and individuals seeking to optimize network performance.
Network switches are hardware devices that operate at the data link layer of the OSI model, facilitating the transfer of data between devices within a local area network (LAN). Unlike hubs, which simply broadcast data to all connected devices, switches intelligently forward data packets only to the intended recipient, thereby optimizing network efficiency and reducing unnecessary network traffic.
In the context of IP address assignment, a network switch serves as a central point through which devices can be interconnected and assigned unique IP addresses. This process is fundamental for enabling devices to communicate with each other and access network resources effectively.
Throughout this article, we will explore the various aspects of network switches and delve into the configuration and assignment of IP addresses, providing a comprehensive guide for network administrators and individuals seeking to gain a deeper understanding of these critical networking components. Let's embark on this journey to unravel the intricacies of network switches and the process of assigning IP addresses within a network.
Understanding Network Switches
Network switches are integral components of modern computer networks, playing a pivotal role in facilitating efficient data transfer and communication among connected devices. These devices operate at the data link layer of the OSI model, enabling the seamless exchange of data within a local area network (LAN).
Unlike traditional hubs that indiscriminately broadcast data to all connected devices, network switches utilize a method known as packet switching to intelligently forward data packets only to the intended recipients. This dynamic routing of data enhances network efficiency by reducing unnecessary traffic and optimizing data transfer speeds.
One of the key advantages of network switches is their ability to create dedicated communication channels between devices, thereby minimizing data collisions and congestion within the network. By establishing individual communication paths, switches enable devices to transmit and receive data simultaneously, enhancing network performance and overall throughput.
Modern network switches often incorporate advanced features such as VLAN (Virtual Local Area Network) support, Quality of Service (QoS) capabilities, and Power over Ethernet (PoE) functionality. VLAN support allows for the segmentation of a single physical network into multiple virtual networks, enhancing security and network management. QoS features enable the prioritization of specific types of network traffic, ensuring optimal performance for critical applications and services. Additionally, PoE functionality empowers switches to deliver power to connected devices such as IP phones, wireless access points, and surveillance cameras over the Ethernet cable , eliminating the need for separate power sources.
Understanding the various types of network switches, including unmanaged, managed, and layer 3 switches, is essential for network administrators and IT professionals. Unmanaged switches are plug-and-play devices that operate without the need for configuration, making them suitable for small-scale deployments. In contrast, managed switches offer greater flexibility and control, allowing for advanced configuration, monitoring, and optimization of network performance. Layer 3 switches, also known as multilayer switches, possess routing capabilities and can make forwarding decisions based on IP addresses, enhancing network scalability and efficiency.
By comprehending the functionalities and capabilities of network switches, individuals can harness the full potential of these critical networking components to build robust and high-performing computer networks.
Configuring the Network Switch
Configuring a network switch is a fundamental aspect of network administration, enabling administrators to optimize network performance, enhance security, and ensure seamless connectivity among devices. Whether deploying a new switch or reconfiguring an existing one, the configuration process involves several key steps to tailor the switch’s settings to the specific requirements of the network.
1. Accessing the Switch: Before initiating the configuration process, it is essential to access the switch’s management interface. This can typically be achieved through a web-based interface or a command-line interface (CLI) using protocols such as HTTP, HTTPS, Telnet, or SSH. Access credentials, including usernames and passwords, are required to log in and begin the configuration process.
2. Initial Setup: Upon accessing the switch, the initial setup involves configuring basic settings such as the switch’s hostname, management IP address, subnet mask, and default gateway. These parameters are essential for enabling remote management and facilitating communication with other devices within the network.
3. VLAN Configuration: For managed switches, configuring Virtual Local Area Networks (VLANs) is a critical step in network segmentation and resource isolation. VLAN configuration involves creating, assigning ports to, and defining the characteristics of individual VLANs to optimize network security and performance.
4. Port Configuration: Each port on the network switch can be customized to accommodate specific network requirements. Administrators can configure port settings such as speed, duplex mode, and flow control to ensure optimal connectivity and data transfer rates based on the connected devices’ capabilities.
5. Quality of Service (QoS) Settings: Implementing QoS settings enables administrators to prioritize network traffic based on predefined rules, ensuring that critical applications receive the necessary bandwidth and network resources. QoS configuration is particularly beneficial for optimizing the performance of voice, video, and data-intensive applications within the network.
6. Security Configuration: Enhancing network security is paramount in the configuration process. This involves implementing measures such as port security, MAC address filtering, and IEEE 802.1X authentication to mitigate unauthorized access and safeguard the network against potential threats.
7. Firmware Updates and Backup: Regular firmware updates and configuration backups are essential for maintaining the switch’s stability and security. Administrators should ensure that the switch’s firmware is up to date and create backups of the configuration settings to facilitate swift recovery in the event of a system failure or configuration loss.
By meticulously configuring network switches to align with the specific requirements and security policies of the network, administrators can establish a robust and reliable network infrastructure capable of meeting the organization’s communication and data transfer needs.
Assigning IP Addresses
Assigning IP addresses to devices within a network is a critical process that enables seamless communication and data transfer. Network switches play a pivotal role in facilitating the assignment of unique IP addresses to connected devices, ensuring efficient network operation and resource accessibility.
1. DHCP Configuration: Dynamic Host Configuration Protocol (DHCP) is a commonly used method for automatically assigning IP addresses to devices within a network. When a device connects to the network, the DHCP server, often integrated into the network switch or managed by a dedicated server, dynamically allocates an IP address from a predefined pool, along with essential network configuration parameters such as subnet mask, default gateway, and DNS servers. DHCP simplifies the IP address assignment process, eliminating the need for manual configuration and minimizing the risk of address conflicts.
2. Static IP Address Assignment: In certain scenarios, static IP address assignment may be preferred for specific devices within the network. Network administrators can manually assign static IP addresses to devices, ensuring that each device retains a consistent and predefined IP address. This approach is beneficial for devices that necessitate fixed addressing, such as servers, network printers, and network-attached storage (NAS) devices.
3. Subnetting and IP Address Range Management: When assigning IP addresses, understanding subnetting principles and effectively managing IP address ranges is crucial. Subnetting allows for the segmentation of a larger network into smaller, more manageable subnetworks, optimizing network performance and resource allocation. By carefully managing IP address ranges and subnet configurations, administrators can efficiently utilize available IP addresses and minimize potential address conflicts.
4. IPv6 Address Assignment: With the proliferation of Internet of Things (IoT) devices and the exhaustion of IPv4 addresses, the adoption of IPv6 has become increasingly prevalent. Network switches must support IPv6 address assignment to accommodate the growing number of devices requiring unique IP addresses. IPv6 address assignment involves configuring devices with globally routable IPv6 addresses, ensuring seamless connectivity and future-proofing the network infrastructure.
5. Quality of Service (QoS) for IP Address Assignment: Implementing QoS policies for IP address assignment processes can optimize network performance and resource allocation. By prioritizing DHCP traffic and IP address assignment requests, administrators can ensure that devices connecting to the network receive timely and efficient IP address assignments, minimizing potential delays and enhancing overall user experience.
By leveraging the capabilities of network switches and employing best practices for IP address assignment, administrators can establish a robust and scalable network infrastructure capable of accommodating diverse devices and applications while facilitating seamless communication and data exchange.
Verifying IP Assignments
After the process of IP address assignment, it is essential to verify the successful allocation and configuration of IP addresses to connected devices within the network. This verification process ensures that devices can communicate effectively, access network resources, and operate without connectivity issues.
1. Network Discovery Tools: Utilizing network discovery tools such as ping, traceroute, and network scanning utilities allows administrators to verify the connectivity and reachability of devices within the network. By pinging assigned IP addresses and conducting traceroute analyses, administrators can confirm the responsiveness and accessibility of devices, ensuring seamless communication across the network.
2. DHCP Lease Status: For dynamically assigned IP addresses through DHCP, monitoring the lease status of IP addresses is crucial. DHCP servers maintain lease records for assigned IP addresses, indicating the duration of the lease and the associated devices. Administrators can verify lease durations and renewal processes to ensure that devices retain valid IP addresses and that the DHCP server effectively manages address allocation.
3. Switch Port Status: Network switches provide insights into the status of individual switch ports and the devices connected to them. Administrators can verify the association of assigned IP addresses with specific switch ports, confirming that devices are connected to the appropriate ports and are successfully communicating within the network.
4. IP Address Conflict Resolution: Address conflicts can arise when duplicate IP addresses are assigned within the network, leading to connectivity issues and communication disruptions. Verifying the absence of IP address conflicts through network monitoring tools and conflict resolution procedures is essential for maintaining network stability and ensuring uninterrupted device communication.
5. Device Configuration Review: Reviewing the configuration settings of individual devices, including their assigned IP addresses, subnet masks, default gateways, and DNS server settings, provides a comprehensive overview of the network connectivity status. This review ensures that devices are configured with accurate network parameters, facilitating seamless communication and resource accessibility.
6. IPv6 Address Verification: In networks utilizing IPv6 addressing, administrators must verify the successful assignment and configuration of IPv6 addresses to devices. This involves confirming the presence of globally routable IPv6 addresses on devices and ensuring their compatibility with IPv6-enabled network services and applications.
By diligently verifying IP assignments through network discovery tools, DHCP lease monitoring, switch port status checks, and device configuration reviews, administrators can uphold the integrity and functionality of the network, ensuring that devices are equipped with valid and accessible IP addresses to facilitate efficient communication and data exchange.
Leave a Reply Cancel reply
Your email address will not be published. Required fields are marked *
Save my name, email, and website in this browser for the next time I comment.
- Crowdfunding
- Cryptocurrency
- Digital Banking
- Digital Payments
- Investments
- Console Gaming
- Mobile Gaming
- VR/AR Gaming
- Gadget Usage
- Gaming Tips
- Online Safety
- Software Tutorials
- Tech Setup & Troubleshooting
- Buyer’s Guides
- Comparative Analysis
- Gadget Reviews
- Service Reviews
- Software Reviews
- Mobile Devices
- PCs & Laptops
- Smart Home Gadgets
- Content Creation Tools
- Digital Photography
- Video & Music Streaming
- Online Security
- Online Services
- Web Hosting
- WiFi & Ethernet
- Browsers & Extensions
- Communication Platforms
- Operating Systems
- Productivity Tools
- AI & Machine Learning
- Cybersecurity
- Emerging Tech
- IoT & Smart Devices
- Virtual & Augmented Reality
- Latest News
- AI Developments
- Fintech Updates
- Gaming News
- New Product Launches
- Behind the Scenes of Artificial Intelligence Leading IT Expert in the Middle East Ali Kamran on the Secrets of Machine Learning
- What is the Best Color Palette for YouTubeVideos
Related Post
Hyperbaric oxygen therapy: revolutionizing treatment for various conditions, 12 best free ai image sharpeners in 2024 (web/pc/mobile), apple wallet availability in the pocketguard app: sync your apple card, apple cash, and savings from apple card accounts, unleashing young geniuses: how lingokids makes learning a blast, designing for flexibility: materials and manufacturing techniques in flexible hybrid electronics, robots acquires spyontech, related posts.
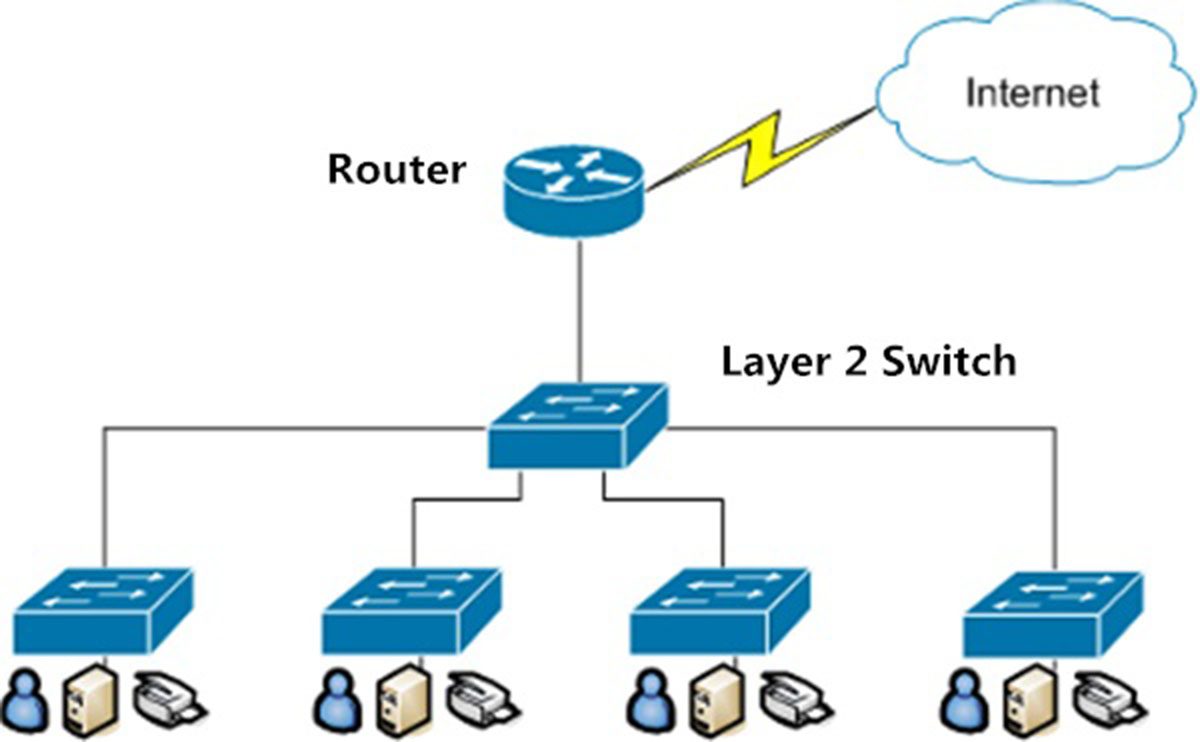
Why Would A Layer 2 Switch Need An IP Address
Can’t Get Network Printer To Print When Plugged Into Network Switch
How To Get IP Address Of A Network Switch
How To Configure An Extreme Network Switch Without A Console Cable

How To Make Workstation Network Like A Server
How Do You Configure A Cisco Switch On VMware Workstation
How To Set Up VLAN On A Managed Network Switch
Why Does A Network Switch Not Work When Directly Connecting To Internet Provider Cable
Recent stories.

Behind the Scenes of Artificial Intelligence: Leading IT Expert in the Middle East Ali Kamran on the Secrets of Machine Learning

What is the Best Color Palette for YouTube Videos?

Sanjuksha Nirgude Soaring High with Robotics

OpenStack Backup and Recovery Software

5 Ways to Improve IT Automation

- Privacy Overview
- Strictly Necessary Cookies
This website uses cookies so that we can provide you with the best user experience possible. Cookie information is stored in your browser and performs functions such as recognising you when you return to our website and helping our team to understand which sections of the website you find most interesting and useful.
Strictly Necessary Cookie should be enabled at all times so that we can save your preferences for cookie settings.
If you disable this cookie, we will not be able to save your preferences. This means that every time you visit this website you will need to enable or disable cookies again.
- Get started
Networking overview
Container networking refers to the ability for containers to connect to and communicate with each other, or to non-Docker workloads.
Containers have networking enabled by default, and they can make outgoing connections. A container has no information about what kind of network it's attached to, or whether their peers are also Docker workloads or not. A container only sees a network interface with an IP address, a gateway, a routing table, DNS services, and other networking details. That is, unless the container uses the none network driver.
This page describes networking from the point of view of the container, and the concepts around container networking. This page doesn't describe OS-specific details about how Docker networks work. For information about how Docker manipulates iptables rules on Linux, see Packet filtering and firewalls .
User-defined networks
You can create custom, user-defined networks, and connect multiple containers to the same network. Once connected to a user-defined network, containers can communicate with each other using container IP addresses or container names.
The following example creates a network using the bridge network driver and running a container in the created network:
The following network drivers are available by default, and provide core networking functionality:
For more information about the different drivers, see Network drivers overview .
Container networks
In addition to user-defined networks, you can attach a container to another container's networking stack directly, using the --network container:<name|id> flag format.
The following flags aren't supported for containers using the container: networking mode:
- --dns-search
- --dns-option
- --mac-address
- --publish-all
The following example runs a Redis container, with Redis binding to localhost , then running the redis-cli command and connecting to the Redis server over the localhost interface.
Published ports
By default, when you create or run a container using docker create or docker run , containers on bridge networks don't expose any ports to the outside world. Use the --publish or -p flag to make a port available to services outside the bridge network. This creates a firewall rule in the host, mapping a container port to a port on the Docker host to the outside world. Here are some examples:
Important Publishing container ports is insecure by default. Meaning, when you publish a container's ports it becomes available not only to the Docker host, but to the outside world as well. If you include the localhost IP address ( 127.0.0.1 , or ::1 ) with the publish flag, only the Docker host and its containers can access the published container port. ]\s+/gm, '')); copying = true; setTimeout(() => copying = false, 2000);"> $ docker run -p 127.0.0.1:8080:80 -p '[::1]:8080:80' nginx Warning Hosts within the same L2 segment (for example, hosts connected to the same network switch) can reach ports published to localhost. For more information, see moby/moby#45610
If you want to make a container accessible to other containers, it isn't necessary to publish the container's ports. You can enable inter-container communication by connecting the containers to the same network, usually a bridge network .
Ports on the host's IPv6 addresses will map to the container's IPv4 address if no host IP is given in a port mapping, the bridge network is IPv4-only, and --userland-proxy=true (default).
For more information about port mapping, including how to disable it and use direct routing to containers, see packet filtering and firewalls .
IP address and hostname
By default, the container gets an IP address for every Docker network it attaches to. A container receives an IP address out of the IP subnet of the network. The Docker daemon performs dynamic subnetting and IP address allocation for containers. Each network also has a default subnet mask and gateway.
You can connect a running container to multiple networks, either by passing the --network flag multiple times when creating the container, or using the docker network connect command for already running containers. In both cases, you can use the --ip or --ip6 flags to specify the container's IP address on that particular network.
In the same way, a container's hostname defaults to be the container's ID in Docker. You can override the hostname using --hostname . When connecting to an existing network using docker network connect , you can use the --alias flag to specify an additional network alias for the container on that network.
DNS services
Containers use the same DNS servers as the host by default, but you can override this with --dns .
By default, containers inherit the DNS settings as defined in the /etc/resolv.conf configuration file. Containers that attach to the default bridge network receive a copy of this file. Containers that attach to a custom network use Docker's embedded DNS server. The embedded DNS server forwards external DNS lookups to the DNS servers configured on the host.
You can configure DNS resolution on a per-container basis, using flags for the docker run or docker create command used to start the container. The following table describes the available docker run flags related to DNS configuration.
Custom hosts
Your container will have lines in /etc/hosts which define the hostname of the container itself, as well as localhost and a few other common things. Custom hosts, defined in /etc/hosts on the host machine, aren't inherited by containers. To pass additional hosts into a container, refer to add entries to container hosts file in the docker run reference documentation.
Proxy server
If your container needs to use a proxy server, see Use a proxy server .

IMAGES
VIDEO
COMMENTS
Right-click on the network adapter you want to assign an IP address and click Properties. Highlight Internet Protocol Version 4 (TCP/IPv4) then click the Properties button. Now change the IP, Subnet mask, Default Gateway, and DNS Server Addresses.
IP Address Assignment in the Same Network. In any network, the assignment of IP addresses is a crucial aspect that allows devices to communicate with each other effectively. When it comes to IP address assignment in the same network, there are specific considerations and methods to ensure efficient allocation.
When you're connected to a network, your computer or smart device will obtain an IP address either from your ISP or your router. There are 2 ways how you can assign an IP address to your device: (1) dynamically via DHCP or (2) statically by manually assigning an IP address yourself. In either case, you must use the IP address that is provided to you by your ISP, or the IP range you allocated ...
When assigning a static IP address you will also need to enter other important address information. The screen shot below shows the static address assignment on my Windows 10 computer however all devices have a similar form for the IP address assignment. Notes: 1. My home network use the network address 192.168.1 (first three numbers) also ...
Manual IP address assignment provides network administrators with full control over IP allocation and allows for precise management of network resources. Assigning IP addresses manually involves configuring the network settings on each device. Here is a step-by-step guide on how to manually assign an IP address:
Look at the ifconfig (or ipconfig on Windows) output of your Internet connected machine. You will see two more things associated with your IP address: a subnet mask and a default gateway ip address. Think about what you will setup as the default gateway if you were to change your IP address say from 'a.x.y.z' to 'b.x.y.z'. Changing it won't work.
Next to IP assignment, select Edit. Under Edit network IP settings or Edit IP settings, select ... To specify an IP address, select Use the following IP address, and then, in the IP address, Subnet mask, and Default gateway boxes, type the IP address settings.
In a Local Area Network (LAN), which typically covers a small geographical area like a home, office, or campus, IP addresses are crucial for managing network traffic and ensuring data packets reach the correct destination. +852-29888918. [email protected]. Service. RIR Membership Management;
To assign a permanent TCP/IP configuration on Windows 10, use these steps: ... replace ADAPTER-NAME with the name of your network adapter. Change IP-ADDRESS SUBNET-ADDRESS DEFAULT-GATEWAY-ADDRESS ...
In order to set a static IP address for either IPv4 or IPv6, you have to provide the next details: IP address: Enter the static IP address you want to use. For instance, I'm changing the IP address (IPv4) of my Windows 11 computer to 192.168.50.10. Subnet mask: Type the subnet mask used by your network. For example, I've configured my mesh ...
Here, our subnet mask is 255.255.255.. This can also be written as a /24 network mask. To understand the IP subnetwork boundaries, let's look at the IP address and subnet mask for our destination device: 192.168.040.039. 255.255.255.000. As you can see, the four octets of the IP address align with the four octets of the subnet mask.
Never assign an address to the very start of the IP pool, e.g. 10.0.0.1 as the start address is always reserved for the router. Even if you've changed the IP address of your router for security purposes, we'd still suggest against assigning a computer. Never assign an address outside of the total available pool of private IP addresses.
Windows allows to assign multiple IP addresses (aliases) to a single physical network adapter. This can be useful when you want to run multiple websites with unique IP addresses on the same IIS server, if you want to bind an application to a specific IP, or if you are preparing to change IP addresses on your network.In Windows, you can add a secondary (virtual) static IP address to an existing ...
A device's IP address actually consists of two separate parts: Network ID: The network ID is a part of the IP address starting from the left that identifies the specific network on which the device is located. On a typical home network, where a device has the IP address 192.168.1.34, the 192.168.1 part of the address will be the network ID.
Assigning Static IP address to most devices is easy, just go to its network settings, look for DHCP option and turn it OFF. Once you do that, you'll see a text area to enter Static IP address. Enter the new IP address there, save changes and that's it. So let's see how to Assign Static IP address to various Operating Systems. 1.
Click on Network & Internet.. Click on "Wi-Fi" or "Ethernet.". Click on the current network connection. Click the Edit button under the "IP settings" section.. Select the Manual option from the drop-down menu.. Turn on the "IPv4" toggle switch.. Set a static IP address for use on the Windows 10 computer.. Specify a "Subnet prefix length" (subnet mask).
8. Go to "Properties" and Click on the "Use the following IP address" radio button for manually adding the IP address. 9. Enter the details provided by your ISP. These includes - IP address - An IP address is a unique address that identifies a device on the internet or a local network.
The screenshot shows an IPv4 address that start with 169.254. This is from the "link local" range (e.g., RFC 3927 page 31 discusses what Windows XP using these addresses). Some people call these addresses "APIPA" addresses, named after Windows XP's process called Automatic Private IP Assignment (APIPA).
The process of assigning IP addresses to devices connected to a network switch is crucial for enabling effective communication and data transfer. Understanding the intricacies of network switches and IP address assignment is essential for network administrators, IT professionals, and individuals seeking to optimize network performance.. Network switches are hardware devices that operate at the ...
Assign a MAC address to a container. For more information about the different drivers, see Network drivers overview. Container networks. ... In both cases, you can use the --ip or --ip6 flags to specify the container's IP address on that particular network. In the same way, a container's hostname defaults to be the container's ID in Docker. ...