Unsupported browser
This site was designed for modern browsers and tested with Internet Explorer version 10 and later.
It may not look or work correctly on your browser.
- Presentations

How to Share Your PowerPoint Presentation Online (For Free)
- Bahasa Indonesia
When you think of PowerPoint presentations, you may think of them as being presented using a projector or large screen display. But when you can't connect in person to give your presentation, posting your PowerPoint online may be the next best alternative.

Maybe your audience doesn't have PowerPoint installed on their device. In that case, it makes sense to use Microsoft PowerPoint Online to share and collaborate. Or, you might have a major message you want to share online with anyone who clicks the link using SlideShare.
In this tutorial, discover a few ways to upload and share a PowerPoint presentation using best practices.
Guide to Making Great Presentations (Free eBook Download)
Before you read on, grab our free eBook: The Complete Guide to Making Great Presentations . It will help you master the presentation process, from: initial idea, through to writing, design, and delivering with impact.

How to Quickly Share PowerPoint Presentations Online (Watch & Learn)
In this quick two-minute screencast video, I'll walk you through using PowerPoint Online and SlideShare to upload your presentation for sharing. I'll show you tips and tricks for each platform to get the most from them.
Both of these services are free when you make an account. You don't need anything other than a PowerPoint file and an account to quickly share your presentation online.

Now, let's dive into some written tips on using these services. I'll show you best practices on getting your PowerPoint online for an audience to see.
Microsoft PowerPoint Online
Do you have a PowerPoint and are you wondering " how to share my PowerPoint online? "
My preferred way to share PowerPoint presentations is to use PowerPoint Online, Microsoft's browser-based version of PowerPoint. If you've used Google Drive and their collaborative apps that live inside your web browser, you can think of this as Microsoft's alternative. Best of all, it's free!

To use PowerPoint Online, you'll need a Microsoft account, which is free to create. Jump over to this link to log in or create a Microsoft account and get started with PowerPoint Online.
1. Upload Your PowerPoint Presentation
Now, you'll need to upload your PowerPoint presentation to make it available online.
There are two ways you can do this:
- Save it to your OneDrive account that's associated with your email address. OneDrive Microsoft's cloud storage app will automatically be available in PowerPoint Online when you log in.
- Log into PowerPoint Online , and click on Upload a Presentation to upload your file from your computer.

2. Invite Viewers to Your Online Presentation
Once your presentation is online, you're ready to invite others to view it. Using PowerPoint Online, click on Share in the right corner above the presentation.
Now, you can add email addresses for anyone to invite to the presentation. Add some email addresses in the To field, along with a message below it to add collaborators.

There are some other key options that you'll want to set each time you add viewers to a presentation:
- On the dropdown options, you can choose between Anyone with the link and Specific people to control who has access to the presentation.
- You can also choose between the permissions Can edit and Can view . If you select the Can edit option, your invitee can make changes to the presentation.
- You can set an expiration date for the share. Or, set a password so that the invitee has to log in to view the presentation.
- You can also copy the link to share it online or through email. (See the steps below.)
3. Optional: Make an Online PowerPoint Presentation Link
Another option is to make the presentation public so that anyone with the URL to your presentation can view it. If you're distributing your PowerPoint presentation to a team online, it's easier to create a link instead of inviting each user's email address.
Here's how to create a link for a PowerPoint:
Click on Copy link on the same sharing window I showed you above. PowerPoint Online creates a URL that you can send to others to collaborate on the presentation with you.

To invite others to make edits using the URL, click on the Anyone with the link can view option. Choose Allow editing from the Other settings section.
Post Your Presentations Online With SlideShare
Besides PowerPoint online, SlideShare is one of the best-known services for posting a PowerPoint online. When Netflix uploaded a slide deck on their culture in 2009, they likely had no idea that it would be viewed 17 million times in the following years.
Just as YouTube is a discovery platform for video, SlideShare is a network where users can discover your slide deck.
SlideShare is now owned by Scribd. You can upload a PowerPoint to SlideShare simply by hopping over to their website and log in (or create) your Scribd account. Or you can still log in through LinkedIn.

SlideShare supports a variety of formats, but it's tailor-made to drop your PowerPoint (PPTX) files into. You can drag and drop a file onto the window or click on a cloud service to quickly add your presentation online.
After you begin uploading your presentation, SlideShare has you add some basic metadata. Add a Title , Category , and Tags to help users discover your content.

Maybe the most important setting on this screen is to choose the Privacy settings for your presentation. A Public presentation appears to anyone who comes across it via search or social, just like the Netflix culture slide deck. You could also choose Limited to make it visible, but not in SlideShare search.
Once you've set the privacy, press Publish . Your presentation will go online, ready to share!
SlideShare is a great choice for when you want to publicize your PowerPoint. But the privacy settings are essential when you're sharing your presentation online.
Learn how to make a great online presentations with SlideShare and PowerPoint in our multi-part tutorial series. Or get started with one of these Envato Tuts+ tutorials:

Send and Share Your PowerPoint Presentations
If your presentation contains sensitive information or you just don't want to publish it online, I still have tips for how to share your presentation effectively.
If you're going to use email or a service like Dropbox to upload your PowerPoint presentation, you might want to reduce the file size of your presentation before you send it. Let's look at two key tips to reduce the file size so that you don't waste someone's inbox space.
1. Compress Images
Images are usually the single largest part of a PowerPoint presentation. Everything else in a presentation is some combination of text and shapes, which don't consume much storage space at all.
Compressing images is the best way I've found to save space. Select a picture and click Picture Format . Choose Compress Pictures.

On the Compress Pictures menu, choose a lower resolution setting from the list of options. I recommend choosing a lower resolution like 150 or 96 PPI. This reduces the space occupied by your images and creates a smaller PowerPoint file.
2. Save a Lower Resolution Copy
Beyond the images in your presentation, you can also save the entire presentation at a lower resolution.
On the File > Save As menu, this time choose the Tools > Save Options menu.

For high-resolution presentations that use premium PowerPoint themes, this step is a must to reduce the file size before you send it to your audience. Find top PowerPoint presentation themes on Envato Elements:

Both of these tricks save some serious storage space when you share your presentation. Even if you're considering uploading it to PowerPoint Online, this is an ideal step to maintain PowerPoint performance.
Five PowerPoint Presentation Templates from Envato Elements for 2022
You've just learned how to share PowerPoint online. But the first step to sharing a presentation is to find the right template.
As you're looking for a PowerPoint template, keep in mind these top template options. Each of these has been selected to give you a stylish presentation template:
1. Permanent

Permanent template has 32 master slides, so there's plenty of room to add all your information. Plus, this template comes with charts, diagrams, tables, and more. Picture placeholders make it easy to add an image by dragging and dropping the image into it.
2. Everlux PowerPoint Template

Everlux is a professional template that comes with a portfolio where you can showcase your previous work. This template comes with over 40 unique slides in total. The minimal design makes it easy to use the template for any purpose. It comes with maps, graphs, icons, and more.
3. Hexas PowerPoint Template

Hexas has a modern design with geometric patterns. It comes with over 120 total slides that you can add information to. Also, this template comes with five premade color schemes making it easily customizable. Quickly add an image by dragging and dropping the image into an image placeholder.
4. Diminished PowerPoint Template

Diminished is a multipurpose PowerPoint template that comes with five color variations. It comes with over 150 total slides. This template comes with graphics, illustrations, and infographics. It also comes with portfolio galley slides to showcase any previous work.
5. Kiran Template

Kiran template has a minimal design that's good for a marketing presentation. This template comes with over 46 unique slides. It also comes with a lookbook where you can showcase your products. Easily drag and drop the image of your choice into the picture placeholder to add it to your slide.
Recap & Keep Learning More Great PowerPoint Presentation Tools
This tutorial showcased three key methods to share your PowerPoint presentation. The decision should come down to whether you're trying to attract a public audience (SlideShare) or collaborate with other PowerPoint users with PowerPoint Online.
If you aren't sold on using PowerPoint Online, check out some of the PowerPoint tutorials below. I'll show you how to use PowerPoint to work together online, and Laura Spencer offers a compelling look at using Google Slides instead.

Need Help? Grab Our Making Great Presentations eBook (Free)
We've got the perfect complement to this tutorial. You can find more information in our new eBook on making great presentations . Download this PDF eBook now for FREE with your subscription to the Tuts+ Business Newsletter.

It'll help you master the presentation process, from: initial creative ideas, through to writing, design, and delivering with impact.
Create and Share Your PowerPoint Online Today!
It can be helpful to share your presentation in many ways. Now that you know how to share a PowerPoint presentation as a link, try it for your next presentation. To save time creating your PowerPoint presentation, consider signing up for Envato Elements.
Editorial Note: This tutorial was originally published in November of 2017. It's been updated by Sarah Joy to make the information relevant and current. Sarah is a freelance instructor for Envato Tuts+.

Already have an account? Sign In
You can also continue with SAML SSO
Don't have an account? Sign Up
- File Sharing
- Screenshot Capture
- Screen Recording
Share Presentations Online
Instantly share your presentations online using links
or, drop the file here
[file-name]
Upload complete.
By sharing your files or using our service, you agree to our Terms of Service and Privacy Policy .
Free Presentation File Sharing
Share your presentation files with anyone without worrying about registration or software installation. Our online presentation sharing tool lets you share PowerPoint (PPT, PPTX), OpenDocument (ODP), and other presentation formats with ease on any modern web browser for free!
Upload Securely
Safely upload your presentation through an HTTPS connection. We use AES-256 military-grade encryption to keep your file safe and delete it from our servers after a day for added security.
Share Anywhere
With our secure link or email sharing feature, you can share your presentation anywhere and with anyone. Your recipients can view the file online without signing up for a Jumpshare account or installing any app.
Collaborate With Ease
Take team collaboration to the next level with our commenting feature. Receive feedback on your presentation and reply to individual comments for an effortless exchange of ideas.
Lock Your File
Worried about your presentation falling into the wrong hands? With our Plus plan, you can password protect your files, ensuring that only trusted recipients have access.
Set Link Expiry
Share your presentation with confidence using Jumpshare Plus. Our link expiry feature lets you set a time limit for the link, after which it automatically expires, preventing anyone from accessing your file.
Advanced Analytics
Take control of your business with Jumpshare Plus. Monitor who views or downloads your presentation as well as from where and when, make informed decisions and stay ahead of the competition.
How to Share Presentation Online
Choose your presentation from the indicated area at the top of the page.
Wait a brief moment for the file to be uploaded to to our secure servers, then click the Share Your File button to open it in our online file viewer.
Click the Copy Link button at the top-right of the file viewer and paste the link wherever you wish to share the file.
Frequently Asked Questions
How long does my presentation stay online?
We keep your presentation on our server for 24 hours before deleting it. However, if you sign up for an account , we will keep it online for as long as you have an active account or you delete the presentation yourself.
Are there any limitations to sharing?
You can share just one presentation at a time using this free tool, and each file must not exceed 100MB in size. Additionally there is a daily limit of 3 presentation shares. If you wish to share more files or ones larger than 100MB, you can sign up for a free account.
Is it safe to share my presentation online?
Absolutely! Your presentation is transferred to our server using an SSL connection, stored using military-grade AES-256 encryption, and shared using a secure shareable link.
I have other questions about sharing files online!
No problem! We have a 24/7 support team to assist you with sharing files online. Just shoot us a message at [email protected] and we will get back to you as soon as possible.
Other Formats You Can Share Online
Jumpshare supports over 200 file formats that you can share online, 100% free! To share other supported file formats, head on over to our File Sharing page.
The Easiest Way To Communicate Visually
Jumpshare is much more than a file sharing tool. It is a powerful visual communication app that offers screen recording, screenshot capture, and more in one package.
Share your work & ideas in seconds. Visually.

- Record your screen.
- Capture screenshots.
- Capture GIFs.
- Share anywhere instantly.

- Get started with computers
- Learn Microsoft Office
- Apply for a job
- Improve my work skills
- Design nice-looking docs
- Getting Started
- Smartphones & Tablets
- Typing Tutorial
- Online Learning
- Basic Internet Skills
- Online Safety
- Social Media
- Zoom Basics
- Google Docs
- Google Sheets
- Career Planning
- Resume Writing
- Cover Letters
- Job Search and Networking
- Business Communication
- Entrepreneurship 101
- Careers without College
- Job Hunt for Today
- 3D Printing
- Freelancing 101
- Personal Finance
- Sharing Economy
- Decision-Making
- Graphic Design
- Photography
- Image Editing
- Learning WordPress
- Language Learning
- Critical Thinking
- For Educators
- Translations
- Staff Picks
- English expand_more expand_less
PowerPoint - Sharing Your Presentation Online
Powerpoint -, sharing your presentation online, powerpoint sharing your presentation online.

PowerPoint: Sharing Your Presentation Online
Lesson 33: sharing your presentation online.
/en/powerpoint/rehearsing-and-recording-your-presentation/content/
Introduction
PowerPoint offers several options to enhance or even totally change the way you deliver presentations. Instead of presenting your slide show normally, you can choose to present it as a video , or you can even present it live online so others can view it remotely. No matter how you choose to give your presentation, you can enhance it by customizing your slide show to remove or reorder slides. All of these options can help you give a polished and professional presentation.
Optional: Download our practice presentation for this lesson.
Watch the video below to learn more about the different ways you can share your presentation.
Exporting a presentation as a video
The Create a Video feature allows you to save your presentation as a video. This can be useful because it lets your viewers watch the presentation whenever they want. To make sure your viewers have enough time to view each slide, you might want to rehearse the timings or record your slide show before using this feature.
To create a video:
- Click the File tab to access Backstage view .

- Click Create Video . The Save As dialog box will appear.

In addition to emailing your video, you can upload your video to free video-sharing sites like YouTube . Once your video is uploaded, you can give the link to anyone you want to see it. To learn more about using YouTube to share videos online, review our YouTube tutorial.

Presenting your slide show online
Presenting a slide show online is surprisingly easy. All you and your viewers need is an Internet connection—they don't even need PowerPoint. Once your viewers are connected, you can start the presentation as you normally would.
Please note that you cannot edit your presentation or mark it with a highlighter or pen while you are presenting a slide show online. You also cannot use PowerPoint to speak to your audience. Plan to communicate with your viewers through teleconferencing, or pre-record your narration.
To present online:
- Select the Slide Show tab, then locate the Start Slide Show group.

- A link will appear. If it's not already selected, select the link.

- Click Start Presentation .
- Present the slide show as you normally would, using the mouse or keyboard to advance the slides.

- Open our practice presentation .
- Export the practice presentation as a video, and save it to your computer.
- If you have a friend or family member with an Internet connection, try to present the slide show online .
/en/powerpoint/what-is-office-365/content/
You’re using an older browser version. Update to the latest version of Google Chrome , Safari , Mozilla Firefox or Microsoft Edge for the best site experience. You are using an outdated browser, so there may be issues with displaying the page. To make the website work correctly, use the latest version of one of these browsers: Google Chrome , Safari , Mozilla Firefox or Microsoft Edge .
- Corporate Training
- Course Selling
- Academic Learning
- Learning Basics
- Instructional Design
- Online Training Tools
- Manufacturing
- Products iSpring Suite iSpring Learn
- Use Cases Training organizations Onboarding Compliance Training Induction Training Product Training Channel Partner Training Sales Training Microlearning Mobile Learning
- Why iSpring
- Company About Us Case Studies Customers Partnership Course Development Contact Us
- Knowledge Hub Knowledge Hub Academy Webinars Articles Guides Experts on iSpring
- Language EN English Français Deutsch Español Italiano Nederlands Português Polski 中文 日本語 العربية Indonesia
- Shopping Cart
How to Share a PowerPoint Presentation Online

content creator
Paulina Fox See full bio →
Professional presenters, salespeople, developers, designers, teachers, event spokespersons – we all have the problem of sharing PPT slides with a wider audience. Live presentations are cool, but they impose evident limitations. Those 10 – 100 listeners in the room will definitely enjoy the good vibes and a proper joke that come in a package with a nice presentation. Yet there are thousands of people out there who didn’t attend your class or event, but could make good use of your findings.
So the question is: what’s the best way to share your presentation online so more people could see it? Out of a dozen or more ways to solve the issue, let’s get down to the five that seem to make the most sense.
1. Use Presentation Hosting
There’s a bunch of web-based slide hosting services out there that can help you upload and share a presentation without quality losses or security implications, for example, SlideShare, MyPlick, and Slideboom.
The good news is, this scenario makes a remote presentation easy since it’s browser-based and there’s no need to employ your own proprietary server or deal with bandwidth issues. What’s more, most hosting providers include administrative tools so you can keep track of your presentations if you have only a few uploaded.

Check out iSpring Learn LMS to get a better feeling of how it works →
5. Share the Source File
Least sophisticated therefore highly popular, this method has its pros and cons. Indeed, you might be well off uploading your presentation on DropBox or Google Drive and sharing a link with a buddy. However, your buddies might not have PowerPoint installed. Or, chances are, they are using an older version, so turns out the slides just won’t open, and the visual frills you sweated over three nights in a row will get lost. Also make sure you always indicate file size, as a download may result in a very lengthy process for some people.
Besides, there are security risks to consider. The presentation might get copied, modified and distributed across the web before you even know it. If your content is sensitive and better kept from prying eyes, it makes sense to consider the safer options described above. To learn more about how to protect PowerPoint slides, also read this article .
Here are our Top 5 ways of sharing PowerPoint presentations online. Hopefully, we managed to convey the feeling of how cool it is to broadcast your materials to a bigger audience yet stay in control of things. Whatever option you choose, make sure you get the most out of PowerPoint, which is a tremendously powerful tool, indeed.
Good luck with your presentations, and stay tuned for more tech notes!
Table of Contents
iSpring Suite
Create online courses and assessments in record time.

Content creator
Paulina Fox
Passionate about design and tech, Paulina crafts content that helps customers delve deeper into iSpring products.

Online Presentations: 3 Ways to Present Live Online in PowerPoint!
Demand for online presentations, and the programs to deliver them, has increased exponentially, especially in the last couple of years . Whether for business or in educational settings, being able to present well online is crucial in 2023, and will continue to be so for the foreseeable future.
Thanks to modern technologies, we can now present long distance . So you’re no longer tied to a meeting room and can reach a much wider audience through the internet. Theoretically, it’s possible to work from anywhere and present to anywhere, saving time and costs all round. We’ll outline three different ways to deliver your PowerPoint presentations online.
In today’s blog post we would like to introduce you to three variants of live streaming PowerPoint presentations.
Online Presentations: An absolute must in 2023
It’s not a completely new thing that events and (PowerPoint) presentations are being delivered via video link rather than in person, but the pandemic has hugely accelerated the trend. There are now many online presentation options on the market allowing you to share your presentation live and let your audience actively participate .
Thanks to modern technologies, it is possible to show presentations over long distances . This means you are no longer tied to a meeting room and can reach a wider audience via the Internet. In theory, there is the possibility to work from any place and thus save time and travel.
Nowadays you can broadcast your presentation (live) and let your audience actively participate in the presentation.
We’ll show you three ways to present online, highlighting the advantages and disadvantages of each. If you need help creating an online presentation, this blog post can help. Tips for delivering your online presentation can be found here .
Addressing data protection and security concerns
It is important to consider privacy and security issues to ensure the privacy of participants and the security of data . By paying attention to these aspects, the trust of the participants can be gained, and a successful and safe live presentation can be conducted.
Select only reputable providers that offer a secure connection and encryption . Find out about the provider’s privacy policy to ensure that no personal data of participants is stored.
Preparation of a PowerPoint presentation for online sharing
To ensure a smooth process when sharing your presentation, you should check your presentation in advance . If possible, view the shared presentation yourself and make sure that all elements are displayed correctly.
Check your notes or comments . Are they sufficient for the presentation or do you need to add more?
Tip: For jumping from slide to slide faster, you should include links or hyperlinks in your presentation in advance. This way, you can jump directly to the corresponding slide if there are any questions.
3 options on how to present your presentation live
Option 1: online presentation, option 1: share as a link.

The first way to share your presentation with your audience is really simple: just send a link. This allows you to present to a wide and unlimited audience directly, easily and hassle-free . If you’re doing it this way, the more compact and concise you can make your presentation, the better, so as to minimize loading delays. Some features may need to be compromised, however.
- Live stream your presentation by clicking the Share option in the File tab, and then clicking Show Online.
- This opens a dialog box that displays the custom URL of your presentation.
- Simply copy the link and email it to your audience.
- When they receive the link, click Start Presentation and you can present to your audience in real time.
- When you are done with the presentation, just click End Online Presentation .
Online Presentation, option 2: Office Mix

You can use this method if you subscribe to Office 365 or use PowerPoint 2013 and download the free Office Mix add-in . This blog post explains how to download add-ins.
Office Mix is designed to facilitate interaction between different Microsoft Office programs, and offers many features and possibilities.
The advantage of this program is that Office Mix works fluidly with your slide content, allowing you to add audio files, videos, polls and quizzes to your slides and make them more interesting . This is especially useful in an educational environment to track the progress of students outside the classroom. It helps you, as a presenter, to maximize the motivation and engagement of your audience. These features can be found under the Mix tab and Quizzes and Video apps. Office Mix also offers a live feature that allows you to guide viewers through the slides in real time using videos, audio files, and illustrations . Office Mix also has its own website to help users navigate through the handy features and provides several tutorials to help new users get started. The program just requires an internet connection, and you then share your presentation online with your audience. A major advantage is that the audience can return to the slides after you’ve finished your online presentation and access them again .
Online Presentation, option 3: Upload to a platform

SlideShare is a collection of websites where you can upload, share and archive your online presentation. You can also search and view online presentations yourself using the search box. Similarly, others can find your presentation using keywords. This sounds great, but the platform does not allow you to interact directly with your audience.
If you don’t want your presentation to be private, y ou can share it on all possible channels and gain a wide audience . Do keep in mind that people have to be able to understand your presentation even without your accompanying lecture. As your audience is unable to interact, there is no room for follow-up questions . When creating your online presentation, then, try to create appealing and comprehensive slides in order to keep the audience’s attention.
Click here to go to SlideShare.
PowerPoint for the web
PowerPoint offers a free, pared-down, web version . This lets you create, upload and share your presentations directly. To use the service, you must have a Microsoft account. You can find more information about the platform in this post .
The big advantage of the web version is being able to present online presentations live . To access this, select whether the presentation is publicly accessible or only to be seen by a selected audience (e.g. employees or customers) under Screen Presentation . When you start the broadcast, a link and a QR code are generated that are unique to your online presentation. Participants can then scan the QR code or enter the link in their browser to join the online presentation.
Click here for PowerPoint for the web.
Group-chat software like Skype (for business), Zoom or Microsoft Teams

Group-chat software was around long before the pandemic, but is now increasingly relevant. Such software allows you to interact with your audience, broadcast your presentation live, and respond directly to questions .
You can use all three programs for free after registration , then share your presentation with your audience using the Share Screen option. Note that Zoom has a screen sharing time limit in the free version; you can bypass this by upgrading to the paid version.
All three programs allow you to interact directly with your audience and, if you want, to see your audience through the camera option. The options for viewers to raise their hands to ask a question or write a comment in the chat, mean that you can respond directly to questions.
Click here for Skype, here for Zoom and here for Microsoft Teams.
Tip: Skillfully deliver your online lecture
You’ve created the perfect PowerPoint presentation to share? Great, now consider the next step: the online lecture.
This type of presentation differs in some respects from a presentation with an audience on site . You need to focus even more on keeping the attention of the audience . After all, ending your presentation is just a click away.
You will get many tips & tricks around the online lecture in the article on “Virtual Lectures”.
Conclusion: There are so many ways to present well online
Presenting your presentation live online has never been easier. Most of the options available are even free ! Do bear in mind, though, that on some of the platforms you can’t interact with the audience.
Have a look at the options and choose the one which suits you best .
If you have any questions about online presentations, or indeed about PowerPoint in general, please feel free to contact us on [email protected] .
Are you looking for visually supportive and professionally designed slide templates ? Feel free to have a look around our store. Here we have numerous slides prepared for you to download on a wide variety of (business) topics. Take a look today! ► To the store
You might also be interested in the following articles:
- PowerPoint Online
- Virtual presentations
- Body language while presenting
Share this post
- share
- save

Design Thinking: Problem Solving with a Difference

Why Corporate Mission Statements Are So Important

7 Tips & Learnings from the Apple Keynote
What are the ways that you can share your presentation so others can view it?
Discover various methods to share your presentation so others can easily view and access it.
Different Ways to Share Your PowerPoint Presentation
Method #1: uploading to google drive, step 1: save your powerpoint presentation.

Step 2: Upload to Google Drive

Step 3: Generate a Shareable Link

Step 4: Share the Link
Method #2: sharing directly from powerpoint, step 1: open your powerpoint presentation.

Step 2: Share as a Link

Step 3: Share the Link
Method #3: sending via email.

Step 2: Attach and Send via Email

Method #4: Using Online Platforms

Step 2: Upload to SlideShare

Frequently Asked Questions:
How do i ensure my powerpoint presentation remains private when sharing via google drive, can i share a powerpoint presentation directly from powerpoint if i don't have an internet connection, what are the file size limitations for sending a powerpoint presentation via email.
- Gmail: Up to 25 MB per email. If the file exceeds this limit, Gmail automatically uploads it to Google Drive and sends a link instead.
- Outlook: Up to 20 MB per email. Larger files can be sent via OneDrive with a link.
- Yahoo Mail: Up to 25 MB per email. Larger files can be sent using Dropbox integration.
- Other Email Clients: Check the specific file size limits as they can vary.
Create PPT using AI
Just Enter Topic, Youtube URL, PDF, or Text to get a beautiful PPT in seconds. Use the bulb for AI suggestions.
character count: 0 / 6000 (we can fetch data from google)
upload pdf, docx, .png
less than 2 min
Sanskar Tiwari
Founder at MagicSlides
What is the shortcut for opening a new presentation in PowerPoint
1 August 2024
How to apply a template to an existing presentation in PowerPoint
How to create a dos and donts slide in PowerPoint
How do I enable design ideas in PowerPoint?
How to delete a PowerPoint presentation completely
In a presentation, what is layout?
How to Create a QR Code for a PowerPoint Presentation
How to Email a PowerPoint Presentation
How can shapes enhance your PPT Presentation?
Stunning presentations in seconds with AI
Install MagicSlides app now and start creating beautiful presentations. It's free!

Get AI-Generated Presentations Ready in Seconds
Free AI PPT Tools
Presentation Guru
Five (plus one) ways to share a powerpoint presentation.

When you think of a PowerPoint presentation, slides on a projector or a large screen display come to mind. But, the typical classroom has changed. So has the conference room, for that matter.
If you’re giving a presentation, your audience may not even be in the same room as you. Instead of being on the other side of the table, they may be on the other side of the screen.
Moreover, if your presentation is vital to your organization or classroom, chances are your listeners will want copies.
In these circumstances, how do you effectively share your PowerPoint presentation with your audiences?
The short answer, you share your presentations online!
But, how? Previously, Presentation Guru covered a few easy-to-use web services for sharing PowerPoint presentations . In this article, we’re going to explore ways other than web services to share PowerPoint Presentations.
[This article contains affiliate links. For more information, see our disclosures here .]
One of the easiest ways to send presentations to your audience is by email. All you’ll need to do is compress the presentation or save a lower resolution copy to attach to the email, and then automate the sending process by setting up filters. For example, you can configure your email service to send your presentation to any incoming email with a subject that contains the word “Presentation”. Gmail is one of the most popular email services and offers a plethora of customization and filter features.
However, it can prove tricky if your presentation is very large, but here are a few quick steps to compress your presentation:
- Left click on the saved ppt file
- click on ‘ Add to Archive… ’
- Open the compressed file, click on a picture to access the Picture Tools menu.
- Click on Forma t menu.
- Click on Compress Picture icon .
- Uncheck “Apply only to this picture”
- Check “Delete cropped areas of pictures”
- Select “Email (96 ppi): minimize document size for sharing”
Now that the file is in a more manageable size, you can easily attach it to your email.
You can also email the presentation directly from PowerPoint to your contacts via File / Share .

However if the presentation contains classified information, email is not the safest option because your contacts can download and modify them. In which case, you hsould look at some of the other options available.
2) File Sharing Services
You can upload your presentation to any of the file sharing platforms out there, like Google Drive, Dropbox etc. and then share the link with people. This works best if you only have to send it to a limited number of people. On the other hand, the people you share the presentation with, will need PowerPoint to access it, or else some features of the presentation may not be displayed correctly.
3) Embed Code
You can use a code generated, for your slide deck, by a third party service such as Zamzar or PowerPoint to HTML 5 and paste it on your website. You can convert the presentation to HTML 5 or Flash via any number of free and paid convertors. Once uploaded to the hosting service, you get an embeddable code which you can use on your website. HTML5 gets better visibility across all browsers and gadgets than Flash, so HTML5 would be the better option of the two. That said, some PowerPoint features cannot be rendered properly through HTML5.
You can also create an HTML 5 version of your presentation to embed on a website directly from PowerPoint Online . Embed feature is only available with PowerPoint Online and not with the PC or Mac versions.
The first step to creating an embeddable link, is to save your presentation onto your OneDrive account. Next, you’ll need to sign in to PowerPoint Online and create the embeddable link.

4) Make it a Video to Publish on Youtube
Did you know? One third of online activity is spent watching videos . So, why not convert your presentation into a video people can easily watch? PowerPoint 2016 offers a feature to convert your presentations to video. You can then choose to upload the presentation video to your Youtube account, where you can also receive instant feedback from your audience in the form of comments, likes, shares, number of views etc directly under your video.

Other than PowerPoint itself, you can use different softwares, such as Movavi and ImTOO , to turn your presentation to video. They also offer you other cool features like voice over, music, animations etc.
5) Save as PDF
This one is as easy as it sounds. Just click on the ‘ Export ’ tab in the File menu, and then click on ‘ Create PDF/XPS Document ’. It’s that easy!

This is a great option when you’re presenting to an audience that might not have access to Microsoft PowerPoint. There is hardly any computer or smartphone that can’t open PDF files. All you’ll need to do is send the link or file from a hosting service to your audience. For example, upload your PDF presentation to DropBox, Google Drive or OneDrive etc. and then share the link with your audience.
Honorary Mention – Microsoft Broadcast Slide Show/Present Online Feature
Although we said we’d be sharing ways that don’t include web services, this one doesn’t exactly count as one because it’s built into PowerPoint itself. (Also, it wasn’t mentioned in our last article!)
Microsoft PowerPoint 2010 started offering the “Broadcast Slide Show” feature. It has since improved and become even easier to share with your viewers. It enables the presenters to invite their attendees online, via a link. When clicked, the link directs them to a real-time, web based viewing of the presentation. The presenter can pause and resume the slide show during broadcast. The attendees don’t need to have PowerPoint to view the presentation, all they need is a Windows Live ID to join the session.
However, to be able to use the ‘ Present Online ’ feature, you will need to have a Microsoft Office Pro or Business version of Office 365 .

Not only can your viewers attend your presentation through a browser, they can even download the presentation, if you opt for it.

Depending on your security preferences, the options we’ve outlined above are the easiest ways to share your PowerPoint presentations with your audience. Additionally, to make it even more convenient for your in-room attendees, you can create a QR code of your shareable presentation and display it on the big display screen or projector before the start of your presentation. This way, all you audience will need to do is scan the QR and access the presentation, without having to manually put in the link in their devices.
If you liked this you might also like
Best Web Services for Sharing Presentations Online
The Most Useful PowerPoint Add-ins for Better Presentations – how to share a slide library with colleagues
Advanced Features of PowerPoint 2016 – real time collaboration options
- Latest Posts
Rakiah Oneeb
Latest posts by rakiah oneeb ( see all ).
- The Most Reliable Places to Find Credible Data - 22nd January 2019
- 5 Apps To Make You a Better Public Speaker - 31st October 2018
- Choosing a Presentation Remote Control - 9th October 2018
- Five (Plus One) Ways to Share a PowerPoint Presentation - 11th September 2018
- 5 More Ways to Get Instant Feedback from Your Audience - 17th July 2018
Your email address will not be published. Required fields are marked *
Follow The Guru

Join our Mailing List
Join our mailing list to get monthly updates and your FREE copy of A Guide for Everyday Business Presentations

The Only PowerPoint Templates You’ll Ever Need
Anyone who has a story to tell follows the same three-act story structure to...
Due to recent expansions in US sanctions against Russia and Belarus as well as existing country-level sanctions in Iran, North Korea, Syria, Cuba, and the Crimea region (each a “sanctioned country”), Zapier will no longer be able to provide services in any sanctioned country starting September 12, 2024. These sanctions prohibit US companies from offering certain IT and enterprise software services in a sanctioned region.
Starting September 12, 2024, Zapier customers will no longer be able to access Zapier services from a sanctioned country. We understand this may be inconvenient and appreciate your understanding as we navigate these regulatory requirements.
How to share your Google Slides presentation
- Written by: Emma Trantham
- Categories: Google Slides
- Comments: 4

Wondering how to share a Google Slides presentation? Good news! It’s a pretty simple process. There are multiple ways of sharing a Google Slides deck. The right method for you will depend on how you’re going to deliver the slides, the required file type, and your audience. Do you want to share so that a colleague can proof-read and edit, or so that an online audience has the virtual equivalent of a handout?
As Google Slides exists completely online, sharing your presentation with others isn’t limited to an email attachment. This post will show you how to share Google Slides presentations in five ways, there’s definitely something here to meet your needs!
Share with people and groups
Publish to the web
Download as different file type
Email as attachment
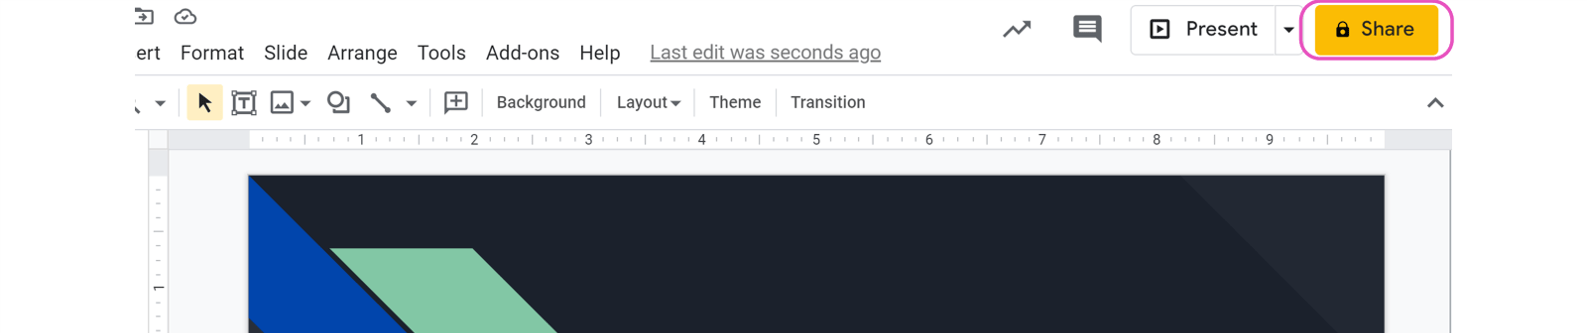
Before we get to that, you need to know where to find the Share function in Google Slides.
- Open Google Slides and click File , in the top bar
- Click Share at the top of the drop-down menu
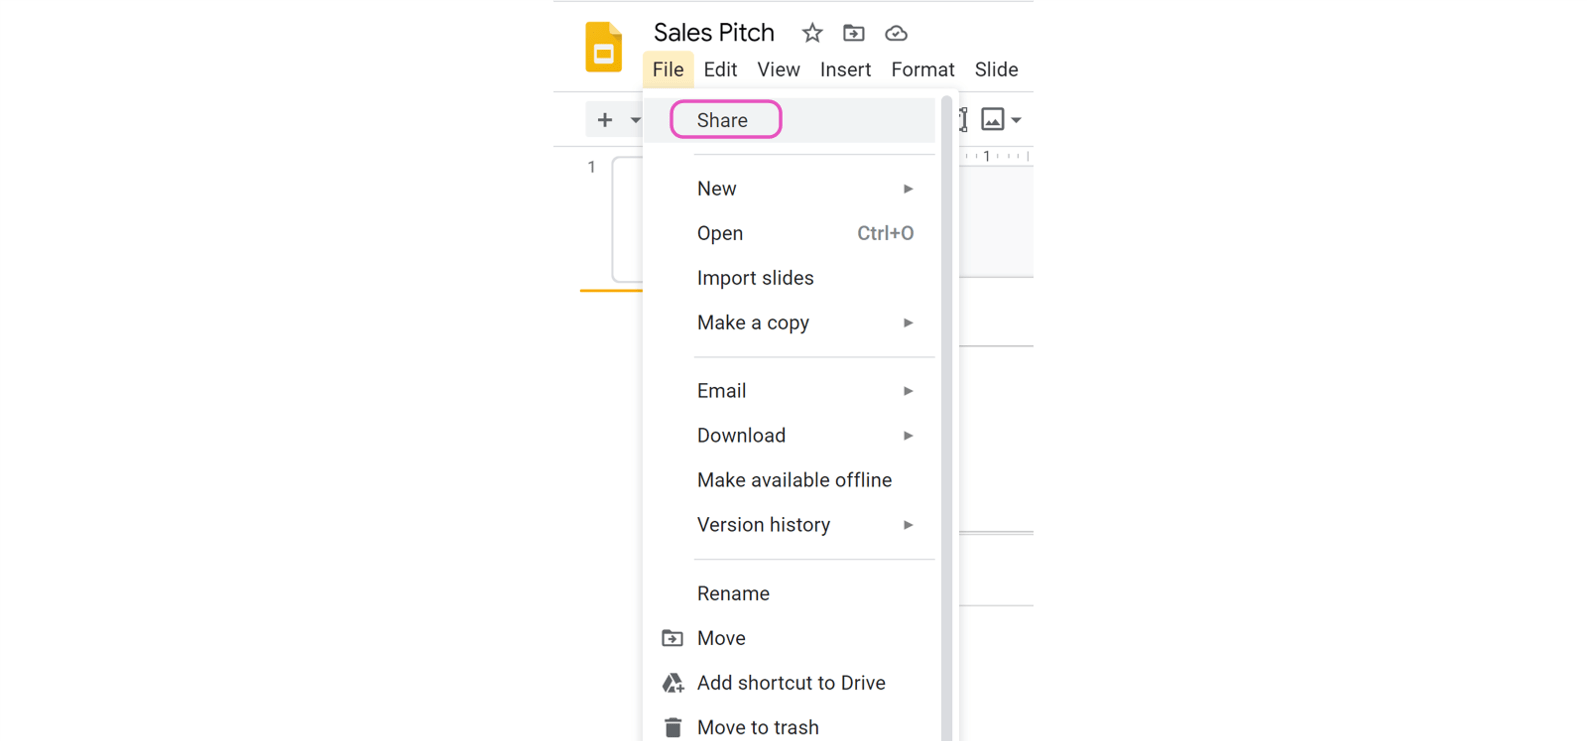
- Or, click Share at the top right-hand side of your window.
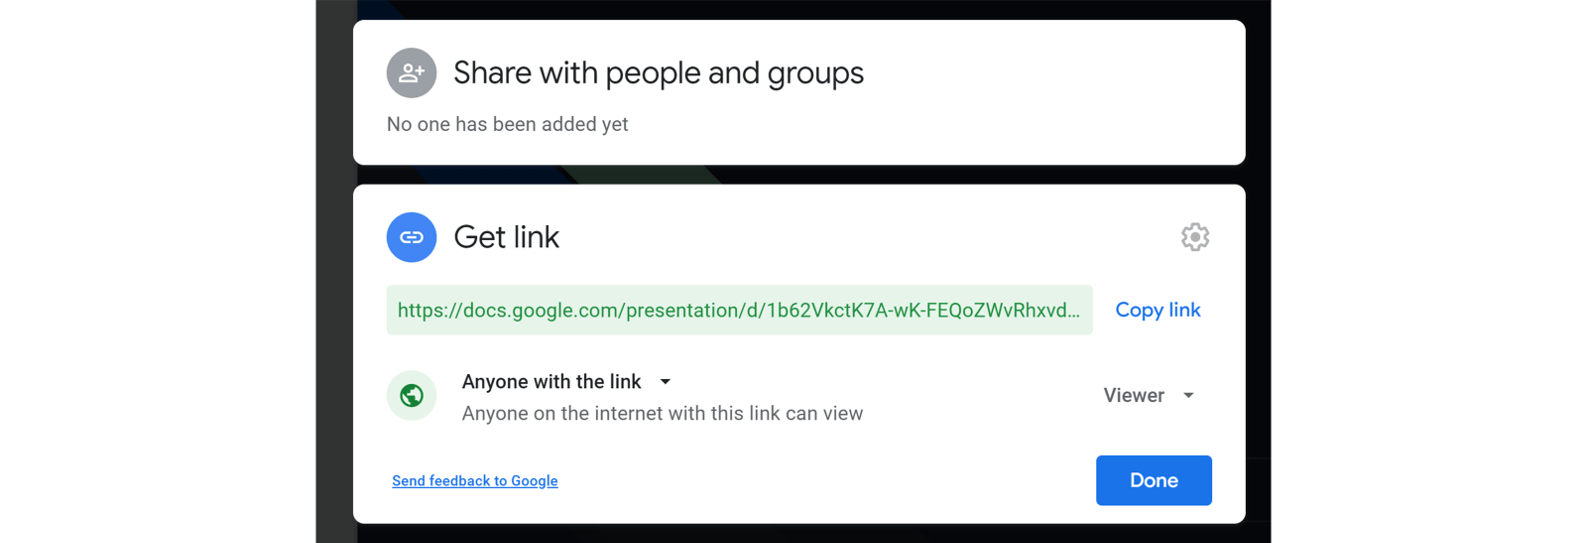
1. How to share Google Slides presentations with people and groups
Using Share with people and groups , you can share your Google Slides presentation with multiple people at once. This is helpful if your teammates need to collaborate in the same deck or if you require feedback from a colleague or client. Share with people and groups allows you to change the editing permissions per contact. You can allow each contact to simply view the document, or add comments, or edit it themselves. The level of permission you choose can be different for each contact you share with, giving you a lot of flexibility.
- Click Share to bring up the Share with people and groups pane.
- Next to Add people and groups , start typing the name or email address of the contact you want to share the deck with. A list of recommendations will appear as you type. Once you’ve selected the right contact, their name will appear at the top of the pane. If the person you want to share with is not already in your contact list, you need to type in their full email address.
- Click the small cross next to a contact name to deselect the contact.
When you share using Share with people and groups , Google will ask the user to log in to their Google account to access your shared file. If the user does not have a Google account, they will be unable to access your deck. Just head to the next section to find out how to grant access to non-Google users.
Now you’ve chosen your contact, you can alter their permissions to change how they are able to interact with the deck. There are three options – Viewer , Commenter , and Editor . Simply click on the option currently visible and a drop-down menu will appear allowing you to choose whether your contact can… well… view, comment on or edit the deck. Pretty self-explanatory, right?
But which permission should you give to who and when?
- Viewer: This will prevent contacts from editing slides. If your deck is completely finished and approved, set the permissions to Viewer to stop contacts accidentally editing – or even deleting – slides from your finished presentation!
- Commenter: The best option for gathering feedback. If your contact has limited knowledge of Google Slides, direct them towards our handy Ultimate Guide to Google Slides post so that they can brush up! In the meantime, share your deck using the Commenter function. This way, contacts can comment without being able to rearrange slides, or change text or animations.
- Editor: Perfect for collaborative projects. Editor allows you to share an editable version of your deck. Everyone with this permission can work on the same slides at the same time. This means you don’t end up with multiple versions of the same deck.
For more tips on how to improve collaboration in Google Slides, check out these 6 ways to get the most out of online collaboration with Google Slides .
Once you’ve selected one of these permission options, you’re free to hit Send . If you tick Notify people , your contact will receive an email letting them know that they have permission to access or interact with your deck.

In the Share with people and groups pane, the owner of the Google Slides presentation appears at the top. Beneath that, you can see who has access to the deck and the status of their permissions. If you want to change someone’s permissions, press the yellow Share button at any time and edit permissions using the same drop-down menu.
To stop sharing with a specific person:
- Click Share and scroll to the contact you want to remove
- Click the drop-down arrow next to their name
- Select Remove
- Click Save .
Notice the Give temporary access and Make owner options. If you choose to Give temporary access , you can edit the number of days that your contact has access to your deck. All you have to do is click the number of days next to Access expires to change the expiration date. This can be a great option if you’re working with people outside of your organization, such as clients or agencies. For example, you can schedule the expiration date for the end of a project, once the feedback has been received and the work completed.
Make owner allows you to pass ownership of the deck to another user. After you’ve created a presentation you might need to hand it over, to the presenter for example. You can use this option to give someone else complete control. Use it with caution, however. Once you’ve handed over ownership, you cannot retrieve it – unless the new owner hands it back or chooses to grant you access permissions.
Top tip: If you’re the owner of the deck (if you have created it yourself or have been given ownership by the original creator), there are further sharing options. When you click Share , you’ll notice a cog appears in the top right-hand corner pop up. This allows you to choose whether your Editors can change permissions and share or if Viewers and commenters can see the option to download, print, and copy. All you have to do is tick or untick the box. Easy!
2. How to share a Google Slides presentation via a link
In this window you can also get a link.
- Click the blue Copy link button.
- Paste the link anywhere, from an email draft to a Microsoft Teams chat
This link will only work for people who have been given permission to view, edit or comment on the deck. To change this:
- Click Share
- In the Get link section, press Change .
- Choose whether your deck is Restricted or if Anyone with the link can view. Note: when you change a link’s setting to Restricted , the only people who can still see the deck are those you have directly shared with in the Share with people and groups section.
Though the Anyone with link function can be useful, it’s not the most secure option. Remember: the users that you originally shared the link with can continue to share the link with their friends, colleagues, and contacts too, meaning your presentation can be shared endlessly and with anyone! If your deck contains confidential content, you should not use this method.
3. How to publish a Google Slides presentation to the web
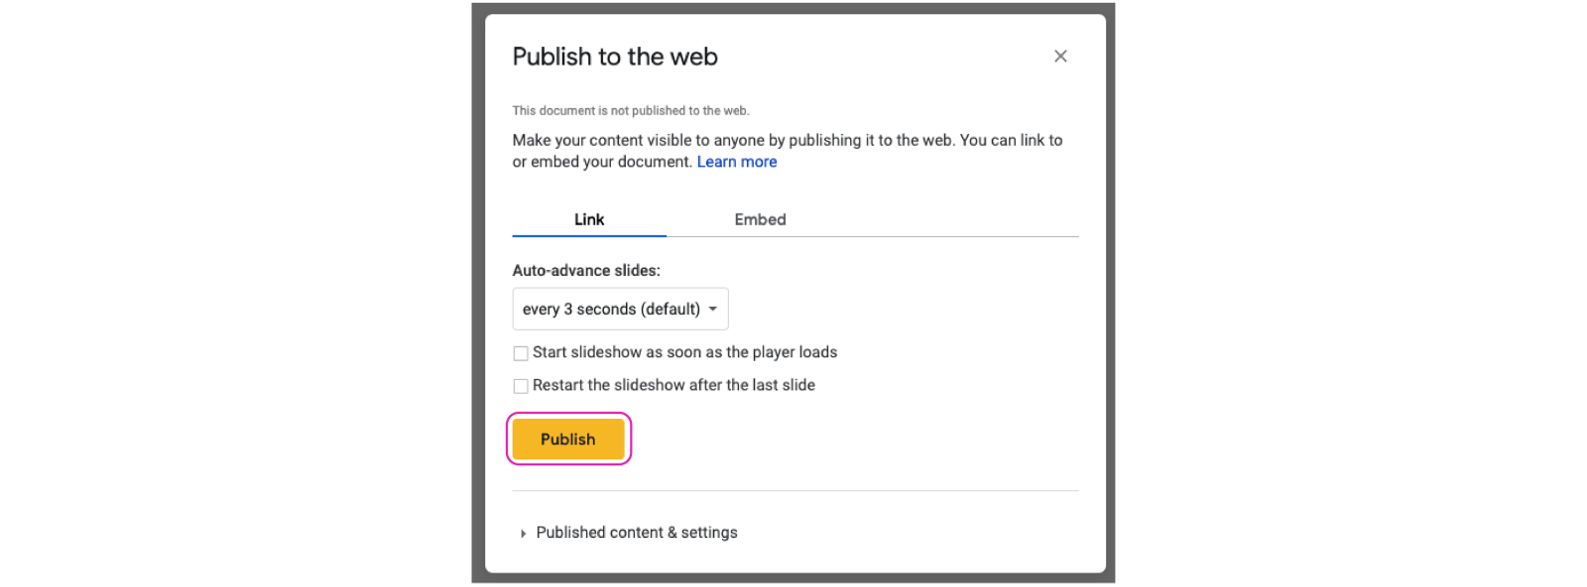
If you don’t want your viewers to edit your deck, then Share with groups and people may not be the option for you. Instead, choose to Publish to the web . With this option, your deck becomes non-editable, it will simply play as if your deck was a video; auto-advancing through the slides. This means that the viewer won’t have control over which slides they view or the order they view them in. The content of your slides will be visible to anyone and everyone when publishing to the web, so be careful about choosing this option if your slides contain confidential information.
- Click File
- Select Publish to the web
- Choose Link or Embed. You can share the URL with your contacts, or you can embed the link on a website or blog
- Choose how your slides playback using the drop-down menu beneath Auto-advance slides
- Click Publish
- Copy the URL or HTML and share your deck
4. How to download a Google Slides deck as different file type
Another method of sharing (or saving) your slides involves downloading the deck as a different type of file.
- Under File select Download .
- Select the format you need (Microsoft PowerPoint (.pptx), PDF Document (.pdf), or JPEG Image (.jpeg)), and the download will begin.
- Open your file
While there are many formats available, we don’t recommend all of them. For example, when downloading as an Image, whether PNG or JPEG, the quality of your slides can be lost, the presentation will be static, and you can only download one slide at a time. If you’re printing or emailing your deck, downloading as a PDF is the best option to get a static version of your slides.
Since PowerPoint is the closest option to Slides, this format retains the presentability of the deck. However, there’s a chance that your content will corrupt or break as not all features are transferable between file formats. Check for any changes and make tweaks – like removing animations – before sending your presentation to your contacts. To find out more about the differences between PowerPoint and Slides, check out 9 Google Slides features we wish PowerPoint had or if you want to try different platforms to PowerPoint, we recommend The ULTIMATE Guide to PowerPoint Alternatives .
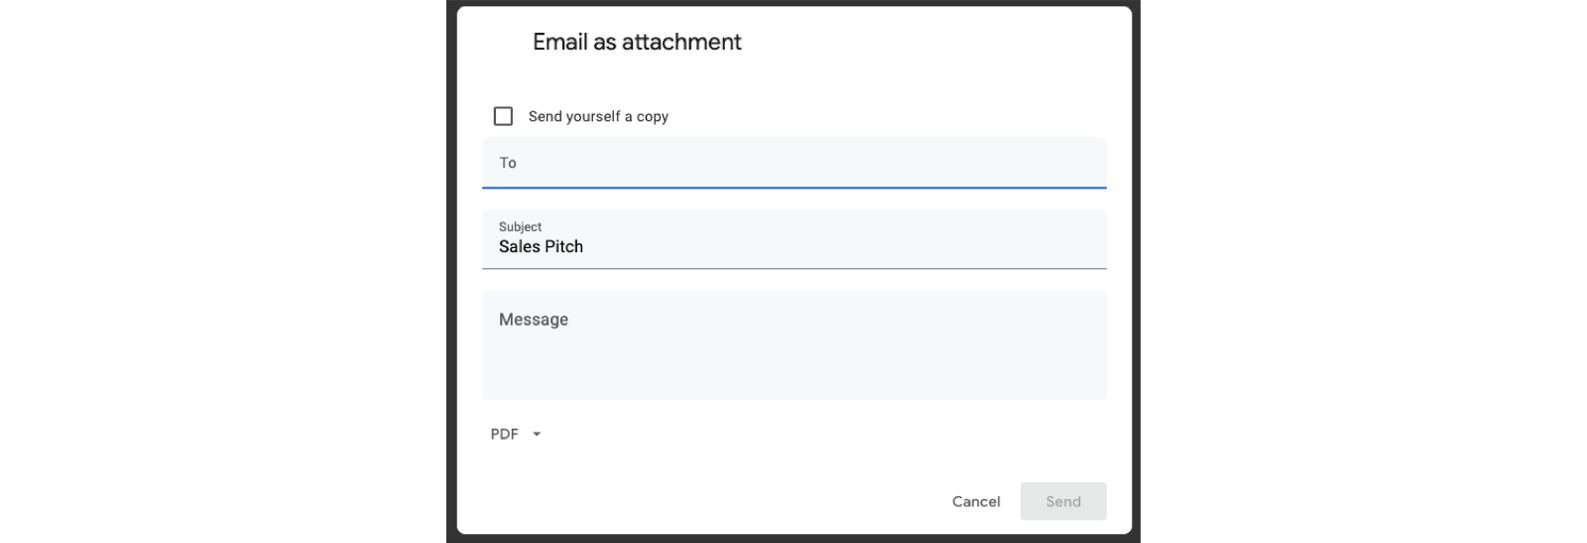
5. How to email your Google Slides presentations as an attachment
If all these sharing options still aren’t quite cutting it, there’s one more! To share your slides via email:
- Select Email as attachment
- Type the name or email address of your contact
- Pick the file type your deck
- Add a message, then hit Send
That’s the last of our five tips on how to share a Google Slides presentation. Now you know pretty much everything there is to know about sharing your slides and, if you want to make those slides even more awesome and effective, you have got to check out these 5 Google Slides video tutorials to level up your skills .

Emma Trantham
Principal consultant, related articles, how to present in google slides with present mode toolbar.
- Google Slides / Presentation skills
It takes time to create engaging, visual slides, so why undermine all your effort at the crunch point? Delivering a presentation properly really isn’t that tricky! With Google Slides’ Present mode toolbar, it’s super easy to present in Google Slides navigating your presentation effortlessly.

How to use Presenter view in Google Slides
- Comments: 5
For seasoned presenters and newbies alike, the move to online presenting comes with the joint complications of an online audience and unfamiliar tech. Talk about spinning plates! This blog post covers how to use Presenter view in Google Slides, so that you can be more professional and feel more confident.
Linking Google Slides and Google Keep
- Google Slides
If you're using Google Slides regularly then it's worth getting to know how you can integrate it with your other favorite Google Workspace programs - this time, Google Keep!

What is the name of piece that I attach to my chromebook that allows me to present Google slides
Hi Milton. I’m not sure what you mean – could you please clarify?
Hello, My PowerPoint contains an audio file. I uploaded it to Google Sites (new) and there’s no audio. So I uploaded my PowerPoint to Google Slides and inserted that into my Google portfolio Site hoping that would fix the problem. It didn’t. Can you tell me how to get the audio file to upload to my portfolio site, along with my slides? Thank you! Pam
Hi, I am looking for a way to have Google slides running on a laptop or tablet and instead of the presentation going to a screen, to go live i.e. as it would on a projecter in a URL that I can tell people about, so they can use it with their mobile phones, tablets etc. The sort of application would be for Carol singing, each slide would have no more than two lines to allow for large type and as it goes through the verses it shows on singers devices, one slide at a time. This of course would be outside, i.e. people would at best use mobile data, or if it would work for a larger number by wifi tethering (wifi provided by 1phone/tablet. Thank you, Sam
Join the BrightCarbon mailing list for monthly invites and resources
Thank you for today’s PowerPoint productivity masterclass. I’ve learned so much from BrightCarbon when it comes to PowerPoint. If there isn’t a BrightCarbon fan club already, I’ll be happy to start one! Kimm Babo Wegmans Food Markets

- Presentations
Online Presentation Maker for Engaging Presentations
Create Presentations

- Online presentation maker with 900+ slide layouts.
- Millions of images, icons and graphics to choose from.
- Dozens of chart types to visualize data and numbers.

Chosen by brands large and small
Our presentation maker is used by over 27,500,000 marketers, communicators, executives and educators from over 133 countries that include:
EASY TO EDIT
Presentation Templates
Avoid the trouble of having to search for just the right template or create your own slide design from scratch by tapping into our library of more than 900 slide design layouts for practically every content need, from diagrams, charts and maps to image collages and quote slides.

Create Presentations All Presentation Templates
Features of the Presentation Maker
Beautiful presentation themes.
Choose from one of our presentation themes with hundreds of available slide layouts for you to pick from and build a beautiful presentation. Find slide layouts to fit any type of information you need to communicate within your presentation and customize them to perfectly fit your brand or topic.

Build your presentation
With fully customizable slides, text blocks, data visualization tools, photos and icons to help tell your story, you can easily build creative and cool presentations as quickly as you need. Build the perfect slides with Visme’s easy-to-use presentation editor.

Customize every aspect of your presentation with your own images and text
Choose from over a million images, thousands of icons, dozens of charts and data widgets to visualize information in an engaging way. Apply a color scheme to all your slides with one click. Add animation effects, transitions, interactivity, pop-ups, rollovers and third-party content such as live websites and social media feeds.

Record yourself presenting
Once you’ve created your presentation, do more than only share or download it. With Visme’s Presenter Studio, you can record your presentation and share it with your audience.
- Record your screen, audio, and video, or switch off your camera for an audio-only presentation.
- Present asynchronously on your own time, at your own pace. Let your colleagues watch it at their convenience.
More Great Features of the Presentation Maker
- Stunning presentation themes and premade templates
- Millions of stock photos and icons to choose from
- Input your brand fonts and colors to create branded company content
- Easy drag-and-drop design tools, made with the non-designer in mind
- Search for slide layouts that match your presentation content
- Easily present online or share with your peers
Share Your Presentation
Visme makes it easy to create and share presentations online. Our presentation software allows you to present online by generating a link to access your presentation, share privately by sending a password protected link to friends and colleagues, or even turn your presentation into a lead generation tool by requiring email sign-in before viewing.

LEARN ABOUT PRESENTATIONS
What is a Presentation ?
A presentation is a sequence of slides that tell a story or teach an audience about a topic. These are often used in business as ways of demonstrating something and in the classroom as teaching aids. While PowerPoint long dominated the presentation industry, Visme’s free online presentation maker allows you to create even more beautiful and engaging content.
With Visme's engaging presentation maker, you can start with a template, dive into one of our themes with various slide ideas, or mix and match slides from different templates to create your own masterpiece.

Use the presentation maker to take the trouble out of presentation design.
Creating a slide deck for an important presentation can take several hours, if not days. Our free presentation maker provides a searchable slide library with 900+ layouts that you can fully customize. With so many options, you can easily find the exact slides that you need instead of searching for the right template or building a slide design from scratch.
EVERYTHING YOU NEED + MORE
More Than a Presentation Maker
Visme’s online presentation tools allow you to create an interactive online presentation that will blow your audience away. Add interactive elements, animate your slides and create a presentation that will have your viewers talking for days to come.
MAKE IT ENGAGING
Interactivity
Create interactive presentations with popup and rollover effects that allow your viewer to interact with your design to learn more information.

VISUALIZE YOUR DATA
Charts & Graphs
Share data, statistics, simple numbers and more in your presentation slides with Visme’s easy-to-use charts, graphs and other data widgets.

BEAUTIFY YOUR CONTENT
Stock Photos & Graphics
Choose from over a million stock photos, icons, illustrations, characters, lines, shapes and more to create an engaging presentation design.
HOW IT WORKS
Make Presentations in 5 Steps
Whether you’re creating a presentation to pitch your business, to inform your industry or to update your team or supervisors, you want your slideshow to be equal parts beautiful and informative. Visme makes it easy with our powerful presentation maker.
Mix and match template styles and slide ideas, customize with your own ideas, insert design elements from our asset library, present online with presenter notes and more.
- Sign up for free or log into your Visme account and create a new project.
- Choose one of our beautiful themes under the Presentations content category or select a pre-designed presentation template.
- Add new slides from our theme library to help guide your presentation design.
- Customize text boxes, fonts, colors, photos, icons, charts, data visualization tools and so much more within your slides.
- Quickly and easily share or present your slideshow by clicking Share in the top navigation bar and viewing our share options.
How to Use the Presentation Maker
Before creating your slide deck, make sure to create an outline with all the major points that you need to include within your presentation.
Start creating your slides. You can easily use our free presentation slides and templates to help you create a well-designed and informative presentation.
Easily replace any image with millions of free images within our editor, as well as diagrams, charts, icons, illustrations and maps.
Insert your own text by clicking on any text box and typing in your own information (or you can simply copy and paste it from your outline).
Our free presentation maker online also comes with built-in animation effects. Add transitions, audio, pop-ups, rollovers and interactive buttons to wow your audience.
Use the Presenter View to rehearse your delivery. Use the timer to make sure you don’t go over the allotted time. You can easily add presenter notes that only you will see while you present.
Generate a public or private URL to share with anyone or embed your slide deck on your website or blog by clicking the Share button in the Visme editor.
Download as an editable PowerPoint or in HTML5 to keep all of your animations and interactivity intact for offline presenting.
Who can benefit by using our presentation maker?
Business professionals.
- Create ready-to-use presentations instantly for important meetings or pitches
- Save time from designing and let AI do the work for you
- Customize templates to match your brand or industry
- Create interactive slides that keep your students engaged through sessions
- Break down complex topics with informative and fun presentations
- Design educational presentations in minutes, not hours
Sales Teams
- Create a library of customizable templates for team members to use
- Design slides that professionally showcase your products and services
- Customize presentations to suit different prospects and sales use cases
Consultants
- Generate presentations that will impress VCs and investors
- Use data-driven design to get the best presentation design options
- Create presentations that are built with your brand and mission in mind
Event Planners
- Design presentations to outline event schedules, details and budgets
- Generate easy-to-follow slides so teams are informed on event details or changes
- Prepare persuasive sponsorship decks without any design skills
- Save time and quickly craft client and prospect presentations
- Add strategies and recommendations with minimal design effort
- Customize each presentation to your client's branding
Questions About the Presentation Maker
How can i create an account with visme, how much does it cost to create a presentation with the presentation maker app, can i create animated projects, is it possible to make interactive projects with the presentation maker, how do i present my slide deck, how can i create a slide deck in a few minutes, what our users say about us.
“After trying tools like Canva and Adobe Spark, we picked Visme. Nothing else matched the flexibility, capabilities or ease of use.”
“Visme is cost efficient and helps in saving time. As a small organization, we have limited resources, and Visme has been a good solution for that.”
Your presentations deserve to be beautiful and so does the rest of your content
Sign Up Free
How-To Geek
How to share your powerpoint presentation.

Your changes have been saved
Email is sent
Email has already been sent
Please verify your email address.
You’ve reached your account maximum for followed topics.
Quick Links
Sharing your powerpoint presentation.
Aside from the traditional method of sending a PowerPoint presentation to others as an email attachment, you can also upload and share your presentation from the cloud. All you need to get started is a OneDrive account. Here’s how.
You can save a PowerPoint presentation to the cloud fairly easily. In fact, it takes only a few simple clicks. For this to work, though, you’ll need a OneDrive account. If you use Office 365, then you already have one. If not, all you need to do is create a Microsoft account and then sign in to OneDrive. This article will assume you already have a OneDrive account.
Related: How to Share Things from OneDrive
First, open the PowerPoint presentation that you’d like to share. At the top-right corner of the window, you’ll see a “Share” button. Go ahead and select it.

Once selected, the “Share” window will appear. You have a few different options here. In the “Attach a copy instead” group, you can choose to send your presentation as a PowerPoint or PDF attachment. Selecting either of these options will open your computer’s default mail client.
What we’re interested in, though, is sharing to OneDrive. To do this, select your OneDrive account under “Share.”

If you haven’t already named your presentation, you’ll be prompted to do so. After you give it a name, click “OK.”

Your presentation will now be uploaded to the cloud and the “Share” pane will appear on the right-hand side. This is where you can invite people to edit (or read) the document. In the address bar, enter the email of the recipient. Alternatively, select the icon to the right of the address bar and select a recipient from your Outlook address book.

After you’ve entered the recipient’s email, you can then assign a permission level. Once you’ve given read/write or read-only permission, you can then add an optional message. When you’re ready, click “Share.”

The recipient will receive an email providing access to the presentation.
Note: If you’re the recipient, be sure to check your spam folder! During our testing, we found the invitation in spam.
An alternative method for inviting people is to get a sharing link. At the bottom of the “Share” pane, select “Get a sharing link.”

Next, choose which type of link you’d like to provide. You can choose between a read/write link or read-only link.

A link will then be generated. Select “Copy” to copy the link to your clipboard.

Anyone you share this link with will then have access to the presentation. This will allow multiple people to collaborate on your presentation in real-time !
- Microsoft Office
- Office 2016
- Microsoft PowerPoint
- Help Center
- Get started
- Learn by product
- Learn by role & industry
- Hybrid workplace tips
- Gen AI tips
- Productivity tips
- Business tutorials
- Switch from Microsoft & others
- Support & accessibility
- Google Workspace
- Privacy Policy
- Terms of Service
- Submit feedback
- What's new?
- Get started Welcome Get ready to switch What to do on your first day Your first week & beyond Cheat sheets & reference guides Open Google Workspace apps
- Learn by product Calendar Chat Chrome browser Docs Drive Gemini Gmail Meet Sheets Slides Vids Managed teams Mobile & device setup All products
- Learn by role & industry Administrative assistants Digital marketing Finance Healthcare Human resources Law practices Manufacturing Media & entertainment Nonprofits Professional services Project management Research & development Retail Sales & marketing Technical support UX design Visual design Web development
- Hybrid workplace tips Hybrid work training & help Use Meet Companion mode Stay connected when working remotely Work from home Work with remote teams Plan & hold meetings from anywhere Hold large remote events Work with non-Google Workspace users
- Gen AI tips Generative AI training & help Get started with Gemini Use the Gemini side panel Gemini cheat sheet Role-specific prompts & use cases Tips for writing prompts for Gemini Gemini usage limits Learn about generative AI
- Productivity tips Set up business meetings Discuss topics with your team Brainstorm with colleagues Improve communication Make video conference calls Create great presentations Create strong proposals Onboard team members Optimize your inbox Analyze data Clean up data Go paperless
- Business tutorials Use generative AI at work Plan & manage a project Plan & hold meetings from anywhere Hold large remote events Stay connected when working remotely Collaborate with decision makers Share a final document Free up storage space Plan a project with external clients Delegate work when you're OOO Get up to speed after time off Additional training resources
- Switch from Microsoft & others Switch from Microsoft Switch from Slack Switch from Zoom, Skype, or Webex Switch from Box, Dropbox, or C:\ drive Switch from HCL Notes
- Support & accessibility Support for users Support for administrators Accessibility Save or customize Learning Center guides
Bring your best ideas to life with Gemini for Google Workspace. Get tips & real-life use cases for using gen AI at work .
Get started with Slides in Google Workspace
Share a presentation.
On this page
Present your slides, unshare a presentation, comment on a presentation, chat with collaborators in a presentation.
Want advanced Google Workspace features for your business?
Try Google Workspace today!
To present a full-screen presentation in Google Slides:
- Open a presentation in Google Slides .
- From the current slide, the presentation will become full screen. To change slides, use the arrow keys on your keyboard or click the arrows at the bottom of the presentation.
- To exit full-screen, press the Esc key.
View a presentation with speaker notes
- Click Presenter view .
- Click Speaker notes .
Do other actions while you're presenting
When you present, you can choose more options from the toolbar at the bottom of the presentation window:
- Select slides to present from a list
- Open "Presenter" view
- Turn on laser pointer
- Print the presentation
- Download the presentation in PDF or PPTX format
Share a presentation with specific people
- Up to 100: You can let up to 100 people with view, edit, or comment permissions work on a Google Docs, Sheets, or Slides file at the same time.
- 100 or more: When 100 people or more are accessing a file, only the owner and some users with editing permissions can edit the file. To let more than 100 people view your file at the same time, publish it as a web page instead .
- On your computer, go to Google Drive .
- If you use an eligible work or school account , click Add expiration to add an expiration date .
- Optional: Add a message to your notification email.
- If you don't want to notify people, uncheck the box.
- Click Send or Share .
Share a link to a presentation
You can choose if your file should be available to anyone or restricted to only the people with access. If you allow access to anyone with the link, your folder won't restrict who can access it.
- Select the file you want to share.
- Choose who can access the file.
- Learn more about how others view, comment, or edit files.
- Click Done .
Stop sharing a presentation you own
- Find the file or folder in Google Drive , Google Docs , Google Sheets , or Google Slides .
- Open or select the file or folder.
- Find the person you want to stop sharing with.
- Click Save .
Remove a link to a presentation you own
- Find the file or folder in Google Drive , Google Docs , Google Sheets , or Google Slides .
- Select Restricted .
- Click Done .
- On your computer, open a document, spreadsheet, or presentation.
- Highlight the text, images, cells, or slides you want to comment on.
- Type your comment.
- Click Comment .
- Enter your message in the chat box.
Note: All chats in Google Docs, Sheets, and Slides include anyone viewing the file. The chats aren't saved.
Google, Google Workspace, and related marks and logos are trademarks of Google LLC. All other company and product names are trademarks of the companies with which they are associated.
Was this helpful?
Learn how to print Learning Center guides, save them as PDFs, or customize them for your organization.
Free All-in-One Office Suite with PDF Editor
Edit Word, Excel, and PPT for FREE.
Read, edit, and convert PDFs with the powerful PDF toolkit.
Microsoft-like interface, easy to use.
Windows • MacOS • Linux • iOS • Android

- Articles of PPT
5 Easy Ways to Share Your Presentation so Others Can View It
Sharing your presentation with others has become essential to communication in professional and personal settings. Whether you're giving a business proposal, delivering a conference speech, or sharing a memorable travel experience, sharing your presentation effectively is crucial. However, many users are unaware of how to share PowerPoint presentations with others. What are the ways that you can share your presentation so others can view it? This article will guide you thoroughly on sharing the presentation and enables others to view the presentation.
Part 1: How to Share Presentations with Others to View? (5 Common Ways)
PowerPoint is a powerful application of Microsoft. With PowerPoint, you can create creative and professional-looking presentations. However, what to do if you want to share your presentation with others to view or edit it? We have researched and brought you five common and easy ways to share a PowerPoint presentation with others.
Method 1: Use WPS Office Presentation Service
WPS Office is the best alternative to Microsoft Office. It offers Microsoft Word, PowerPoint, PDF, and Excel on its application that can be used simultaneously. The software aims to boost users’ creativity and productivity.
Here’s how to use the WPS Office presentation service and share your PowerPoint presentation with others:
Step 1: Download the WPS Office application from its official website and install it on your Windows or Mac.
Step 2: Open the WPS Office application, click on presentation, and open a blank document.
Step 3: If you already have a presentation, you can click Menu in your right upper corner to open it, or else you’ll have to create and save a presentation.
Step 4: Go to Menu in your right upper corner, click Share, and a share and collaboration box will pop up.
Step 5: Copy the link, allow or disallow permission. You can also attach links to emails, send to mobiles or sync to mobiles of people you want to share presentations with. Once they open the link, they can view or edit it.
Method 2: Share Directly on PowerPoint
Did you know that you could share your PowerPoint presentation directly from PowerPoint? Well, yes, you can. Here’s how to do it:
Step 1: Open the PowerPoint application on your Windows or Mac.
Step 2: Click on the ribbon and the Share button. You’ll see a Send Link Box pop-up.
Step 3: You can use the drop-down to change permissions. Copy and send the link to people whom you want to share the presentation with.
Method 3: Save Your Presentation File as a PDF File
Another way to share your presentation is to save it as a PDF file and share it with others to view. Here’s how to save and share it as a PDF file:
Step 1: First, open the Microsoft PowerPoint application on your Windows or Mac.
Step 2: Simply open or create a PowerPoint presentation.
Step 3: Click on the File button in the upper right corner and click on the Save As button.
Step 4: Now, you’ll be asked for the document location where you want to save it and the format in which you want to save it.
Step 5: Click on Save As Type and choose PDF. Choose the location of the document and save it as PDF.
Step 6: Simply send the PDF PowerPoint to people you want to share the presentation with, and they can view it.
Method 4: Use a File-sharing Service
You can always use a file-sharing service to share your PowerPoint presentation with people to view or edit it. The most common file-sharing services are Google Drive, OneDrive, or DropBox. Here’s how to do it:
Step 1: Open the website or application of your file-sharing service company (Google Drive, OneDrive, or DropBox)
Step 2: Login or sign up first. Furthermore, click on the + sign or add a sign to add your PowerPoint presentation to the file-sharing service.
Step 3: You can share the link of the file-sharing service with people you want to share the presentation with.
Step 4: You can also convert your PowerPoint presentation to different file formats such as PDF, Mov, MP4, and JPEG and then upload it to the file-sharing service.
Method 5: Embed your Presentation on a Web Page
Embedding your presentation on a web page is possible. Embedding works best when you have a personal website or blog and want to share your PowerPoint presentation. Here’s how to do it:
Step 1: First, upload your PowerPoint presentation to a file-sharing service (Google Drive, One Drive) and click on share to see the embed option.
Step 2: You can convert your PowerPoint presentation into MP4 format and then upload it on YouTube.
Step 3: After uploading it on either YouTube or file sharing service, click the share button to see the Embed option.
Step 4: Click on Embed, and you’ll have the embed code of your presentation.
Step 5: Now paste this embed code on your website and share your PowerPoint presentation with your website or blog audience.
Use Word, Excel, and PPT for FREE, No Ads.
Boost your professional productivity by 10x with WPS's abundant free PPT templates.
Microsoft-like interface. Easy to learn. 100% Compatibility.
Part 2: Why is it Better to Share the Presentation Using WPS Office
WPS Office is the best alternative to Microsoft Office and its applications. It’s an office suite that enables users to use Word, Excel, PowerPoint, and PDF on a single application. This allows users to multitask by simultaneously using, creating, editing, saving, and sharing through four applications. WPS Office aims to boost the creativity and productivity of users through its user-friendly and simple interface.
WPS Office is a free software offering many advanced tools and functions essential for day-to-day and professional work. Moreover, customer support and help support makes the app better than Microsoft Office. The software is used by millions globally and’s compatible with Windows and Mac.
Steps to Edit Word/Excel/PowerPoint in WPS:
Step 1: Download the WPS Office through its official website and install it on your Windows or Mac.
Step 2: Open the application and sign up or log in to use it properly.
Step 3: Click on Word, Presentation, PDF, or Excel to start your work.
Step 4: Simply open a blank document and start creating it. You can open a file by clicking on Menu and Open.
Step 5: Create, edit, save, share, and do more efficiently. You can save and share through the Menu bar easily.
Part 3: Benefits of Sharing Your Presentation:
Expand Reach: Sharing your presentations digitally enables you to reach a broader audience than traditional methods.
Convenience: Gone are the days of carrying physical copies of your presentation. Digital sharing provides convenience and portability.
Real-time Access: With online sharing, your audience can access your presentation instantly from anywhere in the world
Better Communication: Sharing your PowerPoint presentation with others can improve communication.
Quality Check: When you share your presentation with others, and they view and edit it, it benefits in maintaining a good quality PowerPoint presentation. They can help you correct mistakes and errors, resulting in better presentation quality.
Continuity of Work: When you share your presentation with others and allow them to edit it, it’ll benefit you when you are unavailable or on sick leave. This will ensure that your work isn’t stopped and that your colleagues with whom you shared your presentation will continue the work.
1. Is it safe to share confidential presentations online?
Yes, by using secure file-sharing services with encryption and password protection, you can ensure the safety of your confidential presentations.
2. Are there any size limitations for sharing presentations through email attachments?
Most email providers have attachment size limitations. Consider using cloud storage and sharing the link if your presentation file is too large.
3. How do I send a large PowerPoint?
You can send or share an extensive PowerPoint presentation through the link. Simply click on the ribbon and on Share to access your presentation link.
4. How do I share a PowerPoint presentation on WhatsApp?
You can share a PowerPoint presentation on WhatsApp by sending a link or PDF file of your PowerPoint presentation. You can access the link in the ribbon and share box. You can save your PowerPoint presentation in PDF format by changing the File Type to PDF.
You learned five easy ways to share your presentation so others can view it. You can share your presentation as a link, PDF, or attachment through OneDrive, or upload an embed file on your website or blog. Moreover, we highlighted the benefits of sharing PowerPoint presentations. However, Microsoft Office isn't free. That’s where it’s the best alternative WPS Office.
WPS Office is similar to Microsoft Office. It’s an office suite that allows users to use Word, Excel, PowerPoint, and PDF on a single application. This allows users to multitask by simultaneously using, creating, editing, saving, and sharing through four applications. WPS Office aims to boost the creativity and productivity of users through its user-friendly and simple interface. It's used by millions globally and works perfectly on Windows and Mac. Don’t wait; download yours now!
- 1. How to Use Page Layout View in Excel (Easy Ways)
- 2. 3 Easy Ways to Share a PowerPoint on Google Drive
- 3. How to Share PowerPoint on Webex (Easy ways)
- 4. How to Enable Presenter View in WPS Presentation (Easy & Quick)
- 5. How to Share Your Presentation As A Link? (In Easy Methods)
- 6. 3 Effective Ways to Share a Large PowerPoint File

15 years of office industry experience, tech lover and copywriter. Follow me for product reviews, comparisons, and recommendations for new apps and software.
- Customer Help
- X (Twitter)
How to Share PowerPoint: A Comprehensive Guide
You’ve just finished crafting a brilliant PowerPoint presentation, and now it’s time to share it. But how exactly do you do that? Whether you’re collaborating with a team or presenting to an audience, sharing your work is essential. Let’s dive in and explore the different methods available to share your PowerPoint presentation.
Different Methods How to Share PowerPoint: A Step-by-Step Guide
Sharing a PowerPoint presentation can seem like a straightforward task. However, with multiple ways available, it’s essential to choose the method that best suits your needs. Here’s a detailed tutorial on different methods to share your presentation.
- Step 1: Open the presentation file you’d like to share in Microsoft Office.
- Step 2: Click on “File” located in the top-left corner of the ribbon.

- Step 4: Your default email client will open. Attach the file and enter the email address of the recipient.
- Step 5: Before you click send, ensure your presentation file size doesn’t exceed the email provider’s limits. If it does, consider other ways to share your presentation.
- Step 1: Open the presentation you’d like to share in PowerPoint.
- Step 2: Launch Microsoft Teams. If you haven’t used it, you might want to check Microsoft support for a quick guide.
- Step 3: In the top-right corner, click on the ‘Files’ tab.
- Step 4: Upload your presentation and then invite others to view or edit the presentation.

- Step 1: Open your presentation in PowerPoint.
- Step 2: Click on “File” in the upper left corner of the ribbon.

- Step 4: Once you’ve made your choice, save your file. Now, it’s easy to share your presentation as a video or PDF file with others.
- Step 1: Save a copy of your presentation in PowerPoint to your preferred cloud storage, such as OneDrive, Google Drive, or others.

- Step 3: Choose whether to ‘Send a copy’, ‘Send a link’, or ‘Share a link’.
- Step 4: Attach your file or link to your comment or email and send. Windows users might see this in the corner of the window, while Mac and PC users might find it in the corner of the screen.
- For those who’d like a visual guide, you can watch this video supported by Microsoft on how to share.
- Collaborate with others for real-time feedback. In PowerPoint Online or PowerPoint for the Web, click on the ‘Share’ button in the upper right corner of the screen, and invite collaborators.
By following these steps, you’ll make your presentations easily accessible to your audience, fostering better collaboration and understanding.
Creating and sharing presentations has never been easier with tools like PowerPoint 2016. Whether you’re in work or school, you can create a presentation, store it on OneDrive, and seamlessly share a presentation with others. Choose to send a link, send a copy, or convert your presentation as a PDF file. With the ‘click share’ feature, sharing with specific name or email address is straightforward. This information aims to make your collaborative efforts smoother, ensuring your audience can view your presentation or even provide feedback with ease. So, whenever you want to share a presentation, just remember these simplified steps.
Yes! You can save your presentation as a PDF or share it as a view-only link using Office 365.
Yes, most email providers have a limit, usually around 25MB. Consider using cloud storage or a link for larger files.
You can set permissions to ‘view-only’ or save your presentation as a PDF.
Absolutely! Just hide the slides you don’t want to share, save it as a new file, and then share.
When shared via certain cloud platforms like OneDrive, you can view activity reports and see who accessed the file.
You must be logged in to post a comment.
- Business articles (22)
- Google Slides (57)
- Keynote (27)
- PowerPoint (83)
- Support (2)

Work together on PowerPoint presentations
When you save your presentation to OneDrive or SharePoint in Microsoft 365 , you can work on it concurrently with your colleagues.
Share your file with others
To invite other people to access your PowerPoint file and collaborate, take these steps:

Use the drop-down list to indicate whether a recipient can edit the file or only can view the file. Optionally add a note.
To proceed, select Send .
Note: The Share dialog box offers an alternative option: Use the Copy link button and share the link. Anyone with the link can access the document with default permissions.
Collaboration
As others join you in working in your shared document, you can see evidence of their presence and activity.

To enable automatic display of full names (i.e., for Accessibility purposes) go to File > Options > Advanced > Display > Show presence flags for selected items

When you’re done working, simply save your file. If there are no conflicts in the revisions, they will be automatically merged.
Reviewing changes and resolving conflicts
When you close/exit your shared PowerPoint presentation file, you can review the recent changes and resolve any difference across the team’s edits.
Review all changes
Upon saving your file, all non-conflicting changes are automatically merged into your presentation. You can see these in the My Changes view.
Choose either My Changes or Changes by Others .

When you are done resolving conflicts, select Done .
More detail about conflicting changes

Communicate in the shared file via Comments, Tasks, and Chat
In addition to seeing each other’s slide revisions in real time, PowerPoint enables various team interactions within the presentation file.
Comments. To create, view, or respond to comments, use the Comments icon. You can reply to, resolve, or mark comments as complete. To learn more, see Add comments .
Tasks. A Task is a special kind of Comment that can be assigned and tracked to closure. To learn more, see add Tasks . Chat. (Microsoft 365 only) You can instantly chat with other people who are working in a presentation stored on OneDrive for work or school or SharePoint in Microsoft 365.
On the toolbar, at the right end, click the icon (picture or initials) of a collaborator who is currently working in the file.

Use the chat window to interact with everyone who is currently in the file.
Note: If another person subsequently opens the file to edit it, they can also join the chat. However, they will see only the new messages from that time forward, not the chat history.
Notifications upon reopening a changed file

See others’ recent revisions

Select the thumbnail to open the full-size slide.

Note: Recently revised slides are highlighted, but all revisions may not be indicated on the slide. Non-indicated revision types include notes pane changes, deletion of shapes, comment additions, and animation changes.
Access prior versions of a presentation
While you are working on files stored via OneDrive and OneDrive for work or school, Office preserves prior versions of them. For a specific file, you can view the list of prior versions and optionally restore a prior version.
View the prior-versions list
With the file open, take these steps:
Select the file name in the title bar of the app window.
Select Version History.

Open a prior version
In the Version History pane, select a previous version.
Select Open version .
View the read-only copy now displayed in a separate window.
More information about revision highlighting
Several factors can affect the extent to which revision highlighting occurs.
Revision highlighting works on shared documents that are stored in OneDrive and SharePoint.
Changes are not highlighted if the file is encrypted or password protected.
Changes are not highlighted if the file is in .odp format or the older PowerPoint .ppt or .pps format.
Changes are highlighted only when the person making the change is using PowerPoint for the web, or PowerPoint for Microsoft 365. (More specifically, at least version 1707 of Current Channel or version 1803 of Semi-Annual Enterprise Channel). Here is a link to Find your Office version .
Changes are not highlighted if revision data has been turned off for the document in the Trust Center Privacy Options . Privacy options NOT turned on If the privacy options are not turned on, the presentation will store the user's name and the time of the most recent edits to an object. If needed, you can remove that information via Document Inspector. Learn how in this article: Remove hidden data and personal information by inspecting documents, presentations, or workbooks . Privacy options ARE turned on If the privacy options are turned on, the revision highlighting gets turned off. Thus, there is no storage of person-related data (usernames and their recent access timing.)
Where the data is stored
In order to make revision highlighting possible, data about the read/unread status of individual slides is stored separately by PowerPoint. Where that data is stored depends on which version and channel of PowerPoint is in use.
Note: We are in the process of shifting towards storing that data in an online Microsoft service designed for saving user settings.
This table lists versions of PowerPoint and where each one stores the read/unread status data specific to each person who opens the file. Use this link to Find your Office version .
|
|
|
|
|---|---|---|
|
| between 1707 and 1710 | On PC disk, under the path: %appdata%\Microsoft\PowerPoint\SlideViewState This location is protected by the Windows Users folder; if you want to, you can manually delete the files that record your own read/unread status. |
|
| 1711 | Microsoft Online service |
|
| 1803 | Microsoft Online service |
|
| 16.11 | Microsoft Online service |
|
| 16.0.9001.2077 | Microsoft Online service |
|
| 2.9.108.0 | Microsoft Online service |
|
| 17.8827 | Microsoft Online service |
Do you miss Slide Libraries?
If you’d like to see Slide Libraries in PowerPoint, please send us your feedback. See How do I give feedback on Microsoft 365 . Your input will help us prioritize which features to include in future updates.
Share your presentation with others and collaborate on it at the same time

Note: If you'd rather not upload your presentation to your OneDrive or SharePoint, you can share it via an email attachment by selecting Send a Copy instead.
Enter the email address of the person you'd like to share the presentation with. If you already have the person's contact info stored, you can just enter the name. The control at the top lets you determine whether your invitees can edit the file or only can view the file.
Click Share . An email will be sent to your invitees.
See where others are working in your shared presentation
Open the presentation and start working in it.
If someone else is viewing or working in the presentation, their thumbnail picture appears in the top-right corner of the ribbon. PowerPoint alerts you when people enter or leave your presentation.

You'll also see the name of anyone viewing or editing the presentation in the Share pane. There's an indicator—on the thumbnail of the slide and in the actual slide—that shows where someone is working in the presentation. Hover over or select that indicator to find out who is editing.

(For accessibility, PowerPoint also allows you to turn on automatic display of the editor's name. Turn it on by selecting PowerPoint > Preferences > View > Show presence flags for selected items .)

When you’re done working, save your file.
If your updates and other authors’ updates don't conflict, they'll be merged automatically, and you don’t need to do anything else.
Notifications when you open a changed file
|
This feature is available only to for Windows desktop clients. |
After other people make changes to a shared presentation file, PowerPoint for Microsoft 365 for Mac notifies you when you re-open the file. A small banner tells you who has made changes to your presentation while you were away.

Tracking changes: Revisions by others are highlighted
PowerPoint for Microsoft 365 for Mac automatically keeps track of changes made in online documents.

When you re-open a changed presentation (or are in a file being actively edited by someone else), changed slides are highlighted in turquoise in the thumbnail pane. A tooltip says, "Slide has unread changes."

Select a thumbnail to look at the full-size slide. You'll see the changed portion of the slide outlined in turquoise. An accompanying notation tells you who made the change, and when. By looking at the revised slide, you clear away the turquoise highlighting and the "slide has unread changes" notation on that slide.
(There are some cases where a revised slide is highlighted, but the kind of change that has been made isn't outlined on the individual slide. Examples of such changes include: Changes in the Notes pane, deletion of a shape, addition of a comment, and animation changes.)

What determines whether changes are highlighted:
This feature works on shared documents stored in OneDrive and SharePoint.
Changes are highlighted only when the person who makes the change is using PowerPoint for the web, or PowerPoint for Microsoft 365 for Mac—at least version 16.11. Find your Office version
Changes aren't highlighted if the file is encrypted or password-protected.
Changes aren't highlighted if the file is in .odp format or the older PowerPoint .ppt or .pps format.
Communicate by using Comments

You can add a new comment or reply to or resolve existing comments.
( Microsoft 365 only ) Tag a colleague in a comment by using the @-sign followed by the person's name. That person receives an email message with a link to your comment. Clicking the link brings them into the document and into the conversation.

See previous versions of the file
Office preserves prior versions of your SharePoint, OneDrive, and OneDrive for work or school files while you’re working on them.
To open the list of the prior versions of a file, select the file name in the title bar of the app window, then select Browse Version History .
Version History is for viewing, not editing. You can see any prior version of a file.
To open a prior version:
In the Version History pane on the right, select Open Version in one of the version-history items.
A read-only copy of that version is opened in a separate PowerPoint window.
You can copy content from a prior version. You can also Save A Copy of a prior version so that you can edit it separately from the file you're currently working on.
Share a presentation with others

Add a message to your colleagues if you like.
Click Send .
When multiple people work in a file at the same time, indicators show you where they are:
Towards the top right corner of the window you'll see a badge - with their profile picture or initials - for each person who currently has the file open. Select that badge to see where in the slide deck they currently are.
On the thumbnail pane you'll see a label appear at the top right corner of the slide thumbnail with the name of the person currently on that slide.
See revisions made by other people
When you open a presentation that someone else has changed, PowerPoint tells you in two ways:
A While You Were Away message appears on the right side of the window.
In the slide thumbnail pane on the left, slides that have been revised are highlighted with a turquoise background.
When you open that slide, you'll also see a turquoise outline around the revised slide element. By looking at the revised slide, you clear away the turquoise highlighting and the "slide has unread changes" notation on that slide.
Confer by using Comments or Chat

Tag a colleague in a comment by using the @-sign followed by the person's name. That person receives an email message with a link to your comment. Clicking the link brings them into the document and into the conversation.

Use File > Info > Version History to open the list of the prior versions of a file.
Version History is for viewing, not editing. You can see any prior version of a file. You can copy content from a prior version. You can also Save A Copy of a prior version so that you can edit it separately from the file you're currently working on.
Rename a presentation file
You can rename a file in PowerPoint for the web while you're co-authoring with others.

Type a new name for the file. Or use the arrow keys to position the insertion point within the title, and then type your changes to the file name.
Press Enter when you're done.
In a moment, the name change syncs with other instances of the file that are currently open.

Need more help?
Want more options.
Explore subscription benefits, browse training courses, learn how to secure your device, and more.

Microsoft 365 subscription benefits

Microsoft 365 training

Microsoft security

Accessibility center
Communities help you ask and answer questions, give feedback, and hear from experts with rich knowledge.

Ask the Microsoft Community

Microsoft Tech Community

Windows Insiders
Microsoft 365 Insiders
Was this information helpful?
Thank you for your feedback.
COMMENTS
Present online. Click Slide Show > Present Online > Office Presentation Service. Select the Enable remote viewers to download the presentation check box if you want to allow your audience to download a copy of the presentation file. Click Connect. To send your meeting invitation to attendees, choose one of the following: Copy Link (so that you ...
Here's how to create a link for a PowerPoint: Click on Copy link on the same sharing window I showed you above. PowerPoint Online creates a URL that you can send to others to collaborate on the presentation with you. Create a link to view the PowerPoint presentation using the Get a link option.
Share and collaborate with PowerPoint for the web. Share your presentation. Select Share on the ribbon. Enter the names or email addresses of the people you want to share with. Or select the drop-down to change permissions. Allow editing is checked by default. To change permission to view only, uncheck this box and select Apply.
Share your PowerPoint presentation with others. Windows macOS. Select Share. If your presentation isn't already stored on OneDrive, select where to save your presentation to the cloud. Choose a permission level, like Anyone with a link, or maybe just people in your company. You can also control if people can edit or just view the doc.
1. Choose your presentation from the indicated area at the top of the page. 2. Wait a brief moment for the file to be uploaded to to our secure servers, then click the Share Your File button to open it in our online file viewer. 3. Click the Copy Link button at the top-right of the file viewer and paste the link wherever you wish to share the file.
Open the PowerPoint file you want to present. Start or join a Zoom meeting. Click Share Screen in the meeting controls. Select your monitor then click Share. (Optional) On the meeting controls menu, hover over You are screen sharing, then click the drop-down arrow , to view the screen shared with your participants.
Click the Present Online command. A dialog box will appear. Click Connect. A status message will appear as PowerPoint prepares your online presentation. A link will appear. If it's not already selected, select the link. Click Copy Link to make a copy of the link, which you can paste just about anywhere—including Facebook, a blog, or an email.
5. Share the Source File. Least sophisticated therefore highly popular, this method has its pros and cons. Indeed, you might be well off uploading your presentation on DropBox or Google Drive and sharing a link with a buddy. However, your buddies might not have PowerPoint installed.
The seven options are: Share your entire screen/desktop. Share the Slide Show window. Share the editing window with a clean look. Run the Slide Show in a window and share that window. Use the PowerPoint sharing option in Teams. Use Presenter View to show the audience your slides while you see Presenter View. Present with your video beside your ...
Live stream your presentation by clicking the Share option in the File tab, and then clicking Show Online. This opens a dialog box that displays the custom URL of your presentation. Simply copy the link and email it to your audience. When they receive the link, click Start Presentation and you can present to your audience in real time.
Step 2: Share as a Link. Generate a shareable link directly from PowerPoint. Click on "File" in the top-left corner. Select "Share" from the menu. Click on "Get a sharing link" or "Share with people." Choose "Anyone with the link can view" to ensure accessibility. Copy the generated link.
Open the compressed file, click on a picture to access the Picture Tools menu. Click on Forma t menu. Click on Compress Picture icon. In the compress picture box: Uncheck "Apply only to this picture". Check "Delete cropped areas of pictures". Select "Email (96 ppi): minimize document size for sharing". Click OK.
The easiest way to share a presentation is with your presentation app's built-in sharing and embed tools, something that comes with most online presentation apps today including Google Slides, PowerPoint Online, Keynote, Zoho Slides, Slides, Prezi, Microsoft Sway, Adobe Spark, Canva, Swipe, and Slidebean. Typically, these apps let you copy a ...
On Office Online, pick PowerPoint for the web. Under Let's Get Started, pick New blank presentation. To name your presentation file, on the orange Top Bar, select the existing file name, such as Presentation1, and type a new file name. Begin creating your presentation. Note: PowerPoint for the web automatically saves your changes as you go, and ...
Email as attachment. Before we get to that, you need to know where to find the Share function in Google Slides. Open Google Slides and click File, in the top bar. Click Share at the top of the drop-down menu. Or, click Share at the top right-hand side of your window. 1.
With Visme's Presenter Studio, you can record your presentation and share it with your audience. Record your screen, audio, and video, or switch off your camera for an audio-only presentation. Present asynchronously on your own time, at your own pace. Let your colleagues watch it at their convenience. Create Your Presentation.
Step 1: Open your PowerPoint presentation and click on the File tab. Step 2: Click on Share and then select Email. Step 3: Choose one of the options, such as Send as Attachment, Send a Link, or Send as PDF. Step 4: Enter the email address of the recipient, and add a subject and a message if you want.
First, open the PowerPoint presentation that you'd like to share. At the top-right corner of the window, you'll see a "Share" button. Go ahead and select it. Once selected, the "Share" window will appear. You have a few different options here. In the "Attach a copy instead" group, you can choose to send your presentation as a ...
Remove a link to a presentation you own. Find the file or folder in Google Drive, Google Docs, Google Sheets, or Google Slides. Open or select the file or folder. Click Share or Share Copy link . Under "General access", click the Down arrow . Select Restricted.
Present your slides. If you're already in a Teams meeting, select Share and then under the PowerPoint Live section, choose the PowerPoint file you're wanting to present. If you don't see the file in the list, select Browse OneDrive or Browse my computer. If your presentation is already open in PowerPoint for Windows or Mac, go to the file ...
Here's how to do it: Step 1: Open the PowerPoint application on your Windows or Mac. Step 2: Click on the ribbon and the Share button. You'll see a Send Link Box pop-up. Step 3: You can use the drop-down to change permissions. Copy and send the link to people whom you want to share the presentation with.
Share Using a Link with Microsoft 365. Step 1: Make sure your presentation is saved to the cloud, preferably on OneDrive or SharePoint. Step 2: In PowerPoint, click on "File" and select 'Share'. Step 3: Choose 'Share with people'. Step 4: Set your desired permission level - whether you'd like others to edit or just view.
Hello! We are excited to announce Steam Families is now available for all users. Steam Families is a collection of new and existing family-related features. It replaces both Steam Family Sharing and Steam Family View, giving you a single location to manage which games your family can access and when they can play. Create a Steam Family To get started, you can create a Steam Family and then ...
Chat. (Microsoft 365 only) You can instantly chat with other people who are working in a presentation stored on OneDrive for work or school or SharePoint in Microsoft 365. On the toolbar, at the right end, click the icon (picture or initials) of a collaborator who is currently working in the file. On the menu that appears, select Join Group Chat.