How-To Geek
How to screen share a powerpoint presentation in zoom.
Giving a presentation over Zoom? No biggie. You can easily present your slideshow by using the screen share feature. Here's how.

Quick Links
Grant access to share screens in zoom, screen share a powerpoint presentation in zoom.
No matter where you work, meetings all have one thing in common: PowerPoint presentations. If you use Zoom, you can easily present your slideshow to the participants by sharing your screen . Here's how it's done.
If you're the host of the Zoom meeting , you'll be able to share your screen without issue. However, if you're joining a meeting that you aren't the host of, you may need to request permission from the host to be able to share your screen.
As a general rule, we recommend that hosts disable the screen-share feature for participants by default for security reasons . If you aren't the host of the meeting, be sure to reach out to the host in advance to request permission to share your screen during the Zoom call. Hosts can always enable the feature during the call, but it's always good to be a step ahead.
If you're the host of the meeting and someone is requesting permission to share their screen during the meeting, click the up arrow next to "Share Screen" at the bottom of the window.
In the menu that appears, click "Advanced Sharing Options."
The "Advanced Sharing Options" window will appear. In the "Who Can Share" section, click the bubble next to "All Participants."
All participants in the meeting can now share their screen.
To screen share your PowerPoint presentation, go ahead and open the PowerPoint presentation that you would like to present. However, before you put the presentation in Slide Show view, you'll want to share your screen. At the bottom of the Zoom meeting window, click "Share Screen."
If you're using a single monitor, you will immediately start sharing your screen. If you're using dual monitors , you'll need to click the screen that your presentation will be shared on. In our case, that will be "Screen 2."
To begin sharing that screen, click "Share" at the bottom-right corner of the screen select window.
You're now sharing your screen. Now, in Microsoft PowerPoint, select the "Slide Show View" icon in the bottom-right corner of the application.
From here, deliver your presentation as though you were standing in front of a live audience.
If you are giving a big presentation through Zoom, you're not going to just jump straight into it. You may need to speak to the audience a bit before sharing your screen. If so, here are a few tips on how to look better on your Zoom call .
- Get One: Tornado Alert Apps
- The Best Tech Gifts Under $100
How to Share a PowerPoint on Zoom
Share your screen, whether or not you're the presenter
:max_bytes(150000):strip_icc():format(webp)/DanSeitz-212239-b7461a6af1964919a88b89c04d193d8c.jpg "powerpoint presentation through zoom")
- University of Vermont, Emerson College
:max_bytes(150000):strip_icc():format(webp)/headshot-00415ba557444a8a9b6bb139498b97c5.jpg "powerpoint presentation through zoom")
- The Ultimate Guide to Shopping Online
- The Ultimate Guide to Online Learning at Home
- The Ultimate Guide to Skype
What to Know
- Anybody can share a PowerPoint on a Zoom call but may need permission from the call’s organizer.
- To see notes, you’ll need a second screen to divide the view or have your notes on a separate device.
In this article, we’ll discuss how to share a PowerPoint, or any presentation, on Zoom. You can do this in a few clicks for more straightforward presentations, but for more complex presentations, you may want some more tools.
How Do You Share a PowerPoint in a Zoom Meeting?
For a presentation where you don’t need to see your notes, sharing a PowerPoint is a quick process.
Open your presentation, and close any windows you won't need. This will limit clutter and distractions.
Log into your Zoom call and when you’re ready to present, click Share Screen at the bottom. Choose your presentation from the menu.
When using a single screen, you should always pick the specific program you want to share. Doing this will protect your data and prevent pop-ups and other interruptions.
Go to the Slide Show tab in PowerPoint and click From Beginning . For the smoothest presentation, do this before anyone else joins the call, where possible.
Use the controls in the lower left-hand corner or keyboard controls to move through your presentation as usual.
Be sure to click on the Presentation window if you’re going to use keyboard controls. PowerPoint won’t acknowledge inputs from the keyboard unless you’ve deliberately clicked on the window.
How Do You Share a PowerPoint With Zoom and Still See Notes?
The best way to see your notes is to use a second monitor and PowerPoint’s Presenter View tools. Then your notes and controls are on one screen, visible only to you, and your presentation is on the other.
Open your PowerPoint and go to Presenter View to see your notes . This mode opens two windows: The presentation and the control panel.
Drag the control panel to your primary screen and the presentation window to your second screen. You’ll be able to see and control your presentation while looking directly into your webcam if you’re using it, and you won’t have to hold your neck at an angle to use the controls.
Log into the Zoom call and click Share Screen at the bottom. Choose your presentation window.
If you’ll need to present other documents or materials in addition to your presentation, have them open and minimized on your screen and share your second monitor instead. Then you can quickly bring those materials up without disrupting your flow.
Tips for a Better Zoom Presentation
If you're not the call organizer, contact them and ask what permissions they've set up and whether you'll need permission to share your screen.
For meetings with multiple people sharing the same presentation, book a call a day before and practice "handing off" control of the slides in Zoom. Alternately, the person sharing their screen should prepare to move to the next slide when cued. Everyone should also have an up-to-date copy of the presentation, so it can continue if somebody drops out of the meeting.
Keeping Murphy's Law in mind, having your notes in one or two other places is a good idea. Consider using your phone and a printed copy to ensure that you can rely on one of the two additional sources for your notes if everything goes wrong.
To record yourself giving a PowerPoint presentation on Zoom, launch Zoom and PowerPoint; be sure to close all other applications. Create a new Zoom meeting, select Share Screen , select your PowerPoint presentation, and click Share . Launch your PowerPoint slideshow. In Zoom, choose Record > Record on This Computer . Your computer is now recording.
Join the Zoom meeting from your iPad using Zoom's mobile app for iOS. Open your PowerPoint presentation and tap Share Content from the meeting controls. You can use PowerPoint's annotation and drawing tools to make notations on your slides if you like.
Get the Latest Tech News Delivered Every Day
- How to Share a Screen on Zoom
- How to Share Audio on Zoom
- How to Create a Microsoft Sway Presentation
- How to Use Speaker Notes in PowerPoint
- How to Share Screen on Zoom on an iPad
- How to Share a Screen on Google Meet
- How to Fix It When a Zoom Camera Is Not Working
- How to Hide and Unhide a Slide in PowerPoint
- How to Share Your Screen on Microsoft Teams
- How to Add Animation to PowerPoint
- How to Cast a Zoom Meeting to Your TV
- How to Make Someone a Presenter on Skype
- How to Screen Share on Discord
- How to Screen Share on a Mac
- An Introduction to PowerPoint
- How to Merge PowerPoints
How to Present PowerPoint Slides in Zoom
Got a presentation coming up? Here's how to share your PowerPoint slides in Zoom and engage your audience.
Preparing to present PowerPoint slides in Zoom for the first time can feel overwhelming. It's a different experience than face-to-face presentations, and naturally, you want to get it right. But don't worry, we've all been there, and we're here to help.
In this article, we’ll guide you through the process step-by-step, so you can deliver your presentation with confidence and avoid awkward pitfalls. Let’s dive in.
Present PowerPoint Slides in Zoom by Sharing Your Entire Screen
One of the easiest ways to share your PowerPoint slide deck is by sharing your entire screen. Here’s how to go about it.
- Open your PowerPoint presentation.
- Start or Join a Zoom meeting . Knowing how to use Zoom like an expert makes this step easy.
When you hide the toolbar, it may appear as a minimized window in your taskbar. Click the window icon to reveal it when you’re ready to stop sharing.
- Press the Esc key on your keyboard to exit the slideshow after your presentation.
- Click Stop sharing .
Sharing your entire screen lets you seamlessly switch between your PowerPoint window and other windows while bringing your audience along. However, it has a downside—your audience will see sensitive details or notifications if they pop up.
Present PowerPoint Slides in Zoom by Sharing a Window
With this method, you share only your PowerPoint window, so your audience won't see other areas of your desktop, including popup notifications. Here’s how to get it done.
- Join the Zoom meeting.
Ensure your PowerPoint window is maximized and running in the background, or it won't appear under the Window tab.
- Click Stop sharing or Stop share when you’re done presenting.
This method is perfect for multi-tasking—that is, sharing your PowerPoint window while viewing your notes (in a separate document) or seeing what’s happening in Zoom.
Rock Your PowerPoint Presentation in Zoom Like a Pro
And that's a wrap! You now know all the key steps to present PowerPoint slides effectively in Zoom. Remember, you have two main options: share your entire screen when you need to switch between different windows during the presentation or share a specific PowerPoint window if you're multitasking and want to keep the rest of your desktop private.
Practice using these features before your next presentation, so you're comfortable and ready. Alongside this, using a whiteboard in Zoom can make your presentations more interesting.
How to Share PowerPoint on Zoom or Teams (Live PowerPoint)
Whether you’re delivering a pitch, teaching a class, or sharing insights with your team remotely, the ability to seamlessly share your PowerPoint presentations via online meeting platforms like Zoom and Microsoft Teams is crucial.
In this guide, we will walk you through the steps to share your PowerPoint slideshows on Zoom and Microsoft Teams efficiently and will also offer tips to ensure your presentations go smoothly.
We will walk you through the process, step-by-step. Let’s dive in.
2 Million+ PowerPoint Templates, Themes, Graphics + More
Download thousands of PowerPoint templates, and many other design elements, with a monthly Envato Elements membership. It starts at $16 per month, and gives you unlimited access to a growing library of over 2,000,000 presentation templates, fonts, photos, graphics, and more.

Modern PPT Templates
New & innovative.

Ciri Template

BeMind Minimal Template

Maximus Template

Pitch Deck Templates
Startup pitch deck.

Minimal PPT Templates
Clean & clear.
Explore PowerPoint Templates
How to Share PowerPoint on Zoom
First, let’s see how to share a PowerPoint presentation on Zoom.
Step 1: Join or Start a Zoom Meeting

Begin by joining an existing meeting or starting a new one. Once you’re in the meeting, ensure your PowerPoint presentation is open on your computer.
Step 2: Share Your Screen

Look for the “Share Screen” button in the Zoom toolbar, usually located at the bottom of the meeting window. Click it to open the screen-sharing options.
Step 3: Select Your PowerPoint Window

In the screen sharing menu, you’ll see all the windows you have open. Select the window that displays your PowerPoint presentation. If you want to share sound from your presentation, don’t forget to check the “Share computer sound” option. Then, click “Share.”
Step 4: Present Your PowerPoint

Once you’ve shared your screen, start your PowerPoint slideshow as you normally would. Your participants will now see your presentation in full screen.
How to Share PowerPoint on Microsoft Teams
If you’re using Microsoft Teams, here’s how to share your PowerPoint presentation.
Step 1: Join or Start a Teams Meeting
Similar to Zoom, the first step is to join or start a meeting in Microsoft Teams. Have your PowerPoint presentation ready to go on your device.
Step 2: Share Content

In the Teams meeting controls, find and click on the “Share content” icon, which looks like an upward-pointing arrow or a square depending on the version.
Step 3: Choose Your PowerPoint File

Teams offers the option to share a PowerPoint file directly. If your presentation is recent, you might see it under the “PowerPoint” section. If not, you can browse for your file by selecting “Browse” and then either “Upload from my computer” or “OneDrive” if your file is stored in the cloud.
Step 4: Navigate Your Slides
After selecting your presentation, it will open in Teams. You can navigate through your slides using the arrow keys or the slide navigator within Teams. This method allows your participants to interact with the presentation if you’ve granted them permission.
10+ Tips for Sharing PowerPoint Presentations
1. check your internet connection.
A stable internet connection is crucial for uninterrupted presentations. Consider using a wired connection for better stability and to reduce the likelihood of connection issues.
2. Close Unnecessary Applications
Close all applications and browser tabs you don’t need during your presentation. This not only helps in reducing distractions but also conserves your computer’s resources, ensuring smoother performance.
3. Use Dual Monitors If Possible
Using dual monitors allows you to have your presentation on one screen and your meeting platform with notes on the other. This setup helps you manage your presentation more effectively while maintaining eye contact with your camera.
4. Familiarize Yourself with Platform Features
Take time to explore and understand the specific features of Zoom or Teams, such as how to switch between presentation modes or how to use in-meeting chat. This knowledge can help you navigate the platform confidently during your presentation.
5. Engage Your Audience
Keep your audience engaged by using interactive elements such as polls, Q&A sessions, or breakout rooms for discussions. Interaction helps maintain attention and fosters a more dynamic and memorable presentation.
6. Practice Screen Sharing Beforehand
Conduct a practice session to familiarize yourself with the screen-sharing process and to check the visibility and readability of your slides. This rehearsal can help you feel more confident and minimize technical glitches.
7. Have a Backup Plan
Prepare for the unexpected by having a backup of your presentation and any necessary platform alternatives ready. Whether it’s a PDF version of your slides or a secondary presentation tool, being prepared can save the day.
8. Optimize Your Presentation for Screen Sharing
Design your slides with screen sharing in mind. Use large, readable fonts and high-contrast colors to ensure your content is easily visible to all participants, even on smaller screens.
9. Mute Notifications
Turn off notifications on your computer and any other devices to prevent disruptions during your presentation. This includes email alerts, message pop-ups, and other notifications that could distract you or your audience.
10. Direct Attention with Annotations
Both Zoom and Teams offer annotation tools that allow you to draw attention to specific parts of your slide. Use these tools sparingly to highlight key points or to guide your audience through complex diagrams.
11. Share Only What’s Necessary
When sharing your screen, select the option to share only the PowerPoint window rather than your entire screen. This approach keeps your presentation focused and prevents accidental sharing of private information.
12. Ensure Good Audio and Lighting
Good audio and lighting are essential for keeping your audience engaged. Use an external microphone if possible, and position yourself in a well-lit area, ideally with the light source in front of you, to improve visibility.
Mastering the art of sharing PowerPoint presentations on Zoom and Teams can greatly enhance the impact and effectiveness of your virtual meetings.
By following the steps and tips outlined in this guide, you’ll be well-equipped to deliver engaging, seamless presentations that captivate your audience and communicate your message clearly.
Search results for
Affiliate links on Android Authority may earn us a commission. Learn more.
How to share PowerPoint presentations on Zoom
Published on March 1, 2023
A quality PowerPoint presentation can add immeasurably to an online meeting, so it’s essential to know how to share PowerPoint on Zoom . You can even check your notes while your meeting partners see your presentation. The only prerequisite is having permission to share your screen with the meeting. If you scheduled the meeting, then there’s no need to ask. But if it isn’t your meeting, you’ll need to ensure whoever called the meeting allows other participants to share their screens. Then follow the instructions below, and you can share your carefully constructed PowerPoint presentation over Zoom.
QUICK ANSWER
To share a PowerPoint presentation on Zoom, open your PowerPoint presentation and select the Slide Show tab. Start the slide show by clicking From Beginning. In Zoom, click the Share Screen button, and select the PowerPoint slideshow window. Click Share to begin sharing this window with the meeting.
KEY SECTIONS
How to present PowerPoint on Zoom with notes
First, open the presentation you want to share in PowerPoint and open the Slide Show tab. Click Set Up Slide Show.

The menu that comes up will let you set important parameters for your presentation. You can choose:
- Whether to present in a window or full-screen.
- Whether to operate the presentation manually or let it run automatically.
- Which monitor will have the presentation on it (for multiple-monitor setups.)
Set your preferences and click OK.

Next, open Zoom and either set up or join a meeting (again, make sure you have permission to share.) Click the Share Screen button at the bottom.

Use the menu that comes up to choose which window you want to share. You can also choose to share or not share audio in this window. Choose the PowerPoint window and click the blue Share button.

You will now be sharing your PowerPoint window with the meeting. Click one of the Begin Slide Show buttons in PowerPoint to begin your presentation.

At the top of the screen, there will be controls for screen sharing. When your slide show ends, click Stop Share to return to the meeting.

Presenting a PowerPoint presentation on Zoom works great with pre-recorded narrations. But what if you want to use your PowerPoint notes as you present live?
There are two situations to consider when you want to use your notes as you proceed through the slides in your presentation. One situation is when you have two monitors (a monitor and a projector), and the other is when you only have one screen.
With two monitors
It’s easy to see your notes when you have two screens to work with. Begin in PowerPoint by clicking Set Up Slide Show.
Set your show type to Presented by a speaker (full screen). Decide whether to advance through the slides manually or by using timings, and click OK. Now go to the Slide Show menu in PowerPoint and click the box that says Use Presenter View. Select the monitor to display the presentation in the drop-down box above it.

Now it’s time to start or join a Zoom meeting. When in the meeting, click Share Screen at the bottom.
From the menu of open windows on your computer that comes up, select the one named PowerPoint Slide Show .

You are now sharing one of your two screens with your Zoom meeting while, through your use of Presenter View, your other screen has your PowerPoint notes on each slide, controls for the presentation, a timer, and a preview of the next slide. It will look like this.

When your slide show has ended, you can use the End Slide Show control at the top of the page to return to your Zoom meeting. As you can see, using two monitors to share a PowerPoint presentation is convenient. But in a one-monitor situation, it can still be done.
With one monitor
To present with only one monitor and still have access to your PowerPoint speaker notes and controls, you will again use Presenter View, but differently. Start by opening Zoom, then continue by setting up your PowerPoint slide show to be full-screen.

Then start your slide show. It will begin in full screen.
In the lower left hand of the full-screen slide show, you will see a three-dot menu. Click the three dots, and a menu will come up. From that menu, select Show Presenter View.

Presenter View will now open in a separate window. Use Alt-Tab on your keyboard to navigate to Zoom, where you can start or join a meeting. When you’re in the meeting, click Share Screen.

From the window that opens, select the PowerPoint Slide Show window, and click the blue Share button.

You will now be sharing the full-screen presentation you started in PowerPoint with your Zoom meeting. Now use Alt-Tab again to navigate to the window whose name contains the words “PowerPoint Presenter View.” Use the sizing icon in the upper right to reduce the window size.

With the window reduced, you can see the full-screen slide show playing behind the Presenter View window while still having access to your notes and presentation controls.

If it’s your meeting, set up the PowerPoint presentation before the meeting’s start time for a more polished presentation so the invitees don’t see you setting up the slide show. If it’s someone else’s meeting, ask for permission to enter before they do, so you will have time to go through the abovementioned procedures.
Check out our list of the best PowerPoint tools and apps for Android for more presentation options on mobile.
Yes, they do. Since the presentation is still controlled by PowerPoint and merely shared over Zoom, all your animations, morphs, and transitions remain in your control.
The presentation can be as long as the meeting can be, which varies according to what Zoom plan you have.
To see your PowerPoint notes while presenting with one monitor on Zoom, you can use the Presenter View option in PowerPoint, which allows you to view your notes and presentation on separate screens. Open your PowerPoint presentation, and then click on the Slide Show tab at the top of the screen. Next, click the Presenter View button to display your presentation on one screen and your notes on the other. Then, start your Zoom meeting and share your screen with your presentation in Presenter View. This will enable you to see your notes and presentation simultaneously on Zoom.
Yes, you can share a PowerPoint on Zoom if you are not the host, as long as the host has permitted you to share your screen. Once you are in the meeting, click on the Share Screen button at the bottom of the screen and then select the PowerPoint window from the list of available options. This will share your PowerPoint presentation with the other participants in the Zoom meeting.
You might like
Zoom: Screen Sharing Options with PowerPoint and Notes During a Meeting
There are several different ways to share your screen when running a Zoom meeting with slides in PowerPoint or Keynote. This article covers the following topics:
- Windows OS instructions
- Mac OS instructions
- Resizable window in Keynote
- Share individual window in PowerPoint
Sharing your PowerPoint slides only without notes
If you want to share your PowerPoint while using the Presenter View with your notes but only show the slides, the following are steps you could take to do that:
Open your PowerPoint presentation.
In Zoom, click on Share Screen .
Click on the Advanced Tab.
- Select Portion of Screen (Allows you to share just a portion of your screen. When you start sharing, it will display a color rectangle that you can click on and move around and re-size to share just the portion of the screen defined by that rectangle.)
- Click on Share .
For Windows OS in PowerPoint
- Click on the Slide Show tab
- This allows you to display the slides with the notes you prepared in the notes pane.
- Click “Present from Begining under Slide Show”
- This way, only the slides will display to the students.
For Mac OS in PowerPoint
- Click the Slide Show tab
- Click “Presenter View”
- If you have Dual Monitors, there is also an option to Swap Displays if needed.
Other Options
Resizable window in keynote.
Another option is to view the presentation in a resizable window (not full screen).
- Make sure Keynote is updated
- Choose Play>Play Slideshow in Window.
Share Individual Window in Powerpoint
- Choose "Browsed by an individual (window)" and only share that window when you share your screen. This will allow you to have your notes displayed in another document and only show the slides.
Learn more about different ways to share your screen, content, or camera in Zoom .
CONNECT WITH US
Controlling slides shared by another participant
A presenter in a meeting or webinar can give slide control to other participants, so that others can control the progression of slides for the presenter or when they are presenting their portion of the presentation. This avoids the need to ask the presenter to change the slide when they are ready, interrupting the flow of the meeting and presentation. Slide control can be given to multiple participants in a meeting, or multiple panelists in a webinar.
This article contains:
How to assign slide control
How to use slide control, prerequisites for slide control.
- Zoom desktop client for Windows and macOS: Global minimum version or higher
- Zoom Rooms: Global minimum version or higher
- Google Slides
- Microsoft PowerPoint
- Office 365 PowerPoint
Limitations of using slide control
- Assigning slide control can be done when sharing an entire screen or the specific Keynote, PowerPoint, or Google Sheets window.
- When using Google Slides, the presentation must be shared in Slideshow view , as Presenter view is not supported.
- When using Keynote, the presentation must be played in fullscreen view, as Play Slideshow in Window is not supported.
- A Zoom Room may only request slide control from another meeting participant performing screen sharing; it may not offer slide control to other participants when the Zoom Room is performing screen sharing.
How to enable slide control
To enable or disable Slide Control for all users in the account:
- Sign in to the Zoom web portal as an admin with the privilege to edit account settings.
- In the navigation menu, click Account Management then Account Settings .
- Click the Meeting tab.
- Under In Meeting (Basic) , click the Slide Control toggle to enable or disable it.
- If a verification dialog displays, click Enable or Disable to verify the change.
To enable or disable Slide Control for a group of users:
- Sign in to the Zoom web portal as an admin with the privilege to edit groups.
- In the navigation menu, click User Management then Group Management .
- Click the applicable group name from the list.
- If a verification dialog displays, click Enable or Disable to verify the change. Note : If the option is grayed out, it has been locked at the account level and needs to be changed at that level.
To enable or disable Slide Control for your own use:
- Sign in to the Zoom web portal.
- In the navigation panel, click Settings .
- If a verification dialog displays, click Enable or Disable to verify the change. Note : If the option is grayed out, it has been locked at either the group or account level. You need to contact your Zoom admin.
How to use slide control in a meeting or webinar
- Start or join a meeting or webinar.
- Begin sharing a Keynote, PowerPoint, or Google Slides presentation. Note : For more tips on sharing a presentation, please see our specific articles for sharing Keynote , PowerPoint , and Google Slides presentations
- This option will only be available when you are in full-screen presentation mode.
- This option works when sharing an entire screen or the specific Keynote, PowerPoint, or Google Sheets window.
- Select one or more participants you wish to give slide control. The slide control button will update with the number of participants with slide control next to the icon.
After you’ve assigned slide control to a participant, they will retain slide control for the duration of this current session, even if you stop and start sharing again (version 5.13.0 and higher). The slide controls will disappear if you exit presentation mode, but they will re-appear when you begin presenting again. You can revoke an individual’s access by clicking their name in the list, or revoke all access by clicking the Stop Slide Control button or stopping sharing completely.
When you’ve been given access to slide control and the presenter enters presentation mode, a banner notification will appear, informing you of the new access. The slide controls will appear just below the banner, in the bottom-left corner of the presentation view.
- Alternatively, you can use the left and right buttons on your keyboard to move the presentation backwards or forwards.

- Certifications
PowerPoint Zoom: A Great Way to Make Interactive Presentations
- December 27, 2022
- 96 Comments

The PowerPoint zoom feature is a great way to make the presentation dynamic and interactive. When you use this feature, the slides are not presented in a usual order. This feature helps present slides in any order as one likes during the presentation making it more interactive .
This feature is available in Microsoft 365 and Microsoft office 2019. It is not available in other modules.
Have you read our blog on 80 PowerPoint Shortcut Keys
Understanding the Zoom Feature
Zoom feature can be leveraged in just 2 steps
Step 1 – Create basic slides
Create the slides you want to have in your presentation.
For our example, we have 5 slides showing the Presentation rules.
Step 2 – Insert the Zoom Feature
To insert the Zoom feature. Insert an additional blank slide. Then Go to Insert > Zoom
Then Select Slide Zoom.
Choose the slides you want in the Zoom Summary slide. Then click insert. You get the screen shots of the selected slides on one slide. This slide becomes your Summary Zoom Slide .
Format the Summary Zoom Slide. Change the background (if required) and place the screen shots as required (Example shown below).
Now when you go to the presentation mode, you have the option to jump to specific slides and portions of your presentation by clicking on the relevant screen shot.
You can decide where to go based on the flow of the presentation . Summary Zoom Slide helps you control your presentation. You can get move ahead, skip a section, or revisit slides of your presentation without interrupting the flow of your presentation.
Now let us discuss a few other important points.
Here is Free PowerPoint course to learn basic skills
Section Zoom
This feature is useful if your presentation has multiple slides in one section. In such case, divide your presentation to the appropriate sections. Then insert a blank Slide and Go to Insert > Zoom > Insert Section Zoom. Seen Screen shots below.
Once you click insert. You get the screen shots of the selected sections on one slide. This slide becomes your Summary Zoom Slide .
Now you can choose specific sections you want to present based on the flow of your presentation.
Read our blog on How to Create an Effective Business Presentation in 5 Steps
Change Image
Instead of screenshots (as shown in the example) if you want to use any other image, click on the slide screenshot then Click on Zoom > Change Image
Once you click on Change image, you can select the images from a file , or select online. You can also use icons.
Once you make the relevant selection, the slide screen shot changes to the chosen image.
Return to Zoom
If you want to move to the Zoom Summary slide after discussing the chosen slide or section, you should select Return to Zoom.
Click on the slide screenshot then Click on Zoom >Return to Zoom
You should repeat this step for all the slides in the Summary Zoom slide. For select slides/section, if you do not want to move back to the Summary Zoom slide then do not choose this option.
Zoom Transition
The Zoom Transition feature helps create an impressive visual effect when you move from one slide to the other. The default option chosen is Zoom Transition. If you do not want this transition effect, then Go to Zoom> Deselect Zoom Transition
Want to master in Presentation Skills , Join our PowerPoint Online Course right here.
There are multiple design options/border/effects options available in the Zoom Feature. These can be chosen to change the images on the Zoom Summary slide.
This is how we can make our presentation lively. Rather than following the usual flow of slides, with the help of the new Zoom feature we can navigate between slides depending on the flow of our presentation.
Keep learning new things and have fun.
Sign up for our PowerPoint Presentation Skills Training Online

Share This Post:
96 thoughts on “powerpoint zoom: a great way to make interactive presentations”.
[…] sections or slides, creating a more dynamic and immersive experience for your audience. With PowerPoint Zoom, you can easily create links or “zoom areas” on your slides such that when clicked […]
I truly appreciate this blog post.Really looking forward to read more. Great.
Thanks-a-mundo for the blog post. Really Cool.
Thanks for sharing, this is a fantastic blog article.Thanks Again. Cool.
Im grateful for the blog post. Really Cool.
wow, awesome article post.Really looking forward to read more.
Major thankies for the blog article.Really looking forward to read more. Awesome.
Im grateful for the blog post.Really looking forward to read more. Much obliged.
Hey, thanks for the blog.Really looking forward to read more. Awesome.
Fantastic blog post.Really thank you!
Wow, great blog post.Thanks Again. Keep writing.
Thank you for your article post.Really thank you! Awesome.
I think this is a real great article post.Thanks Again. Much obliged.
I cannot thank you enough for the blog. Will read on…
Thanks again for the blog post.Really thank you! Really Great.
Thanks so much for the blog post.Thanks Again. Really Great.
Very good blog.Really thank you! Really Great.
Thanks for the blog post.Really looking forward to read more. Cool.
Really informative post.Thanks Again. Will read on…
Really enjoyed this post.Really looking forward to read more. Really Great.
I really enjoy the blog.Much thanks again. Really Cool.
Thank you for your blog article.Thanks Again.
Thank you for your blog.Really looking forward to read more. Really Cool.
Very good blog article.Thanks Again. Cool.
I value the blog article.Thanks Again.
A round of applause for your blog post.Really thank you! Will read on…
Great, thanks for sharing this article.Much thanks again. Really Cool.
Awesome blog.Really thank you! Great.
Thanks again for the blog post.Really looking forward to read more.
Enjoyed every bit of your blog article.Really looking forward to read more. Really Great.
Thank you for your post. Really Cool.
I think this is a real great blog.Really thank you! Great.
This is one awesome blog post. Will read on…
Hello everyone I am new here, I am waiting for all the guests!
Looking forward to reading more. Great blog.Really thank you! Awesome.
I am so grateful for your post.Really thank you! Great.
I appreciate you sharing this blog article.
I appreciate you sharing this blog article.Really thank you! Really Great.
A round of applause for your blog. Really Cool.
I really like and appreciate your blog.Really thank you! Really Cool.
Enjoyed every bit of your blog article.Really looking forward to read more. Want more.
Fantastic blog post.Thanks Again. Really Great.
This is one awesome post.Much thanks again. Fantastic.
I really liked your blog article.Much thanks again. Cool.
A big thank you for your blog.Thanks Again. Awesome.
Wow, fantastic weblog format! How long have you ever been blogging for?
you made running a blog glance easy. The total glance of your website is magnificent, as smartly as the content! You can see similar: dobry sklep and here sklep online
Im thankful for the blog article.Much thanks again.
Appreciate you sharing, great blog.Much thanks again. Much obliged.
Appreciate you sharing, great article.Much thanks again. Much obliged.
Great, thanks for sharing this article. Keep writing.
Im thankful for the blog post. Great.
Im thankful for the post.Much thanks again. Much obliged.
Fantastic blog post.Thanks Again. Really Cool.
Thank you for your article post.Really thank you! Cool.
wow, awesome blog article.Really looking forward to read more. Keep writing.
Thanks again for the article post.Thanks Again. Keep writing.
I appreciate you sharing this blog article.Really looking forward to read more. Want more.
Say, you got a nice blog.Really looking forward to read more. Will read on…
Looking forward to reading more. Great blog post.Much thanks again. Really Great.
Thanks a lot for the article.Thanks Again. Want more.
Great, thanks for sharing this post.Really thank you! Really Cool.
Im thankful for the blog article.Thanks Again.
I really enjoy the blog.Much thanks again. Will read on…
I appreciate you sharing this post. Will read on…
Thank you ever so for you article.Much thanks again. Cool.
Fantastic article.Really looking forward to read more. Really Great.
I appreciate you sharing this article post. Want more.
Looking forward to reading more. Great blog.Much thanks again. Awesome.
I really liked your blog article.Really thank you! Really Cool.
Thanks-a-mundo for the blog. Fantastic.
Wow, great blog post.Really looking forward to read more. Cool.
I cannot thank you enough for the article post. Will read on…
Wow, great post.Really thank you! Will read on…
Really appreciate you sharing this blog article.Much thanks again. Keep writing.
Thanks so much for the blog post.Much thanks again. Cool.
A round of applause for your blog post. Really Cool.
Thanks so much for the blog post.Really thank you! Awesome.
Im grateful for the post.Much thanks again. Really Cool.
A big thank you for your blog post. Much obliged.
Im thankful for the blog.Much thanks again. Cool.
I am so grateful for your blog.Thanks Again. Cool.
I really like and appreciate your blog article.Really looking forward to read more. Awesome.
Thanks-a-mundo for the blog post.Thanks Again. Will read on…
Very neat article.Really thank you!
Major thanks for the article post.Really thank you!
Really appreciate you sharing this blog.Much thanks again. Cool.
Very informative blog post.Really thank you! Keep writing.
Im obliged for the blog post.Thanks Again. Cool.
wow, awesome article.Really looking forward to read more. Cool.
Awesome blog.Much thanks again. Fantastic.
I think this is a real great post. Really Cool.
Thank you ever so for you blog.Really thank you! Really Cool.
Im grateful for the article post.Really looking forward to read more. Awesome.
Very informative post.Thanks Again. Really Cool.
A big thank you for your blog article.Much thanks again. Really Cool.
Thanks again for the article post.Really looking forward to read more. Really Great.
Add a Comment Cancel reply
Save my name, email, and website in this browser for the next time I comment.
Get A 5X Raise In Salary

Reset Password
Insert/edit link.
Enter the destination URL
Or link to existing content
Zoom Feature in PowerPoint – How to Use it Correctly!
By: Author Shrot Katewa

It is hard to accept but even the most seasoned PowerPoint users find it hard to create a table of contents that is visually modern-looking and interactive! The “ Zoom ” feature can help not only with the table of contents but much more than that!
The zoom feature in PowerPoint helps create visual links between sections of your presentation. It makes the presentation interactive by adding a clickable thumbnail of a slide or a section in your presentation and allowing you to easily navigate within your presentation with cool effects!
Even if you use PowerPoint regularly, chances are you aren’t fully aware of the “Zoom” feature in PowerPoint.
And, by now if you are thinking about zooming in on the slides using the functions provided at the bottom-right corner of PowerPoint, then you really need to go through this article as you might not be aware of one of the most awesome features in PowerPoint called “ Zoom “.
1. What is Zoom in PowerPoint?
Imagine if you could just click on an image on your slide and it just zooms into that image, opening the section of your presentation that provides more information about that image! The “Zoom” feature in PowerPoint, does exactly that!
The zoom feature in Microsoft PowerPoint is a new feature that makes your presentations interactive and dynamic. Using the zoom feature in PowerPoint, you can create a zoom slide from which you can jump to and from specific slides or sections in any order you may need during the presentation.
Let’s explore this feature by checking out some of the different types of “zoom” that you can add to your presentation –
1a. Summary Zoom
The “Summary Zoom” in Microsoft PowerPoint is a landing page where you can see the summarized slides within a page.
In the summary zoom, you can select which slides to show. You can even create summary slides to show on the summary zoom. During the presentation, you can click on any slide on the summary to proceed according to the need of the audience rather than the preset slide progression.
1b. Section Zoom
In Microsoft PowerPoint, “Section Zoom” is a slide that contains the preview and the link to the sections within the presentation.
You can click on them to jump from one section to another to highlight the important parts of your presentation.
1c. Slide Zoom
The “Slide Zoom” feature in PowerPoint allows you to navigate freely through the slides in a presentation. In the slide zoom, you can add all the slides or a few selected slides.
From this section, you can move freely between slides, emphasize the important slides, and even cut the presentation short without seeming so to the audience.
2. How to Insert Slide Zoom in Microsoft PowerPoint?
To use the “Zoom” feature in PowerPoint, first, click on the “Insert” tab. Then, click on the “Zoom” button from the ribbon. Choose the type of zoom from “Summary”, “Section”, and “Slide” zoom. Next, select the slides from the window that pops up by holding the “Ctrl” key, and click on “Insert”.
Here’s a step-by-step process with visual aids on what you need to do –
Step-1: Click on the “Insert” tab
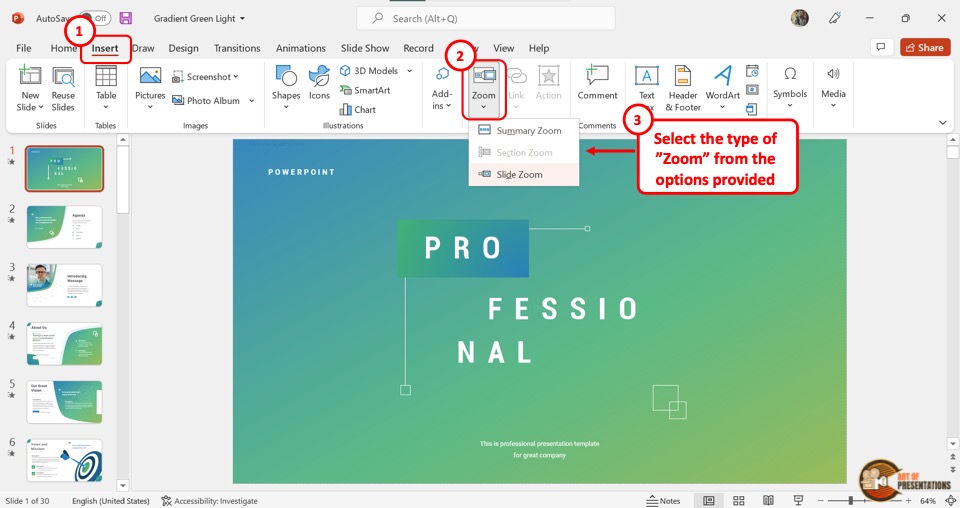
The first step is to open the “Insert” menu. Click on the “Insert” tab which is located in the menu ribbon at the top of the screen.
Step-2: Click on the “Zoom” button
In the “Links” section of the “Insert” menu, click on the “Zoom” button. This will open a dropdown menu. Click on the “Slide Zoom” option from the dropdown menu.
Step-3: Choose the Slide and Click on “Insert”
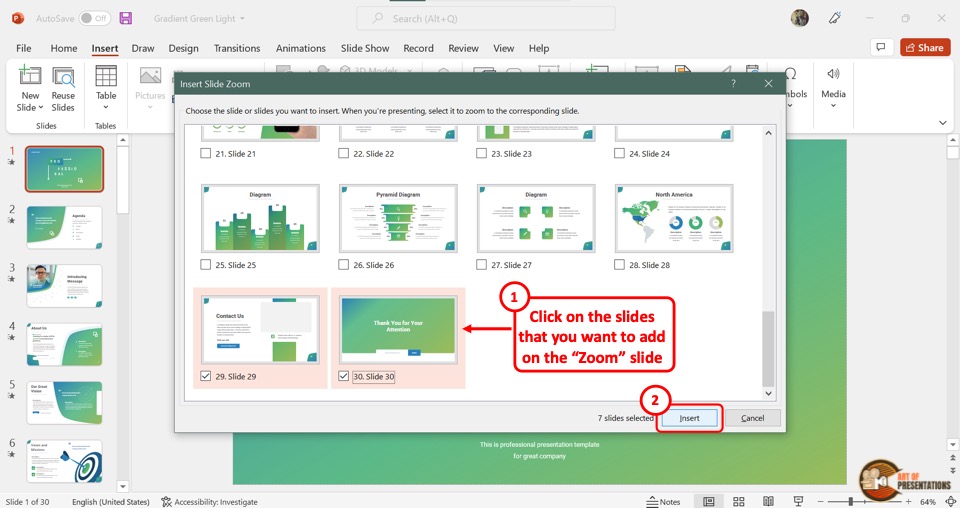
Clicking on the “Slide Zoom” option will open the “Insert Slide Zoom” dialog box.
Select the slides you want to include in the slide zoom and then click on the “Insert” button at the bottom of the dialog box. Now all you have to do is arrange the slides in the slide zoom according to your preference.
3. How to Edit Slide Zoom in PowerPoint?
Once you add the slide zoom to your presentation, you can easily edit it. To access the editing pane, all you have to do is click on the slide zoom. Then click on the “Zoom” tab in the menu ribbon.
3a. Change Borders in Slide Zoom
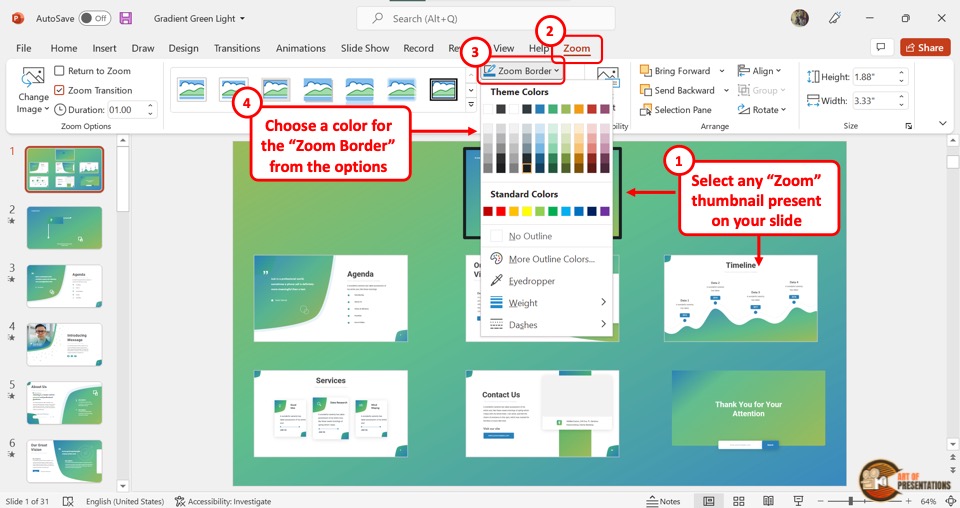
To add or change the border of the slides in slide zoom, click on the “Zoom Border” option. In the dropdown menu, you can click on your preferred color for the border.
You can also click on the “Weight” option and select the border width from the secondary menu. To change the border design, click on the “Dashes” option.
3b. Add Effects in Slide Zoom
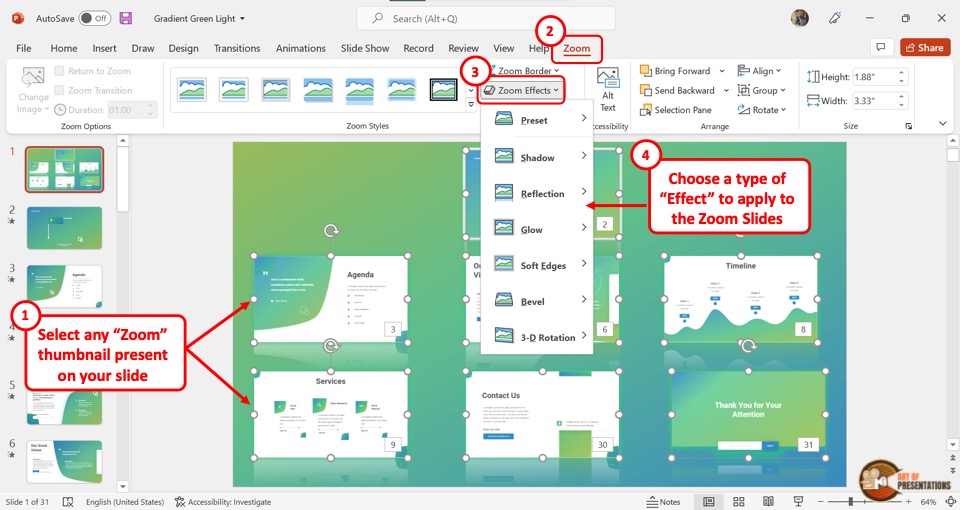
You can add various effects in the slide zoom. To do so, you have to first click on a single or multiple slides in the slide zooms where you want to add effects.
Then click on the “Zoom Effects” option. In the dropdown menu, you can click on any effect option to open a secondary pop-up menu. Click on your preferred effect. You can add multiple effects on a single zoom slide.
3c. Remove Background in Slide Zoom

In Microsoft PowerPoint slide zoom, you can remove the slide background of each slide in the slide zoom. Click on the “Zoom Background” option in the “Zoom Styles” section under the “Zoom” tab. This will remove the background of the selected slide.
4. How to Change Picture in Slide Zoom?
In Slide Zoom, the default thumbnail pictures are a screenshot of the slides. However, you can change the pictures if you want. All you have to do is follow the 4 easy steps.
Step-1: Click on the “Zoom” tab
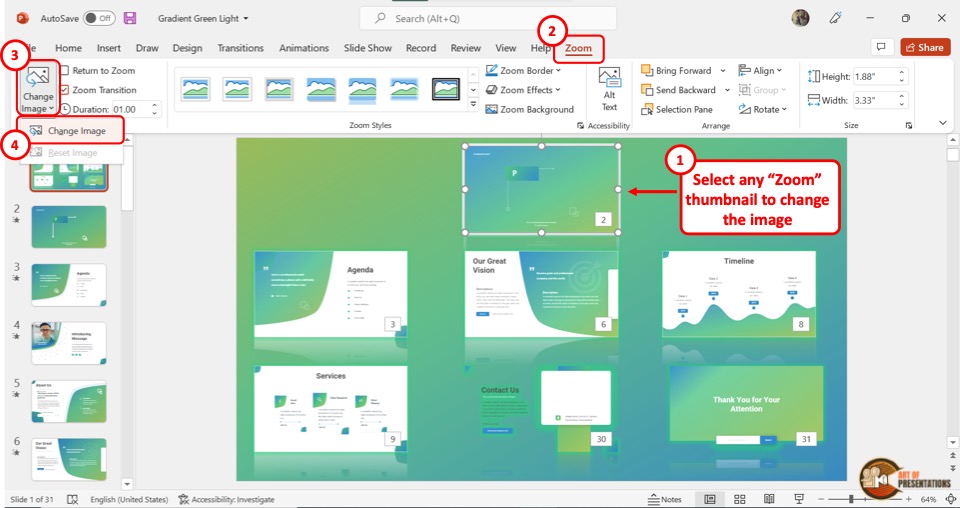
The first step is to click on the slide thumbnail that you want to change. Then click on the “Zoom” tab at which is the last tab in the menu ribbon.
Step-2: Click on the “Change Image” option
The second step is to click on the “Change Image” button which is the first option in the “Zoom Options” section of the “Zoom” menu (as shown in the image in step 1).
Then click on the “Change Image” option from the dropdown menu.
Step-3: Click on “From a File”
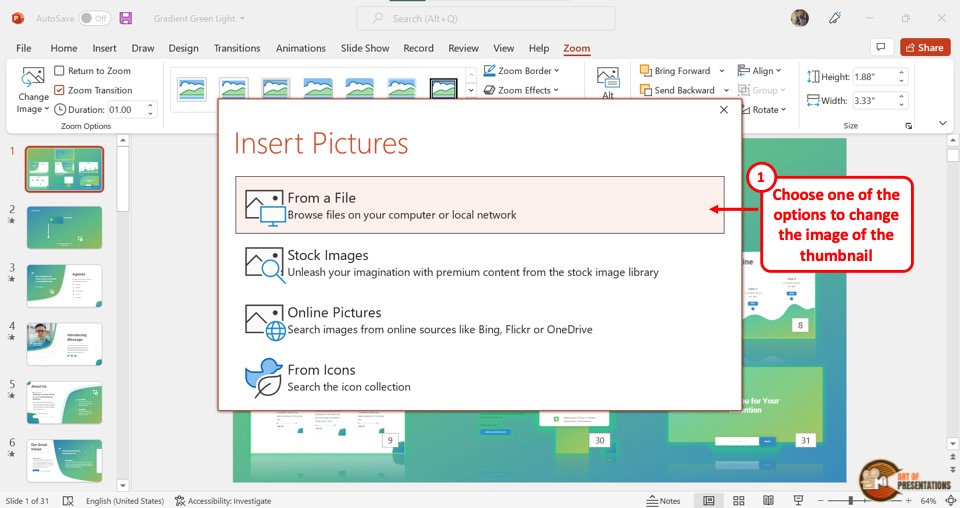
When you click on the “Change Image” option, it will open a dialog box. In the “Insert Pictures” dialog box, click on the “From a File” option. This will open another dialog box.
Step-4: Click on the “Insert” button
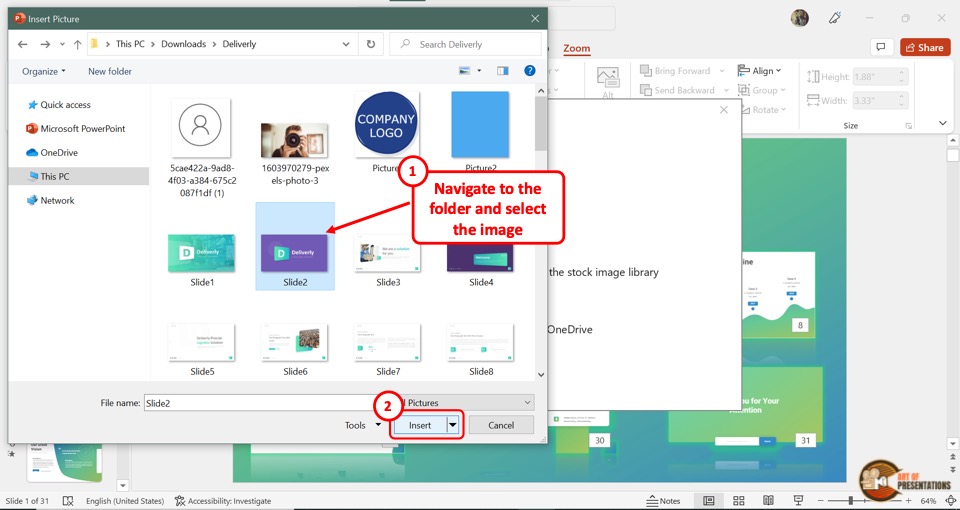
In the “Insert Picture” dialog box, click on the image which you want to add to the slide thumbnail in the slide zoom.
Then click on the “Insert” button at the bottom of the dialog box. In the slide zoom, the original thumbnail will be changed to the selected image.
4a. How to Reset Picture in Slide Zoom?
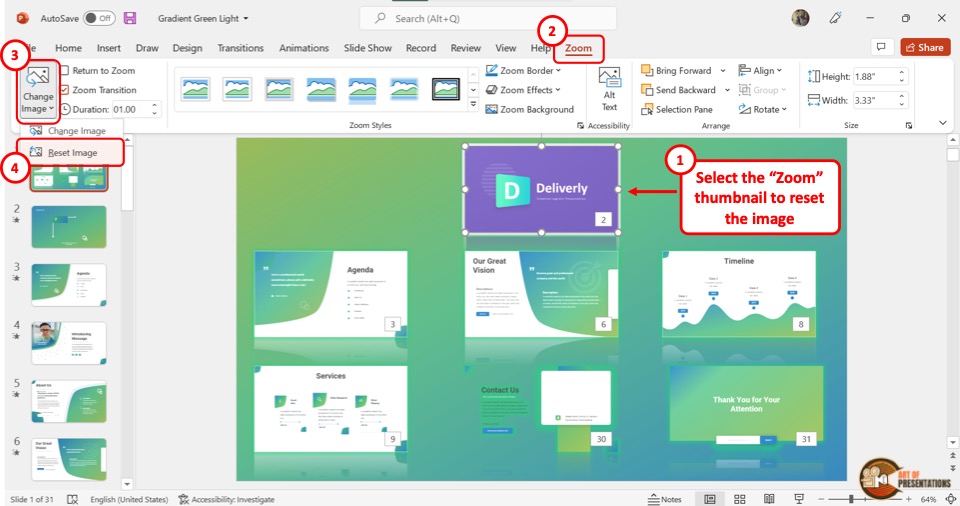
Once you change the picture of the slide thumbnail in the PowerPoint slide zoom, you can revert it to the original thumbnail.
All you have to do is click on the “Change Image” button in the “Zoom” menu. Then click on the “Reset Image” option from the dropdown menu.
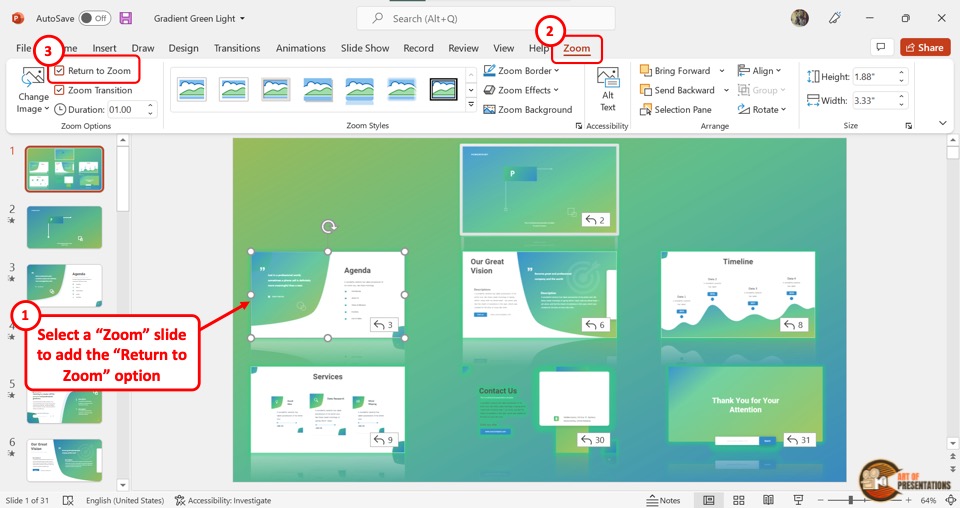
5. How to Stop Slide Zoom?

In the Microsoft PowerPoint slide show, the presentation will return to the slide zoom, after each slide. To stop this, select the slide in the slide zoom and then click on the “Zoom” tab in the menu bar.
In the “Zoom” menu, click on the “Return to Zoom” option. The checkmark in the box next to it will disappear. This will stop the slides from returning to the slide zoom screen.
5a. How to Return to Slide Zoom?
Once you stop the slide zoom on Microsoft PowerPoint, you can turn on the feature again. All you have to do is select the slide again and click on the “Zoom” tab. Then click on the box next to the “Return to Zoom” option.
The checkmark will appear again. Now the screen will return to the slide zoom after the selected slide during the presentation.
Credit to nakaridore (on Freepik) for the featured image of this article (further edited)
Now LIVE! Check out the NEW Zoom Feature Request space to browse, vote, or create an idea to enhance your Zoom experience.
Empowering you to increase productivity, improve team effectiveness, and enhance skills.
Communication
Productivity, apps & integration, employee engagement, business services, customer care, developer tools.
- Financial Services
- Manufacturing
- Small and Midsize businesses
- IT Professionals
- Customer Experience
- Sales and Revenue
- Marketing and Events
- Meeting SDK
- App Marketplace
- Developer Solutions
- Partner Solutions
- Find a Partner
- Become a Partner
- Partner Portal
- Partner Learning Center
- Resource Library
- Webinars & Events
- Customer Stories
- Zoom Trust Center
- Zoom Community
- Learning Center
- How-to Videos
- Global services
- Hardware options
- Customer Managed Key
- Customer Support
- Premier Support
- Developer Support
- Premier Developer Support
Download the Zoom app
Keep your Zoom app up to date to access the latest features.
Zoom Virtual Backgrounds
Download hi-res images and animations to elevate your next Zoom meeting.
- Plans & Pricing
- Join by Meeting ID
- Public Event List
- Screen Share Only
- With Video On
- With Video Off
AI Companion
- Phone System
- Mail & Calendar
- Marketplace
- Rooms and Workspaces
- Workspace Reservation
- Contact Center
- Virtual Agent
- Revenue Accelerator
- Events and Webinars
- Work Transformation Summit
- Customer Success Events
- Customer Success Forum
- Zoom Status
- Submit Feedback
- Community Terms and Guidelines
- Getting Started
- Community Center
- Happy Rewards
- Social Corner
- Community Champion Program
- Billing & Account Management
- Re: Blurry PowerPoint
- Subscribe to RSS Feed
- Mark Topic as New
- Mark Topic as Read
- Float this Topic for Current User
- Printer Friendly Page
- Screen sharing in Meetings 2024-04-23
- Recording with two hosts showing at once and not participants- using powerpoint in Meetings 2024-04-20
- Meeting Participant with free account time limit in Meetings 2024-04-19
- Bilingual Polls in Meetings 2024-04-17
- Blurry video after downloading a meeting in Meetings 2024-04-04
Blurry PowerPoint
- Mark as New
- Report Inappropriate Content
2023-03-23 05:09 AM
- All forum topics
- Previous Topic
2024-04-21 08:00 AM
- Create an email message
- Suggested recipients
- Use @mentions
- Create a signature
- Add attachments
- Check spelling
- Add a reaction
- Out of office replies
- Delay or schedule
- Recall a message
- Automatic forwarding
- Read receipt
- Save a file or draft
- Change display name
- Create a folder
- Use inbox rules
- Conditional formatting
- Use Favorites
- Custom views
- Message font size
- Message list view
- Focused Inbox
- View as conversations
- Filter and sort messages
- Number of messages
- Chat with recipients
- Share an email
- Status in Outlook
- Phishing and suspicious behavior
- Blocked senders
- Protected messages
- Open a protected message
- More to explore

Create and add an email signature in Outlook
In Outlook, you can create one or more personalized signatures for your email messages. Your signature can include text, links, pictures, and images (such as your handwritten signature or a logo).
Note: If the steps under this New Outlook tab don't work, you may not be using new Outlook for Windows yet. Select Classic Outlook and follow those steps instead.
Create and add an email signature
On the View tab, select View Settings .
Select Accounts > Signatures .
Select New signature , then give it a distinct name.
In the editing box below the new name, type your signature, then format it with the font, color, and styles to get the appearance you want.
Select Save when you're done.
With your new signature selected from the list above the editing box, go to Select default signatures and choose whether to apply the signature to new messages and to replies and forwards.
Select Save again.
Note: If you have a Microsoft account, and you use Outlook and Outlook on the web or Outlook on the web for business, you need to create a signature in both products.
Create your signature and choose when Outlook adds a signature to your messages
If you want to watch how it's done, you can go directly to the video below .
Open a new email message.

Under Select signature to edit , choose New , and in the New Signature dialog box, type a name for the signature.
Under Edit signature , compose your signature. You can change fonts, font colors, and sizes, as well as text alignment. If you want to create a more robust signature with bullets, tables, or borders, use Word to create and format your signature text, then copy and paste it into the Edit signature box. You can also use a pre-designed template to create your signature. Download the templates in Word, customize with your personal information, and then copy and paste into the Edit signature box.

You can add links and images to your email signature, change fonts and colors, and justify the text using the mini formatting bar under Edit signature .
You can also add social media icons and links in your signature or customize one of our pre-designed temlates. For more information, see Create a signature from a template .
To add images to your signature, see Add a logo or image to your signature .
Under Choose default signature , set the following options.
In the E-mail account drop-down box, choose an email account to associate with the signature. You can have different signatures for each email account.
You can have a signature automatically added to all new messages. Go to in the New messages drop-down box and select one of your signatures. If you don't want to automatically add a signature to new messages, choose (none). This option does not add a signature to any messages you reply to or forward.
You can select to have your signature automatically appear in reply and forward messages. In the Replies/forwards drop-down, select one of your signatures. Otherwise, accept the default option of (none).
Choose OK to save your new signature and return to your message. Outlook doesn't add your new signature to the message you opened in Step 1, even if you chose to apply the signature to all new messages. You'll have to add the signature manually to this one message. All future messages will have the signature added automatically. To add the signature manually, select Signature from the Message menu and then pick the signature you just created.
Add a logo or image to your signature
If you have a company logo or an image to add to your signature, use the following steps.
Open a new message and then select Signature > Signatures .
In the Select signature to edit box, choose the signature you want to add a logo or image to.

To resize your image, right-click the image, then choose Picture . Select the Size tab and use the options to resize your image. To keep the image proportions, make sure to keep the Lock aspect ratio checkbox checked.
When you're done, select OK , then select OK again to save the changes to your signature.
Insert a signature manually
If you don't choose to insert a signature for all new messages or replies and forwards, you can still insert a signature manually.
In your email message, on the Message tab, select Signature .
Choose your signature from the fly-out menu that appears. If you have more than one signature, you can select any of the signatures you've created.
See how it's done

Top of page
Note: Outlook on the web is the web version of Outlook for business users with a work or school account.
Automatically add a signature to a message
You can create an email signature that you can add automatically to all outgoing messages or add manually to specific ones.
Select Settings at the top of the page.
Select Mail > Compose and reply .
Under Email signature , type your signature and use the available formatting options to change its appearance.
Select the default signature for new messages and replies.
Manually add your signature to a new message
If you've created a signature but didn't choose to automatically add it to all outgoing messages, you can add it later when you write an email message.
In a new message or reply, type your message.

If you created multiple signatures, choose the signature you want to use for your new message or reply.
When your email message is ready, choose Send .
Note: Outlook.com is the web version of Outlook for users signing in with a personal Microsoft account such as an Outlook.com or Hotmail.com account.
Related articles
Create and add an email signature in Outlook for Mac
Create an email signature from a template

Need more help?
Want more options.
Explore subscription benefits, browse training courses, learn how to secure your device, and more.

Microsoft 365 subscription benefits

Microsoft 365 training

Microsoft security

Accessibility center
Communities help you ask and answer questions, give feedback, and hear from experts with rich knowledge.

Ask the Microsoft Community

Microsoft Tech Community

Windows Insiders
Microsoft 365 Insiders
Find solutions to common problems or get help from a support agent.

Online support
Was this information helpful?
Thank you for your feedback.
COMMENTS
Switch back to Powerpoint and click the Slide Show tab. Begin the presentation by selecting the Play from Start or Play from Current Slide options. PowerPoint will display the slide show in a window. In Zoom, start or join a meeting. Click Share Screen in the meeting controls. Select the PowerPoint window and then click Share.
In this step-by-step tutorial, learn how to best present Microsoft PowerPoint slides in Zoom Video Conferencing.⌚ Timestamps0:00 Introduction1:19 Share entir...
At the bottom of the Zoom meeting window, click "Share Screen." If you're using a single monitor, you will immediately start sharing your screen. If you're using dual monitors, you'll need to click the screen that your presentation will be shared on. In our case, that will be "Screen 2." To begin sharing that screen, click "Share" at the bottom ...
In this article I am using the Zoom app in Windows 10. The six options are: Share your entire screen/desktop. Share the Slide Show window. Share the editing window with a clean look. Run the Slide Show in a window and share that window. Use Presenter View to show the audience your slides while you see Presenter View.
If you would like to make your presentations more dynamic and exciting, try using zoom for PowerPoint . To add a zoom, go to Insert > Zoom. To summarize the entire presentation on one slide, choose Summary Zoom. To show selected slides only, choose Slide Zoom. To show a single section only, choose Section Zoom.
This video shows you how to share Powerpoint slides in Zoom, including dual-monitor scenarios and the new "Powerpoint as virtual background" feature. You can...
Here is how you can do that-. Step 1: First, start or join a Zoom meeting. Step 2: Click on " Share Screen " and select the " Advanced " option. From there, select " PowerPoint as Virtual Background " and select the file you want for your presentation. Then click on " Share ".
To record yourself giving a PowerPoint presentation on Zoom, launch Zoom and PowerPoint; be sure to close all other applications. Create a new Zoom meeting, select Share Screen, select your PowerPoint presentation, and click Share. Launch your PowerPoint slideshow. In Zoom, choose Record > Record on This Computer.
Join the Zoom meeting. When it's your turn to present, click the green Share Screen icon. Navigate to Window, select the PowerPoint window, and click Share . Ensure your PowerPoint window is maximized and running in the background, or it won't appear under the Window tab. Zoom automatically switches to the PowerPoint window with a mini ...
Step 3: Select Your PowerPoint Window. In the screen sharing menu, you'll see all the windows you have open. Select the window that displays your PowerPoint presentation. If you want to share sound from your presentation, don't forget to check the "Share computer sound" option. Then, click "Share.".
Start Presenter View Preview by pressing Alt+F5. In Zoom, share a portion of the screen from the Advanced sharing options. Make the current slide larger in Presenter View and adjust the sharing rectangle so you just share the current slide portion of the screen in Zoom. Deliver your presentation. Full detailed article.
The methodology is split into two bits — one: PowerPoint and two: Zoom. First, open up Microsoft PowerPoint and pick the slide you want to share. Now, click on the 'Slide show' tab and hit 'Set Up Slide Show.'. Then, select 'Browsed by an individual (window)' under 'Show type.'. Hit 'Ok' to confirm.
This time, choose Desktop 1 or Desktop 2, depending on which screen you want to share on your Zoom presentation. In PowerPoint for macOS, start Presenter view from the Slide Show > Presenter View button. On Windows, make sure the Use Presenter View box is ticked on the Slide Show tab. Then start the presentation.
To share a PowerPoint presentation on Zoom, open your PowerPoint presentation and select the Slide Show tab. Start the slide show by clicking From Beginning. In Zoom, click the Share Screen button ...
In the meeting controls toolbar, click Share Screen. Click Advanced. Click Slides as Virtual Background. Browse and select the presentation file. Click Open. Once the presentation is imported, the slides will be shown as your virtual background. If your video is on, by default it will be imposed over the slides.
Open your PowerPoint presentation. In Zoom, click on Share Screen. Click on the Advanced Tab. Select Portion of Screen (Allows you to share just a portion of your screen. When you start sharing, it will display a color rectangle that you can click on and move around and re-size to share just the portion of the screen defined by that rectangle ...
Here's how to do that in Zoom. Note that these instructions are for folks wih just one screen. Zooming in Presenter View. To view in Presenter View while presenting in Zoom, you will need to: Click on Presenter View in the menu ribbon at the top of the screen. The presentation will look like this:
To begin a recording of a PowerPoint presentation, move your cursor over the menu bar in Zoom. It's the series of options and buttons at the bottom of the app's screen. First, make sure that your microphone isn't muted. This setting is controlled by the Mute button, found on the left side of the menu bar.
Begin sharing a Keynote, PowerPoint, or Google Slides presentation. Note: For more tips on sharing a presentation, please see our specific articles for sharing Keynote, PowerPoint, and Google Slides presentations; On the sharing toolbar, click Slide Control . Notes: This option will only be available when you are in full-screen presentation mode.
The PowerPoint zoom feature is a great way to make the presentation dynamic and interactive. When you use this feature, the slides are not presented in a usual order. This feature helps present slides in any order as one likes during the presentation making it more interactive. This feature is available in Microsoft 365 and Microsoft office 2019.
Step 2. Duplicate the base slide. To duplicate the base slide, go to the left side of the screen, right click on the slide's thumbnail and click on 'Duplicate slide.'. Right click on the thumbnail to see the Duplicate Slide option. You will then see two thumbnails on the left side of your screen:
To use the "Zoom" feature in PowerPoint, first, click on the "Insert" tab. Then, click on the "Zoom" button from the ribbon. Choose the type of zoom from "Summary", "Section", and "Slide" zoom. Next, select the slides from the window that pops up by holding the "Ctrl" key, and click on "Insert". Here's a step ...
the controls before you recor d your presentation. IF YOU WILL BE USING POWERPOINT: 1. Open the Powerpoint file 2. Click Slide Show 3. Click Set Up Slide Show. 4. Under Show Type, click Browsed by an individual (window) This will allow you to present in slideshow view without being in fullscreen mode. Fullscreen mode can make recording with Zoom
The problem is that Zoom does some kind of "intelligent" (AKA as "stupid") live video optimization. When switching a slide I can literally see it going from sharp to blurry in 1-2 seconds while Zoom is "optimizing" the image. If I share a large portrait photo on a slide, zoom thinks *that* must be the center of attention and blurs *me*.
Design search: Find an efficient design TR = 2s, 300 TR's, 3 stimulus types, 50 repetitions for each type Script @DesignSearch: Parameters # TOGGLE btw the following 2 model parameters set model = GAM # toggle btw GAM and TENT set eff = SUM # toggle btw SUM and MAX # experiment parameters set ts = 300 # length of time series set stim = 3 ...
3D+time Pre-Processing Programs 3DTshift Shift slices to a common time origin (temporal interpolation) 3dDespike Remove spikes from voxel time series 3dDetrend Remove trends from voxel time series 3DFourier FFT-based lowpass and highpass filtering 3dTsmooth Smooth time series in the time domain 3D+time Analysis Programs 3dDeconvolve Multiple ...
To do this, open PowerPoint and create a new blank presentation. From the Home tab, click the drop-down arrow next to the New Slide button. Choose Reuse Slides to open the pane for reusing slides.
Next, create a new PowerPoint presentation by choosing File > New > Blank Presentation. In the new presentation, right-click on the thumbnails panel on the left and select the Keep Source ...
Under Choose default signature, set the following options.. In the E-mail account drop-down box, choose an email account to associate with the signature. You can have different signatures for each email account. You can have a signature automatically added to all new messages. Go to in the New messages drop-down box and select one of your signatures. If you don't want to automatically add a ...